# Debugging Jobs in the Apache Spark™ UI
[Blog](/blog/)>[Technology](/blog/category/technical/)>Debugging Jobs in the Apache Spark™ UI
Debugging Jobs in the Apache Spark™ UI
======================================
April 08, 2017 | By [ Alwyn Davis](https://www.instaclustr.com/blog/author/alwyn/)
[ ](https://x.com/intent/tweet?text=Debugging%20Jobs%20in%20the%20Apache%20Spark%E2%84%A2%20UI&url=https://www.instaclustr.com/blog/debugging-jobs-apache-spark-ui/) [ ](https://www.linkedin.com/shareArticle?mini=true&url=https://www.instaclustr.com/blog/debugging-jobs-apache-spark-ui/&title=&summary=Debugging%20Jobs%20in%20the%20Apache%20Spark%E2%84%A2%20UI&source=)
Overview
--------
In this post, we’ll be running a basic [Apache Spark](https://www.instaclustr.com/education/?_education_technology=apache-spark) job that selects data from a Cassandra database using a couple of different methods. We will then examine how to compare the performance of those methods using the Spark UI.
Setup
-----
For this post, we will use a Zeppelin+Spark+Cassandra cluster. If you’d like to try this out for yourself, you can create an account and a free 14-day trial cluster [here](https://console.instaclustr.com/user/signup?coupon-code=ST2M14).
The code snippets used are available in Instaclustr’s Github site as a [ready-to-go Zeppelin notebook](https://github.com/instaclustr/sample-ZeppelinNotebooks).
Inserting Data
--------------
To start things off, we will create a test keyspace and table in our Cassandra cluster, via Zeppelin (we’re using Zeppelin for this because it provides a nice, quick GUI for CQL queries):
%cassandra // Step 1: Create table CREATE KEYSPACE IF NOT EXISTS spark\_demo WITH REPLICATION = { 'class': 'NetworkTopologyStrategy', 'AWS\_VPC\_US\_EAST\_1': 1 }; CREATE TABLE IF NOT EXISTS spark\_demo.test( key int, letter text, value text, PRIMARY KEY(key, letter) ); INSERT INTO spark\_demo.test (key, letter, value) VALUES (1, 'a', 'test 1'); SELECT \* FROM spark\_demo.test;
1
2
3
4
5
6
7
8
9
10
11
12
13
14
15
16
17
%cassandra
// Step 1: Create table
CREATE KEYSPACE IF NOT EXISTS spark\_demo WITH REPLICATION = { 'class': 'NetworkTopologyStrategy', 'AWS\_VPC\_US\_EAST\_1': 1 };
CREATE TABLE IF NOT EXISTS spark\_demo.test(
key int,
letter text,
value text,
PRIMARY KEY(key, letter)
);
INSERT INTO spark\_demo.test (key, letter, value) VALUES (1, 'a', 'test 1');
SELECT \* FROM spark\_demo.test;
Now that the table has been created, let’s populate it with some test data:
%spark import com.datastax.spark.connector.\_ import org.apache.spark.{SparkConf, SparkContext} import org.apache.spark.SparkContext.\_ // STEP 2: Populate data var testData : List\[(Int, String, String)\] = List() var i : Int = 0; val letters = Array("a", "b", "c", "d", "e", "f", "g", "h", "i", "j") val r = scala.util.Random for( i
1
2
3
4
5
6
7
8
9
10
11
12
13
14
15
%spark
import com.datastax.spark.connector.\_
import org.apache.spark.{SparkConf, SparkContext}
import org.apache.spark.SparkContext.\_
// STEP 2: Populate data
var testData : List\[(Int, String, String)\] = List()
var i : Int = 0;
val letters = Array("a", "b", "c", "d", "e", "f", "g", "h", "i", "j")
val r = scala.util.Random
for( i
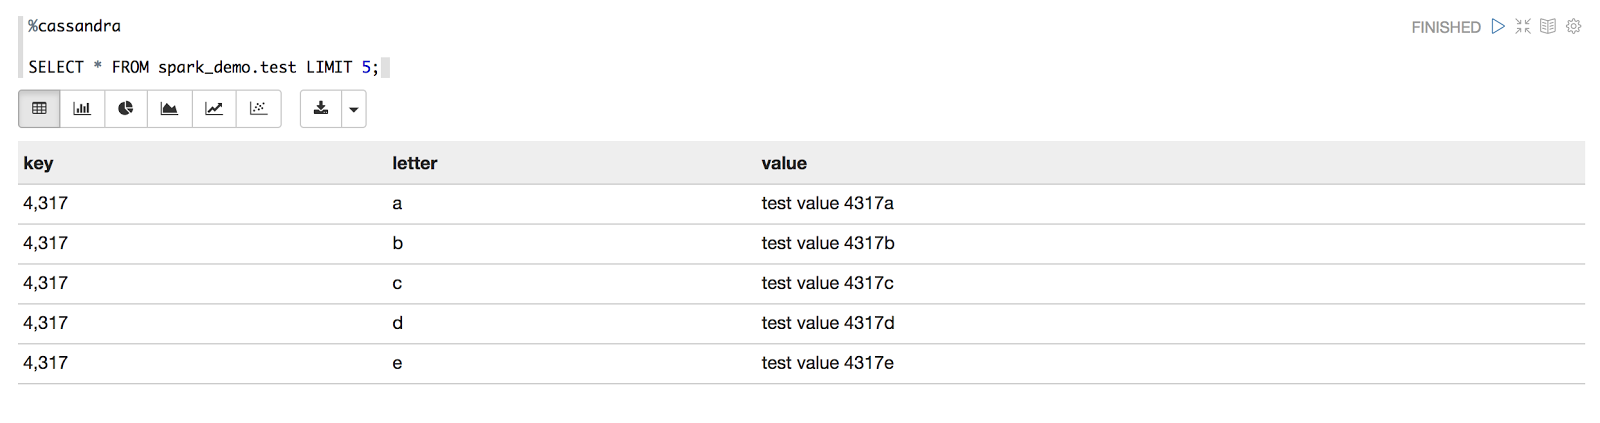
And then run a quick select query to make sure it looks as expected:
[](https://www.instaclustr.com/wp-content/uploads/2021/10/run-Apache-Spark-select-query.png)
Retrieving Data
---------------
Now that we’ve got some test data, we’ll run two different methods of selecting data from the Cassandra table.
### Filter
For the first method, let’s use Spark’s [filter](https://spark.apache.org/docs/1.6.3/programming-guide.html#transformations) transformation to pull the data back from the “test” table to the executor, then find a partition key and then show the “letter” values for each row.
%spark // Step 3a: Filtering using Spark import com.datastax.spark.connector.\_ import org.apache.spark.{SparkConf, SparkContext} import org.apache.spark.SparkContext.\_ val letterCountRdd = sc.cassandraTable("spark\_demo","test") .filter(r => r.getInt("key").equals(1)) .map(((x: CassandraRow) => x.getString("letter"))) .map(letter => (letter, 1)) .reduceByKey{case (x, y) => x+y} println(letterCountRdd.toDebugString) letterCountRdd.collect.foreach(println)
1
2
3
4
5
6
7
8
9
10
11
12
13
14
15
16
17
18
%spark
// Step 3a: Filtering using Spark
import com.datastax.spark.connector.\_
import org.apache.spark.{SparkConf, SparkContext}
import org.apache.spark.SparkContext.\_
val letterCountRdd = sc.cassandraTable("spark\_demo","test")
.filter(r => r.getInt("key").equals(1))
.map(((x: CassandraRow) => x.getString("letter")))
.map(letter => (letter, 1))
.reduceByKey{case (x, y) => x+y}
println(letterCountRdd.toDebugString)
letterCountRdd.collect.foreach(println)
In addition to the letter counts, we’re also showing the RDD dependency graph (the steps required to generate my letterCountRdd) using the [toDebugString](https://spark.apache.org/docs/1.6.3/api/java/org/apache/spark/rdd/RDD.html#toDebugString()) method.
toDebugString uses indents to indicate [shuffle boundaries](https://spark.apache.org/docs/1.6.3/programming-guide.html#shuffle-operations) (transferring data between executors), so for the lowest indent the output is showing that to generate the letterCountRdd each executor will need to:
1. Perform a Cassandra table scan
2. Filter all of the retrieved rows
3. Retrieve the “letter” of each row
4. Create tuples for each “letter” value
The transformed data is then transferred back to an executor for the reduceByKey transformation to be performed.
#### Spark UI
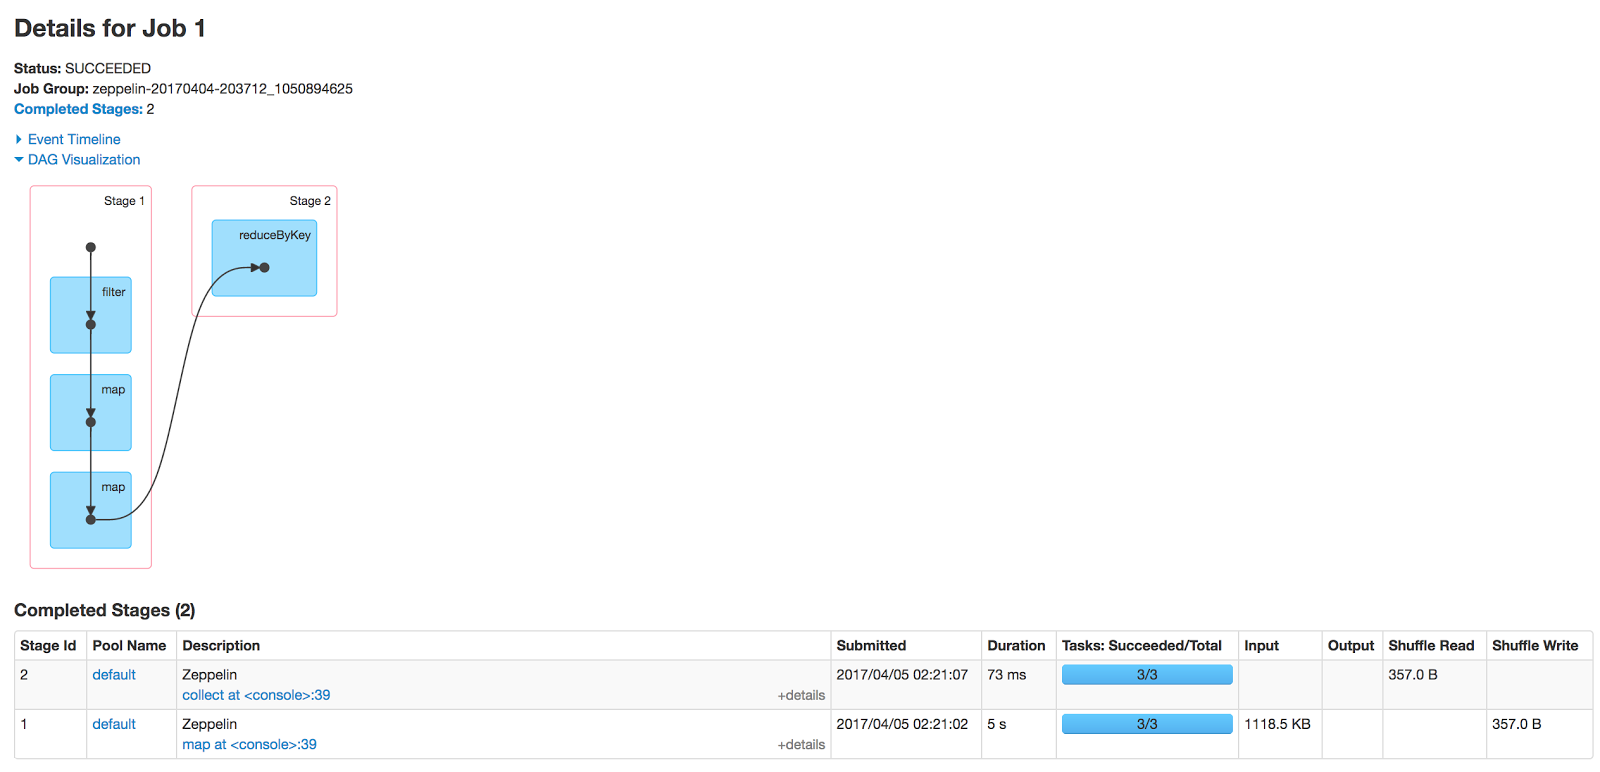
Moving across to the Spark UI, we can navigate to the Jobs page and select the Job that just ran:
[](https://www.instaclustr.com/wp-content/uploads/2021/10/Apache-Spark-UI.png)
From here, we can see that the Job took over 5 seconds to complete and the bulk of that time was spent in Stage 1, gathering and filtering 1,118.5 KB of data (the DAG visualization also shows a nice graphical summary of the RDD lineage).
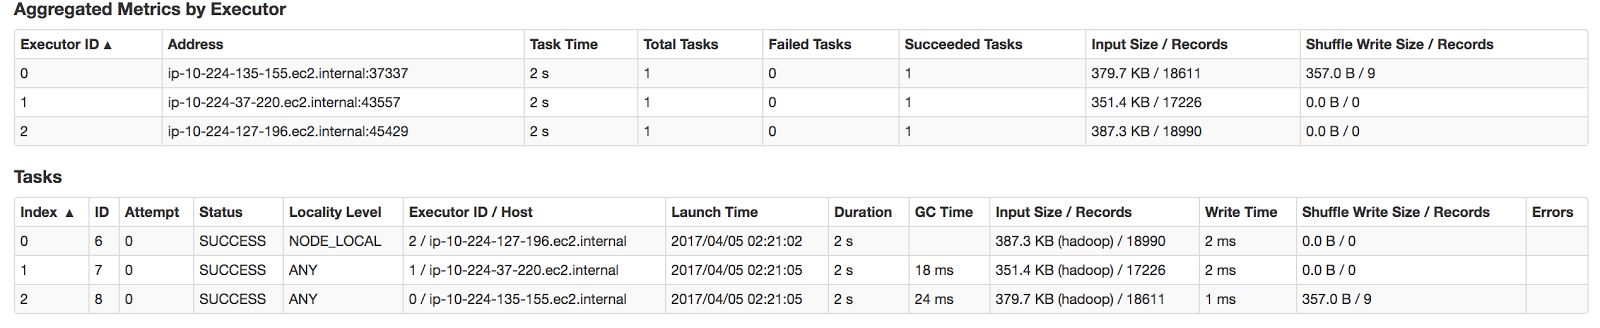
5 seconds and a megabyte of data seems like a lot for the single [partition](https://www.instaclustr.com/blog/cassandra-data-partitioning/) that we’re expecting to return. We can click on the Stage 1 link to show further details of the filtering:
[](https://www.instaclustr.com/wp-content/uploads/2021/10/Apache-Spark-DAG-visualization-and-summary-of-RDD-lineage.png)
Amongst other things, the Tasks table is showing that all three of our executors processed the Stage pipeline and performed full Cassandra table scans (something that should generally be avoided), with only one of them (*ip-10-224-135-155.ec2.internal*) actually ending up with any data.
### Where
For the second method, let’s use the Spark-Cassandra connector’s [select and where methods ](https://github.com/datastax/spark-cassandra-connector/blob/master/doc/3_selection.md)to (hopefully!) reduce the amount of data that needs to be transferred:
- The `where` method informs the connector of which partitions are required and therefore which nodes need to process the task
- The `select` method is retrieving only the column (*letter*) we’re interested in
%spark // Step 3b: Pushing filtering down to the Cassandra node import com.datastax.spark.connector.\_ import org.apache.spark.{SparkConf, SparkContext} import org.apache.spark.SparkContext.\_ val letterCountRdd = sc.cassandraTable("spark\_demo","test") .select("letter").where("key = ?", "1") .map(((x: CassandraRow) => x.getString("letter"))) .map(letter => (letter, 1)) .reduceByKey{case (x, y) => x+y} println(letterCountRdd.toDebugString) letterCountRdd.collect.foreach(println)
1
2
3
4
5
6
7
8
9
10
11
12
13
14
15
16
17
18
%spark
// Step 3b: Pushing filtering down to the Cassandra node
import com.datastax.spark.connector.\_
import org.apache.spark.{SparkConf, SparkContext}
import org.apache.spark.SparkContext.\_
val letterCountRdd = sc.cassandraTable("spark\_demo","test")
.select("letter").where("key = ?", "1")
.map(((x: CassandraRow) => x.getString("letter")))
.map(letter => (letter, 1))
.reduceByKey{case (x, y) => x+y}
println(letterCountRdd.toDebugString)
letterCountRdd.collect.foreach(println)
You can see that we’ve swapped out *filter* for this line:
`.select("letter").where("key = ?", "1")`
In the toDebugString output, it’s showing that the previous filter transformation has been completely removed, as that work has now been pushed down to the Cassandra nodes.
#### Spark UI
Moving back to the Spark UI, the details for this new Job reflect that the *filter* transformation has been dropped. More importantly, the total time has been reduced to 0.5 seconds. There’s not much difference in the *reduceByKey* durations (73 ms vs. 27 ms), so lets inspect Stage 1 again:
[](https://www.instaclustr.com/wp-content/uploads/2021/10/Spark-UI-Cassandra-filter-transformation.png)
This time, only one executor has been initialized because the connector was aware of exactly which node the required partition resided on. In addition, as Cassandra was only returning the “letter” column for partition “1”, the Stage *Input Size* was lowered to 9 bytes.
Conclusion
----------
Hopefully, this post has provided an interesting summary of how we can debug applications using the Spark UI! If you have any questions or feedback, please comment! or feel free to [contact us](https://www.instaclustr.com/contact-us/) directly.
### **Related Guides:**
1. [Apache Kafka: Architecture, deployment and ecosystem \[2025 guide\]](https://www.instaclustr.com/education/apache-kafka/)
2. [Understanding Apache Cassandra: Complete 2025 Guide](https://www.instaclustr.com/education/apache-cassandra/apache-cassandra-database/)
3. [Complete guide to PostgreSQL: Features, use cases, and tutorial](https://www.instaclustr.com/education/postgresql/complete-guide-to-postgresql-features-use-cases-and-tutorial/)
### **Related Products:**
1. [NetApp Instaclustr Data Platform](https://www.instaclustr.com/)
![mail icon]()#### Get the latest articles for open sourceIn your inbox
### Related content
[ Zero Downtime Migration to Instaclustr
Yes, we can migrate existing Cassandra clusters to Instaclustr without any downtime. Here's what to expect from the process...
](https://www.instaclustr.com/blog/zero-downtime-migration-to-instaclustr/)
[ Workflow Comparison: Uber Cadence vs Netflix Conductor
When choosing what’s right for your company’s opensource workflow needs it is important to know the difference and similarities ...
](https://www.instaclustr.com/blog/workflow-comparison-uber-cadence-vs-netflix-conductor/)
[ Will Your Cassandra Database Project Succeed?: The New Stack
Open source Apache Cassandra® continues to stand out as an enterprise-proven solution for organizations seeking high availability...
](https://www.instaclustr.com/blog/will-your-cassandra-database-project-succeed-the-new-stack/)
×Sign upto ourNewsletter
-----------------------