# Running Apache Cassandra® Single and Multi-Node Clusters on Docker with Docker Compose
[Blog](/blog/)>[Technology](/blog/category/technical/)>Running Apache Cassandra® Single and Multi-Node Clusters on Docker with Docker Compose
Running Apache Cassandra® Single and Multi-Node Clusters on Docker with Docker Compose
======================================================================================
January 18, 2024 | By [ Kassian Wren](https://www.instaclustr.com/blog/author/kassian-wren/)
[ ](https://x.com/intent/tweet?text=Running%20Apache%20Cassandra%C2%AE%20Single%20and%20Multi-Node%20Clusters%20on%20Docker%20with%20Docker%20Compose&url=https://www.instaclustr.com/blog/running-apache-cassandra-single-and-multi-node-clusters-on-docker-with-docker-compose/) [ ](https://www.linkedin.com/shareArticle?mini=true&url=https://www.instaclustr.com/blog/running-apache-cassandra-single-and-multi-node-clusters-on-docker-with-docker-compose/&title=&summary=Running%20Apache%20Cassandra%C2%AE%20Single%20and%20Multi-Node%20Clusters%20on%20Docker%20with%20Docker%20Compose&source=)
Sometimes you might need to spin up a local test database quickly–a database that doesn’t need to last beyond a set time or number of uses. Or maybe you want to integrate Apache Cassandra® into an existing [Docker](https://www.docker.com/) setup.
Either way, you’re going to want to run Cassandra on Docker, which means running it in a container with Docker as the container manager. This tutorial is here to guide you through running a single and multi-node setup of Apache Cassandra on Docker.
### Prerequisites
Before getting started, you’ll need to have a few things already installed, and a few basic skills. These will make deploying and running your Cassandra database in Docker a seamless experience:
- [Docker installed](https://www.docker.com/get-started/)
- Basic knowledge of containers and Docker (see the [Docker documentation](https://docs.docker.com/get-started/) for more insight)
- Basic command line knowledge
- A code editor (I use [VSCode](https://code.visualstudio.com/))
- CQL shell, aka [cqlsh](https://cassandra.apache.org/doc/stable/cassandra/tools/cqlsh.html), installed (instructions for installing a standalone cqlsh without installing Cassandra can be found [here](https://docs.datastax.com/en/dse/6.8/docs/installing/cqlsh.html))
### Method 1: Running a single Cassandra node using Docker CLI
This method uses the [Docker CLI](https://docs.docker.com/engine/reference/commandline/cli/) to create a container based on the [latest official Cassandra image](https://hub.docker.com/_/cassandra). In this example we will:
- Set up the Docker container
- Test that it’s set up by connecting to it and running cqlsh
- Clean up the container once you’re done with using it.
#### Setting up the container
You can run Cassandra on your machine by opening up a terminal and using the following command in the Docker CLI:
***docker run –name my-cassandra-db -d cassandra:latest***
Let’s look at what this command does:
- Docker uses the ‘***run***’ subcommand to run new containers.
- The ‘–name’ field allows us to name the container, which helps for later use and cleanup; we’ll use the name ‘***my-cassandra-db’***.
- The ‘-d’ flag tells Docker to run the container in the background, so we can run other commands or close the terminal without turning off the container.
- The final argument ***‘cassandra:latest’*** is the image to build the container from; we’re using the [latest official Cassandra image](https://hub.docker.com/_/cassandra).
When you run this, you should see an ID, like the screenshot below:
[](https://www.instaclustr.com/wp-content/uploads/Cassandra-on-Docker-image1.png)
To check and make sure everything is running smoothly, run the following command:
***docker ps -a***
You should see something like this:
[](https://www.instaclustr.com/wp-content/uploads/Cassandra-on-Docker-image2.png)
#### Connecting to the container
Now that the data container has been created, you can now connect to it using the following command:
***docker exec -it my-cassandra-db cqlsh***
This will run [cqlsh, or CQL Shell](https://cassandra.apache.org/doc/stable/cassandra/tools/cqlsh.html), inside your container, allowing you to make queries to your new Cassandra database. You should see a prompt like the following:
[](https://www.instaclustr.com/wp-content/uploads/Cassandra-on-Docker-image3.png)
#### Cleaning up the container
Once you’re done, you can clean up the container with the ’docker rm’ command. First, you’ll need to stop the container though, so you must to run the following 2 commands:
***docker stop my-cassandra-db***
***docker rm my-cassandra-db***
This will delete the database container, including all data that was written to the database. You’ll see a prompt like the following, which, if it worked correctly, will show the ID of the container being stopped/removed:
[](https://www.instaclustr.com/wp-content/uploads/Cassandra-on-Docker-image4.png)
### Method 2: Deploying a three-node Apache Cassandra cluster using Docker compose
This method allows you to have multiple nodes running on a single machine. But in which situations would you want to use this method? Some examples include testing the consistency level of your queries, your replication setup, and more.
#### Writing a docker-compose.yml
The first step is creating a docker-compose.yml file that describes our Cassandra cluster. In your code editor, create a ***docker-compose.yml*** file and enter the following into it:
version: '3.8' networks: cassandra: services: cassandra1: image: cassandra:latest container\_name: cassandra1 hostname: cassandra1 networks: - cassandra ports: - "9042:9042" environment: &environment CASSANDRA\_SEEDS: "cassandra1,cassandra2" CASSANDRA\_CLUSTER\_NAME: MyTestCluster CASSANDRA\_DC: DC1 CASSANDRA\_RACK: RACK1 CASSANDRA\_ENDPOINT\_SNITCH: GossipingPropertyFileSnitch CASSANDRA\_NUM\_TOKENS: 128 cassandra2: image: cassandra:latest container\_name: cassandra2 hostname: cassandra2 networks: - cassandra ports: - "9043:9042" environment: \*environment depends\_on: cassandra1: condition: service\_started cassandra3: image: cassandra:latest container\_name: cassandra3 hostname: cassandra3 networks: - cassandra ports: - "9044:9042" environment: \*environment depends\_on: cassandra2: condition: service\_started
1
2
3
4
5
6
7
8
9
10
11
12
13
14
15
16
17
18
19
20
21
22
23
24
25
26
27
28
29
30
31
32
33
34
35
36
37
38
39
40
41
42
43
44
45
46
47
48
49
50
51
52
53
54
55
56
57
58
59
60
61
62
63
64
65
66
67
68
69
70
71
72
73
74
75
76
77
78
79
80
81
82
83
84
85
version: '3.8'
networks:
cassandra:
services:
cassandra1:
image: cassandra:latest
container\_name: cassandra1
hostname: cassandra1
networks:
- cassandra
ports:
- "9042:9042"
environment: &environment
CASSANDRA\_SEEDS: "cassandra1,cassandra2"
CASSANDRA\_CLUSTER\_NAME: MyTestCluster
CASSANDRA\_DC: DC1
CASSANDRA\_RACK: RACK1
CASSANDRA\_ENDPOINT\_SNITCH: GossipingPropertyFileSnitch
CASSANDRA\_NUM\_TOKENS: 128
cassandra2:
image: cassandra:latest
container\_name: cassandra2
hostname: cassandra2
networks:
- cassandra
ports:
- "9043:9042"
environment: \*environment
depends\_on:
cassandra1:
condition: service\_started
cassandra3:
image: cassandra:latest
container\_name: cassandra3
hostname: cassandra3
networks:
- cassandra
ports:
- "9044:9042"
environment: \*environment
depends\_on:
cassandra2:
condition: service\_started
So what does this all mean? Let’s examine it part-by-part:
First, we declare our docker compose version.
version: '3.8'
1
version: '3.8'
Then, we declared a network called cassandra to host our cluster.
networks: cassandra:
1
2
3
networks:
cassandra:
Under services, cassandra1 is started. (NOTE: the depends on service start conditions in cassandra2 and cassandra3’s `depends\_on~ attributes prevent them from starting until the service on cassandra1 and cassandra2 have started, respectively.) We also set the port forwarding here so that our local 9042 port will map to the container’s 9042. We also add it to the cassandra network we established:
services: cassandra1: image: cassandra:latest container\_name: cassandra1 hostname: cassandra1 networks: - cassandra ports: - "9042:9042" environment: &environment CASSANDRA\_SEEDS: "cassandra1,cassandra2" CASSANDRA\_CLUSTER\_NAME: MyTestCluster CASSANDRA\_DC: DC1 CASSANDRA\_RACK: RACK1 CASSANDRA\_ENDPOINT\_SNITCH: GossipingPropertyFileSnitch CASSANDRA\_NUM\_TOKENS: 128
1
2
3
4
5
6
7
8
9
10
11
12
13
14
15
16
17
18
19
20
21
22
23
24
25
26
27
28
29
30
31
services:
cassandra1:
image: cassandra:latest
container\_name: cassandra1
hostname: cassandra1
networks:
- cassandra
ports:
- "9042:9042"
environment: &environment
CASSANDRA\_SEEDS: "cassandra1,cassandra2"
CASSANDRA\_CLUSTER\_NAME: MyTestCluster
CASSANDRA\_DC: DC1
CASSANDRA\_RACK: RACK1
CASSANDRA\_ENDPOINT\_SNITCH: GossipingPropertyFileSnitch
CASSANDRA\_NUM\_TOKENS: 128
Finally, we set some environment variables needed for startup, such as declaring CASSANDRA\_SEEDS to be cassandra1 and cassandra2.
The configurations for containers ‘cassandra2 ‘and ‘cassandra3’ are very similar; the only real difference are the names.
- Both use the same cassandra:latest image, set container names, add themselves to the Cassandra network, and expose their 9042 port.
- They also point to the same environment variables as cassandra1 with the \*environment syntax.
- Their only difference? cassandra2 waits on cassandra1, and cassandra3 waits on cassandra2.
-
Here is the code section that this maps to:
cassandra2: image: cassandra:latest container\_name: cassandra2 hostname: cassandra2 networks: - cassandra ports: - "9043:9042" environment: \*environment depends\_on: cassandra1: condition: service\_started cassandra3: image: cassandra:latest container\_name: cassandra3 hostname: cassandra3 networks: - cassandra ports: - "9044:9042" environment: \*environment depends\_on: cassandra2: condition: service\_started
1
2
3
4
5
6
7
8
9
10
11
12
13
14
15
16
17
18
19
20
21
22
23
24
25
26
27
28
29
30
31
32
33
34
35
36
37
38
39
40
41
42
43
44
45
46
47
cassandra2:
image: cassandra:latest
container\_name: cassandra2
hostname: cassandra2
networks:
- cassandra
ports:
- "9043:9042"
environment: \*environment
depends\_on:
cassandra1:
condition: service\_started
cassandra3:
image: cassandra:latest
container\_name: cassandra3
hostname: cassandra3
networks:
- cassandra
ports:
- "9044:9042"
environment: \*environment
depends\_on:
cassandra2:
condition: service\_started
#### Deploying your Cassandra cluster and running commands
To deploy your Cassandra cluster, use the Docker CLI in the same folder as your docker-compose.yml to run the following command (the -d causes the containers to run in the background):
docker compose up -d
1
docker compose up -d
Quite a few things should happen in your terminal when you run the command, but when the dust has settled you should see something like this:
[](https://www.instaclustr.com/wp-content/uploads/Cassandra-on-Docker-image5.png)
If you run the ‘docker ps -a,’ command, you should see three running containers:
[](https://www.instaclustr.com/wp-content/uploads/Cassandra-on-Docker-image6.png)
To access your Cassandra cluster, you can use csqlsh to connect to the container database using the following commands:
sudo docker exec -it cassandra1 cqlsh
1
sudo docker exec -it cassandra1 cqlsh
You can also check the cluster configuration using:
docker exec -it cassandra1 nodetool status
1
docker exec -it cassandra1 nodetool status
Which will get you something like this:

And the node info with:
docker exec -it cassandra1 nodetool info
1
docker exec -it cassandra1 nodetool info
From which you’ll see something similar to the following:
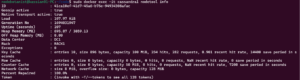
You can also run these commands on the cassandra2 and cassandra3 containers.
#### Cleaning up
Once you’re done with the database cluster, you can take it down and remove it with the following command:
docker compose down
1
docker compose down
This will stop and destroy all three containers, outputting something like this:
[](https://www.instaclustr.com/wp-content/uploads/Cassandra-on-Docker-image9.png)
Now that we’ve covered two ways to run Cassandra in Docker, let’s look at a few things to keep in mind when you’re using it.
### Important things to know about running Cassandra in Docker
#### Data Permanence
Unless you declare volumes on the machine that maps to container volumes, the data you write to your Cassandra database will be erased when the container is destroyed. (You can read more about using Docker volumes [here)](https://docs.docker.com/storage/volumes/).
#### Performance and Resources
Apache Cassandra can take a lot of resources, especially when a cluster is deployed on a single machine. This can affect the performance of queries, and you’ll need a decent amount of CPU and RAM to run a cluster locally.
### Conclusion
There are several ways to run Apache Cassandra on Docker, and we hope this post has illuminated a few ways to do so. If you’re interested in learning more about Cassandra, you can find out more about [how data modelling works with Cassandra](https://www.instaclustr.com/blog/cassandra-data-modeling/), or [how PostgreSQL and Cassandra differ.](https://www.instaclustr.com/blog/apache-cassandra-vs-postgresql/)
Ready to spin up some Cassandra clusters yourself? Give it a go with a [free trial](https://console2.instaclustr.com/signup) on the Instaclustr Managed Platform for Apache Cassandra® today!
### About the author
**[Kassian Wren](https://www.instaclustr.com/blog/author/kassian-wren/)** | Open Source Technology Advocate
Kassian specializes in open source technologies like OpenSearch and Cassandra. With over a decade of experience, they excel in creating impactful educational content across various formats and actively engage with the developer community through events, online platforms, and live presentations. Passionate about fostering knowledge-sharing, Kassian combines technical expertise with community-focused outreach to support and inspire developers worldwide.
![mail icon]()#### Get the latest articles for open sourceIn your inbox
### Related content
[ Zero Downtime Migration to Instaclustr
Yes, we can migrate existing Cassandra clusters to Instaclustr without any downtime. Here's what to expect from the process...
](https://www.instaclustr.com/blog/zero-downtime-migration-to-instaclustr/)
[ Workflow Comparison: Uber Cadence vs Netflix Conductor
When choosing what’s right for your company’s opensource workflow needs it is important to know the difference and similarities ...
](https://www.instaclustr.com/blog/workflow-comparison-uber-cadence-vs-netflix-conductor/)
[ Will Your Cassandra Database Project Succeed?: The New Stack
Open source Apache Cassandra® continues to stand out as an enterprise-proven solution for organizations seeking high availability...
](https://www.instaclustr.com/blog/will-your-cassandra-database-project-succeed-the-new-stack/)
×Sign upto ourNewsletter
-----------------------