Overview: What is an MCP Gateway and why do we need it?
Early LLMs could only reason over what they were trained on, but teams soon realized the answers their models actually needed lived in their own proprietary systems, not on the public web. Connecting that data by hand added significant integration overhead, whether through prompt-injection patterns like RAG or one-off custom tool callouts.
The Model Context Protocol, or MCP, gives AI agents a consistent way to reach an external service and run commands against it. Instead of building one-off integrations for every backend, teams can expose systems as MCP tools that an AI agent can call when it needs information or to complete a task.
However, once MCP becomes part of a production AI system, it has to be just as dependable as every other component in your stack and reaching that level has not been straightforward. Many of the first technology-specific MCP servers were really prototypes, missing the reliability, security, and logging that production needs.
That is where an MCP Gateway helps.
An MCP Gateway sits between your AI agent and your backend systems. It provides a managed, secure, endpoint where the agent can discover available tools and route requests to the right backend.
NetApp recently launched the MCP Gateway on the NetApp Instaclustr Managed Platform to close that gap. In a few minutes you can stand up a production-ready Gateway that is pointed at your existing resources and provisioned just like any other cluster on the Instaclustr platform. During setup you decide which resources to expose, what credentials the Gateway should use, how each tool should be described to the AI Agent, and you can refine all of that over time. This approach helps reduce integration overhead while keeping the agent architecture clean: the AI agent talks to the Gateway, and the Gateway handles the connection to the backend systems.
In this MCP Gateway tutorial, we’ll walk through how to connect an AI agent to two backend systems:
- An HTTP server backend that returns recent customer order data
- An Apache Kafka backend that publishes a support request message
By the end, your AI agent will connect to a single MCP virtual server, discover both tools automatically, and decide which one to use based on plain-language user prompts.
Special note: At launch, the MCP Gateway connects to HTTP server and Kafka backends. Support for PostgreSQL, Cassandra, OpenSearch, ClickHouse, Cadence, and AI Search Knowledge Bases is planned for future releases and subject to change.
Prerequisites
Required for the MCP Gateway setup:
- An Instaclustr account with access to provision clusters (console, Terraform, or API).
- An existing Kafka cluster on the Instaclustr platform with automatic topic creation enabled (turn this on when provisioning the cluster – with it enabled, topic is created automatically). You’ll need the cluster ID, plus a Kafka user (created below in Step 4) when adding the Kafka backend.
- An HTTP server that exposes the order data. In this walkthrough, the orders are served as JSON from a URL.
Optional, only if you want to run the example AWS Bedrock chatbot:
- An AWS account with Amazon Bedrock model access enabled in us-east-1.
- Local tooling: Python 3.11+ and the uv package manager.
What we’ll build: An AI agent connected to Kafka and an HTTP Server
In this walkthrough, we’ll provision a MCP Gateway cluster on NetApp Instaclustr and create an MCP virtual server named supportchatbot. Then, we will attach two backends to it, each exposing a single tool:
ordersapi: An HTTP server backend whoseget_orderstool (GET) retrieves a shopper’s recent orders.supporttickets: A Kafka backend whosesubmit_requesttool publishes a support request to the shoe company team.
After that, your AI Agent connects to the supportchatbot endpoint over Streamable HTTP. It discovers both MCP tools automatically and chooses the right tool based on a user’s plain language request.
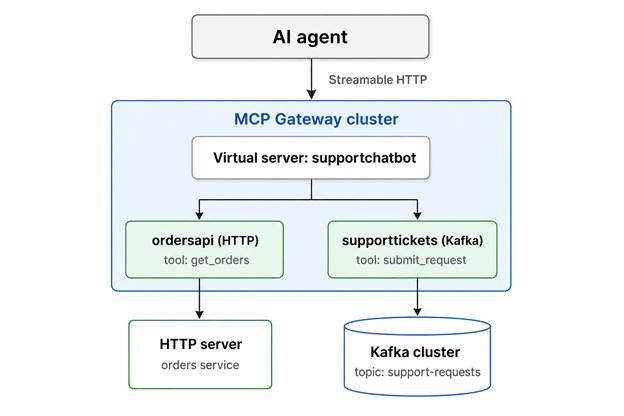
Figure 1. Connecting an AI Agent to HTTP and Kafka backends through the MCP Gateway
Step 1: Provision the MCP Gateway cluster
In the Instaclustr console, provision a new MCP Gateway cluster the same way you would any other cluster. Terraform and the Instaclustr API are equally supported. Within minutes you have a running Gateway ready to configure.
Step 2: Create the MCP virtual server
Open your MCP Gateway cluster and select MCP Virtual Servers, then click Create Virtual Server.
- Name:
supportchatbot - Endpoint URL:
/chatbot
Click Create Virtual Server.
The new supportchatbot server appears in the list. Open its Details page to find the full Endpoint URL. For example:
|
1 |
https://mcp-gateway.<id>.cnodes.io/chatbot |
Copy this; your AI Agent will use it later. At this point, the virtual server has no backends yet.
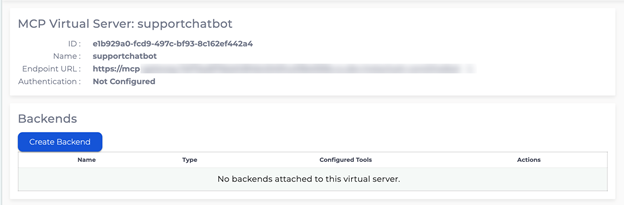
Figure 2. MCP Virtual server details for supportchatbot, with no backends attached yet
Step 3: Add the HTTP server backend (ordersapi) and the get_orders tool
Next, we’ll add the HTTP server backend that exposes sample order data.
On the supportchatbot Details page, under Backends, click Create Backend. Use the following values:
- Name:
ordersapi - Backend Type: HTTP Server
- OpenAPI Server URL: https://gist.githubusercontent.com/aiworldnow
- Authentication Scheme: None
Click Create Backend.
The ordersapi backend now shows under the virtual server with zero tools. Next, we’ll create the tool the AI agent can call.
Open the ordersapi backend and, under Tools, click Create Tool. Use the following values:
- Name:
get_orders - Description: List customers recent orders
- Tool Type: HTTP Operation
- Path:
/7bd3c042b44ef6c928bc7c42a124210e/raw/c5360e9d3b5a99d49117d259be05ca557f26087e/orders_1.json - Method:
GET - Parameters: None
Click Create Tool.
The server URL and tool path combine to fetch the orders JSON from this GitHub Gist.
The orders_1.json served at that URL looks like this:
|
1 2 3 4 5 6 7 8 9 10 11 12 13 14 15 16 17 18 19 20 21 22 23 24 25 26 27 28 29 30 |
[{ "order_id": "1", "customer_id": "1", "item": { "type": "Sneakers", "color": "blue", "size": "10" }, "status": "delivered" }, { "order_id": "2", "customer_id": "1", "item": { "type": "Boots", "color": "brown", "size": "10.5" }, "status": "delivered" }, { "order_id": "3", "customer_id": "1", "item": { "type": "Shoes", "color": "black", "size": "10" }, "status": "delivered" }] |
In this walkthrough, get_orders returns this fixed sample file, so it lists the same orders each time rather than filtering by an individual shopper.
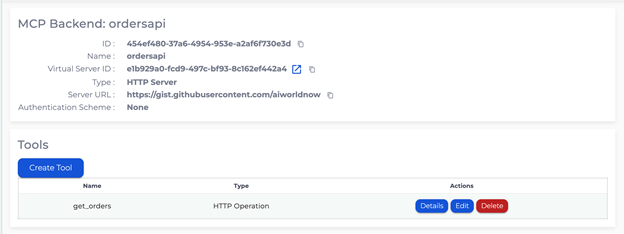
Figure 3. Figure 3. HTTP backend ordersapi with the get_orders tool configured
Step 4: Connect the AI agent to an Apache Kafka backend (supporttickets) and the submit_request tool
Now we’ll add the Kafka backend that publishes support requests. The Kafka backend authenticates as a Kafka user, so create that user first.
4a. Create the Kafka user. In your Kafka cluster (here, shoe-support-tickets), go to Users → Add new Kafka User.
Use the following values:
- Username:
supportmcg - Initial Permissions: Standard (read and write to all topics)
- Authentication Method: SASL
- SASL Mechanism: SASL/SCRAM SHA-256
- Password / Confirm Password: <set a password>
Click Add User.
Keep this username and password, you’ll enter them when creating the backend.
4b. Create the Kafka backend.
Back on the supportchatbot virtual server, click Create Backend.
Use the following values:
- Name:
supporttickets - Backend Type: Kafka
- Kafka Cluster ID: <the ID of your Instaclustr Kafka cluster>
- Username:
supportmcg - Password: <the password you set in 4a>
Click Create Backend.
4c. Create the tool.
Open the supporttickets backend and, under Tools, click Create Tool.
Use the following values:
- Name:
submit_request - Description: Submit support request to Shoe Company team
- Tool Type: Publish Message
- Kafka Topic:
support-requests - Message Description: Support request data in JSON format.
Click Create Tool.
The supportchatbot virtual server now lists two backends – ordersapi (1 tool) and supporttickets (1 tool).
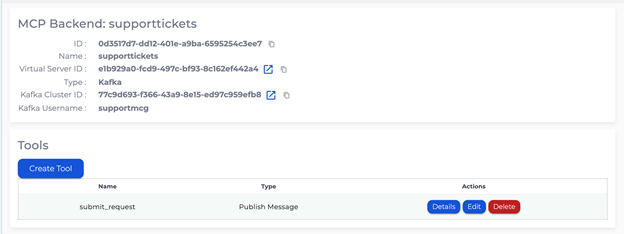
Figure 4. Kafka backend supporttickets with the submit_request tool configured
Step 5: Connect your AI agent to MCP Gateway using streamable HTTP
The MCP Gateway can expose its tools to any supported AI Agent – ChatGPT, Claude, Gemini, or AWS Bedrock, and the connection pattern is the same for all of them: the AI Agent connects to the supportchatbot endpoint over Streamable HTTP, using the MCP server details you copy from the console’s example code. On connect, the AI Agent discovers both tools and decides, for each question, whether to fetch data or take an action. The only thing that differs between environments is how you configure that client and its model, not how it talks to the Gateway.
To verify your setup end to end, point your AI Agent at the virtual-server URL and ask a couple of plain-language questions:
- “Show me my recent orders.”
The AI Agent calls get_orders against ordersapi and lists the blue Sneakers, brown Boots, and black Shoes.
- “My black shoes (order 3) don’t fit, please log a return request.”
The AI Agent calls submit_request to publish a message to the supporttickets Kafka backend.
If the client connects without authentication errors and the right tool fires for each question, your Gateway is working.
Example: Connect AWS Bedrock to the MCP Gateway
This walkthrough uses a small AWS Bedrock Streamlit client. Its config.json includes a bedrock block and AWS credentials specific to this client, but the only part that concerns the MCP Gateway is the mcp section. Paste the endpoint URL you copied in Step 2 into the url field:
|
1 2 3 4 5 6 7 8 9 |
"mcp": { "enabled": true, "servers": { "supportchatbot": { "transport": "streamable-http", "url": "https://mcp-gateway.<id>.cnodes.io/chatbot" } } } |
The full code for the shoe store support chatbot, including the complete config.json, will be available in the GitHub repo.
Run it (AWS credentials come from the standard AWS chain, since this client uses Bedrock):
|
1 2 3 4 5 6 |
cd "MCP Gateway Demo" uv sync export AWS_ACCESS_KEY_ID="..." export AWS_SECRET_ACCESS_KEY="..." export AWS_DEFAULT_REGION="us-east-1" uv run streamlit run src/shoe_bot/app.py |
Once it’s running, open the app in your browser and try the two prompts above. Each prompt triggers the matching tool automatically: the orders question calls get_orders and lists your three orders (Figure 5), while the return request calls submit_request to publish a support ticket to Kafka (Figure 6). You don’t need to specify tool names or routing. The AI agent discovers the tools through the MCP Gateways and selects the right one based on the user request.
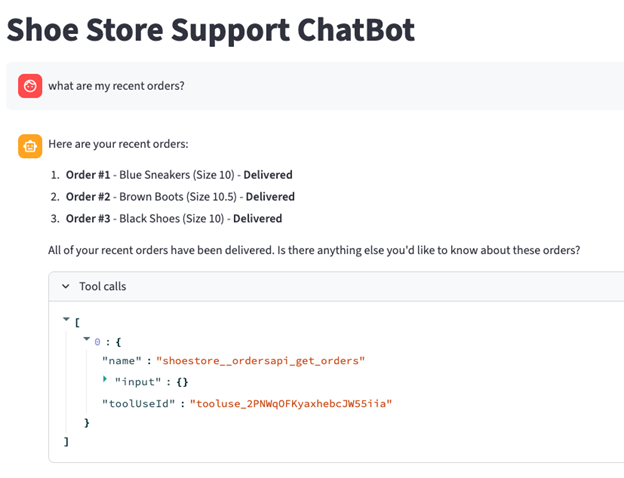
Figure 5. Prompt 1 – the agent invokes the ordersapi get_orders tool and lists the blue Sneakers, brown Boots, and black Shoes
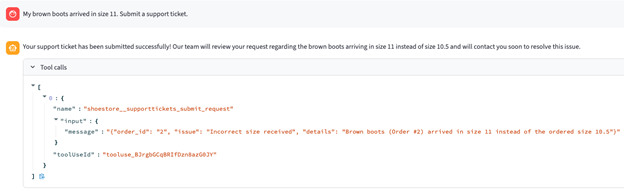
Figure 6. Prompt 2 – the agent invokes the supporttickets submit_request tool, publishing the return request to Kafka
What production controls does MCP Gateway provide?
Once your integration is live, the Gateway handles key production requirements on behalf of the application. The MCP Gateway provides:
- OAuth authentication for connecting AI Agents
- Configurable access to each underlying resource, together with descriptions the AI Agent can read
- Identity mapping from the AI agent context to a backend user
- Logging of all gateway usage
These controls help move MCP integrations beyond prototype-stage connectors and toward production-ready AI agent architectures.
Summary
In this MCP Gateway tutorial, we connected an AI agent to live backend systems using the NetApp Instaclustr for MCP Gateway.
A single supportchatbot virtual server exposes two backends over Streamable HTTP:
- An
ordersapiHTTP backend (get_orders) - A
supportticketsKafka backend (submit_request), both reached over Streamable HTTP
You provision and secure the Gateway once, attach your backends, and your AI agent stays the same. It simply discovers the tools you expose. Support for more backends (PostgreSQL, Cassandra, OpenSearch, ClickHouse, Cadence, and AI Search Knowledge Bases) is coming in future releases.
If you are building AI applications, now is a great time to get started. Provision an MCP Gateway on the Instaclustr platform, follow the steps in this article, and connect your AI agent to your own data through Kafka and HTTP server backends. The MCP Gateway is built on agentgateway, a fully open source project hosted by Agentic AI Foundation under the Apache 2.0 license that you can run and manage yourself.
Want to see this whole setup in action? Check out the YouTube walkthrough video for a live demo of an AI agent connecting to both the HTTP and Kafka backends.
Ready to connect your own AI agent to live data? Spin up an MCP Gateway on the Instaclustr platform and start building today with a free trial – available through the console, Terraform, or the API.