Real-time data pipelines are the backbone of modern data-driven applications. Whether you’re tracking mobile network performance, monitoring IoT sensors, or analyzing user behavior, getting streaming data into your analytical database quickly and reliably is crucial. Today, I want to walk you through one of the most elegant solutions I’ve encountered: using ClickHouse’s Kafka table engine to stream data directly from Apache Kafka into your analytics warehouse.
Why stream Kafka data into ClickHouse?
Before we dive into the technical implementation, let’s talk about why you’d want to do this in the first place. The combination of Kafka and ClickHouse is powerful because each technology excels at what it does best.
Kafka is fantastic at being the central nervous system for your data—potentially ingesting hundreds of thousands or even millions of events per second, buffering them reliably, and making them available to multiple consumers. But Kafka isn’t built for analytical queries. You can’t ask Kafka “what was the average latency across all mobile tests in San Francisco last week?” That’s where ClickHouse comes in.
ClickHouse is built from the ground up for lightning-fast analytical queries over massive datasets. It can aggregate hundreds of millions of rows in seconds, making it perfect for real-time dashboards, monitoring systems, and ad-hoc analysis. But ClickHouse needs data to analyze, and in many modern architectures that data may be flowing through Kafka.
The traditional approach would be to write a separate consumer application that reads from Kafka and writes to ClickHouse. This works, but it adds another component to maintain, monitor, and scale. It’s another potential point of failure in your pipeline.
Kafka table engine changes this game entirely. ClickHouse can consume directly from Kafka topics, eliminating the need for intermediate consumer applications. Once configured, your data flows from producers → Kafka → ClickHouse automatically, with ClickHouse handling all the consumer group management, offset tracking, and fault tolerance for you.
Understanding the architecture
Let’s ground this in a concrete example. Imagine you’re monitoring mobile network performance across the United States. Your system is receiving continuous streams of speed test data—download speeds, upload speeds, latency measurements, device counts—all tied to specific geographic locations identified by quadkeys (a spatial indexing system).
Each message coming into your Kafka topic looks something like this:
|
1 2 3 4 5 6 7 8 9 10 11 12 13 |
{ "quadkey": "0231301230123012", "tile": "POLYGON((-122.42 37.77, ...))", "tile_x": -122.4194, "tile_y": 37.7749, "avg_d_kbps": 185000, "avg_u_kbps": 45000, "avg_lat_ms": 18, "avg_lat_down_ms": 15, "avg_lat_up_ms": 22, "tests": 247, "devices": 98 } |
These messages are flowing into a Kafka topic called mobile_speed_tests continuously—maybe hundreds or thousands per second during peak hours. You need this data queryable in ClickHouse as quickly as possible for real-time monitoring dashboards, network optimization, and trend analysis.
Setting up the integration
If you want to try this for yourself, you can head over to instaclustr.com and register for a free 30-day trial, no credit card needed and deploy both ClickHouse and Kafka. Click here to try it out!
When you’re working with NetApp Instaclustr’s managed ClickHouse, the first step is configuring the Kafka integration through the Instaclustr console. From the left-menu, select ‘Integrations’. You’ll see the following integration options. Find the ‘Kafka’ row, in this case the last row, and click ‘Configure’ (note: this requires your Kafka cluster to also be running on Instaclustr).
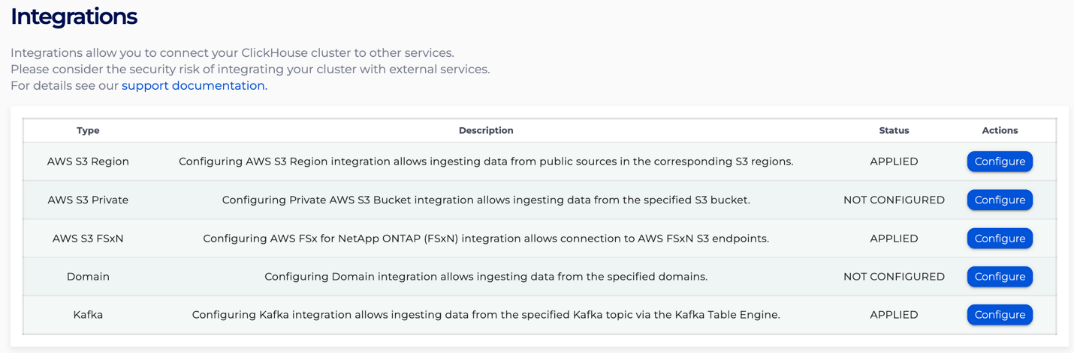
In the Kafka integrations page for your ClickHouse cluster, you’ll specify which Kafka cluster to connect to, which topics ClickHouse should have access to, and the message format (Avro, CSV, JSON, LineAsString, Parquet, or Protobuf). In our case we are using JSON. Click ‘Apply’ and Instaclustr creates the necessary network connectivity and authentication credentials that ClickHouse will use to consume from Kafka as a Named Collection inside of ClickHouse.

Within the Instaclustr management console you will see the new integration applied and the name of the named collection that will be referenced in one of our ClickHouse tables.

This Named Collection stores all the connection details, authentication credentials, and topic information in one reusable object.

Once the integration is configured at the infrastructure level, you’ll set up three components in ClickHouse itself: the destination table, the Kafka table engine, and the materialized view that ties them together.
Building the data pipeline
Step 1: Create your destination table
First, you need a proper MergeTree table where your data will ultimately live. This is where ClickHouse will store and optimize your data for analytical queries:
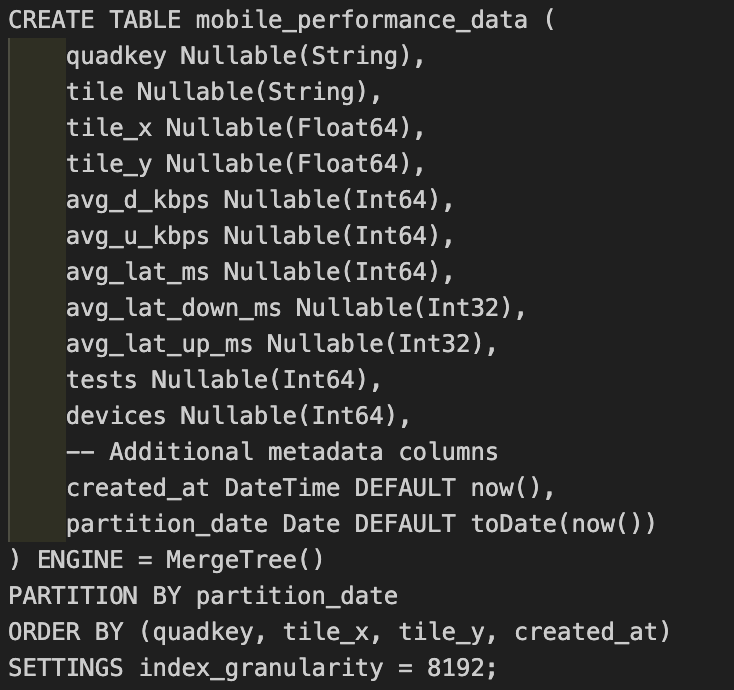
Notice a few important decisions here. We’re using MergeTree, which is ClickHouse’s workhorse storage engine for analytical workloads. The data is partitioned by date—this makes it incredibly efficient to drop old data or query recent time windows. The ORDER BY clause is crucial for query performance; we’re sorting by the fields we’ll most commonly filter on: geographic identifiers and time.
The schema has to match what’s coming from Kafka or it won’t work, but additional fields can also be present. We’ve added created_at and partition_date fields here which are set automatically when data arrives, giving us precise timestamps and enabling efficient time-based partitioning.
Step 2: Create the Kafka table engine
Now comes the magic. The Kafka table engine acts as a window into your Kafka topic:
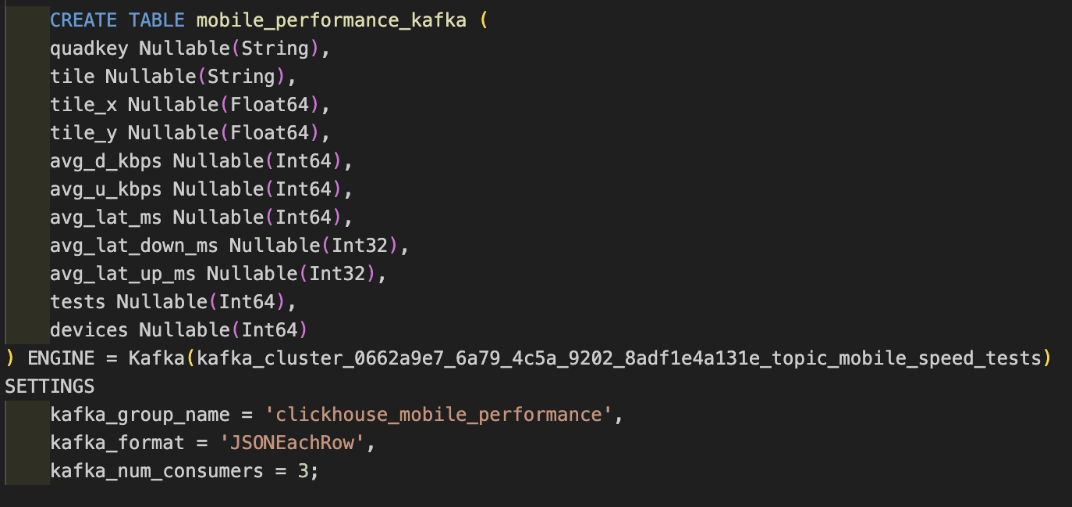
As you can see, the ENGINE references the Named Collection that was created in the Instaclustr console.
This table doesn’t actually store data—it’s a streaming interface. You won’t query this table directly. Instead, you’ll use it as the source for a materialized view.
The settings are important:
kafka_group_namecreates a consumer group, allowing multiple ClickHouse replicas to coordinate consumption.kafka_format = 'JSONEachRow'tells ClickHouse to expect one JSON object per line (standard for many Kafka producers).kafka_num_consumers = 3runs three parallel consumers, increasing throughput.
Step 3: Create the materialized view
Here’s where everything connects. The materialized view is what makes ClickHouse act as a Kafka consumer:
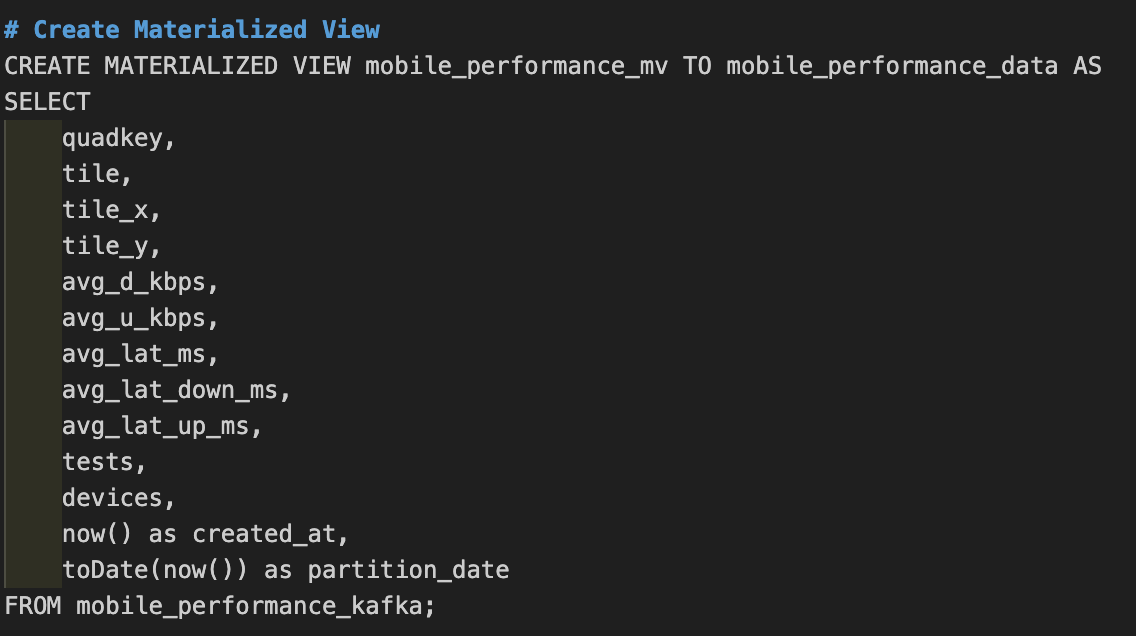
This materialized view continuously reads from mobile_performance_kafka and writes the results to mobile_performance_data. It’s running constantly in the background; as soon as messages arrive in Kafka, ClickHouse processes them and inserts them into the destination table.
Notice how we’re adding created_at and partition_date dynamically using now(). This enriches each record with the time it was processed by ClickHouse.
How the materialized view works as a consumer
This is a crucial concept to understand: the materialized view IS your Kafka consumer. When you create a materialized view sourced from a Kafka table engine, ClickHouse starts consuming from that topic immediately. The view continuously polls Kafka for new messages, processes them through the SELECT statement, and inserts the results into the destination table.
This is fundamentally different from traditional materialized views in SQL databases, which store pre-computed query results. ClickHouse’s materialized views are more like streaming transformation pipelines. They’re reactive—they do their work when new data arrives, not when someone queries them.
The beauty of this approach is that all the complexity of Kafka consumer management is handled for you. ClickHouse manages offsets, handles rebalancing if you add more nodes, deals with network hiccups, and ensures exactly-once or at-least-once delivery semantics depending on your configuration. You don’t need to write consumer code, manage consumer group state, or handle deserialization logic.
Seeing it in action
Once everything is set up, data starts flowing immediately. Messages published to your Kafka topic can appear in ClickHouse within seconds (or faster) with optimized configuration. You can verify this with simple queries:
|
1 2 3 4 5 6 7 8 9 10 11 12 13 14 15 16 17 |
-- See the most recent data SELECT * FROM mobile_performance_data ORDER BY created_at DESC LIMIT 10; -- Check data volume SELECT partition_date, count() as messages, avg(avg_d_kbps / 1000) as avg_download_mbps, avg(avg_lat_ms) as avg_latency_ms FROM mobile_performance_data GROUP BY partition_date ORDER BY partition_date DESC; |
If you’re monitoring mobile network performance like in our example, you might run analytics like:
|
1 2 3 4 5 6 7 8 9 10 11 12 13 14 |
-- Find areas with best performance SELECT round(tile_x, 2) as longitude, round(tile_y, 2) as latitude, avg(avg_d_kbps / 1000) as avg_download_mbps, avg(avg_lat_ms) as avg_latency_ms, sum(tests) as total_tests FROM mobile_performance_data WHERE created_at >= now() - INTERVAL 1 HOUR GROUP BY longitude, latitude HAVING total_tests > 100 ORDER BY avg_download_mbps DESC LIMIT 20; |
These queries are designed to run in milliseconds, even over millions of rows, to give you real-time insights into your streaming data.
Monitoring your pipeline
One of the challenges with streaming pipelines is visibility. How do you know if data is flowing correctly? ClickHouse provides several system tables for monitoring:
|
1 2 3 4 5 6 7 8 9 10 11 |
-- Check Kafka consumer status SELECT * FROM system.kafka_consumers; -- Monitor materialized view activity SELECT database, table, last_exception FROM system.replicated_fetches; |
Final thoughts
The Kafka table engine introduces significant architectural simplification. By eliminating the need for separate consumer applications, you can reduce operational complexity, potential failure points, and the amount of code you need to maintain.
The materialized view acting as a consumer is elegant: it’s declarative (you specify what transformation to apply), it’s automatic (ClickHouse handles the consumer mechanics), and it’s efficient (batching and parallel processing are built-in).
If you’re building real-time analytics, dashboards, or monitoring systems on top of streaming data, give the ClickHouse Kafka table engine a serious look. It might just be the simplest streaming pipeline you’ll ever build.