Where we left off
In part 1, we deployed a managed Apache Kafka cluster with Terraform. That gave us a reliable message broker, but a broker sitting alone isn’t a pipeline—it’s just infrastructure waiting for a purpose.
Today, we add the pieces that turn Kafka into a real-time analytics system:
- ClickHouse®: A columnar database that can query hundreds of millions of rows in milliseconds
- Kafka® Connect: A distributed framework that streams data between systems without writing code
By the end, you’ll have three clusters talking to each other, all deployed from a single Terraform configuration.
Why this architecture?
Before we write code, let’s understand why this specific combination matters.
The problem
Imagine you’re processing user events—clicks, purchases, and page views. Kafka handles the ingestion beautifully: millions of events per second, no problem. But then someone asks, “How many users from California purchased something in the last hour?”
Kafka excels at moving data, not answering questions about it. That’s because it’s a streaming log optimize for throughput and durability—not ad hoc queries. For example, to ask “what happened last Tuesday?” you would need to land that data in a system built for analysis. That’s where ClickHouse comes in.
The traditional solution (and why it’s painful)
Most teams solve this with custom code: a consumer application that reads from Kafka, transforms the data, and writes to a database. It works, but now you’re maintaining:
- A consumer application
- Connection pooling
- Retry logic
- Schema evolution handling
- Monitoring and alerting
- Deployment pipelines for all of the above
That’s a lot of code for “move data from A to B.”
The better way: Kafka Connect
Kafka Connect exists precisely for this use case. Instead of writing custom consumers, you deploy connectors—pre-built plugins that handle the heavy lifting. Want data in ClickHouse? Deploy a ClickHouse sink connector. Need data from PostgreSQL? Deploy a PostgreSQL source connector.
No custom code. No deployment pipelines for data movement. Just configuration.
Who uses this pattern?
This isn’t experimental. Major companies run this exact architecture at scale:
- Cloudflare processes over 6 million HTTP requests per second through their ClickHouse-powered analytics pipeline
- Uber runs over a trillion Kafka messages daily for ride matching, pricing, and analytics
- Spotify streams hundreds of billions of events daily through their data infrastructure to power recommendations
The pattern works because it separates concerns: Kafka handles ingestion, Connect handles movement, ClickHouse handles queries. Each component does one thing well.
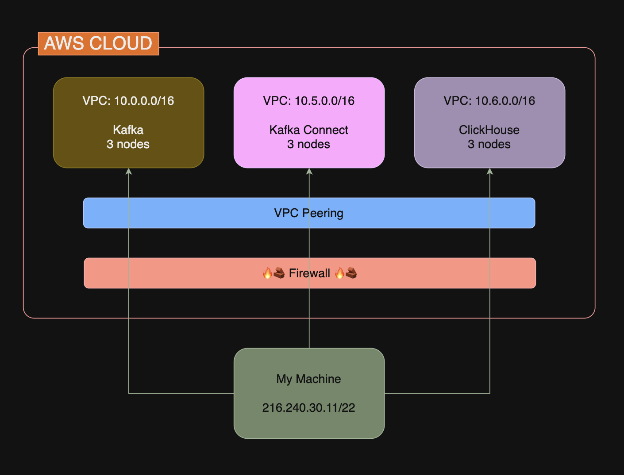
The architecture
Here’s what we’re building:
Three clusters, each in its own VPC:
| Cluster | Network | Purpose |
| Kafka | 10.0.0.0/16 | Message broker for event ingestion |
| Kafka Connect | 10.5.0.0/16 | Streams data from Kafka to ClickHouse |
| ClickHouse | 10.6.0.0/16 | Columnar database for analytics |
The NetApp Instaclustr does support a number of deployment models, such as co-locating these clusters inside the same VPC—but for simplicity today, let’s put them into separate VPC’s.
The firewall rules create a secure data flow: Kafka Connect can reach both Kafka and ClickHouse, but they can’t reach each other directly. Why does this matter? Each component only has access to what it needs. Kafka does not need to query ClickHouse. ClickHouse doesn’t need to read from Kafka (because that’s Connect’s job). By not opening unnecessary paths, you limit the blast radius if something goes wrong.
For example, if an attacker compromises ClickHouse, they can’t pivot directly to Kafka— they would have to go through Connect first, which is an additional barrier.
The complete Terraform configuration
This builds on part 1’s foundation. The code below includes everything from part one, plus new resources noted with #ClickHouse and #Kafka Connect comments.
Create a new directory with these files:
main.tf
|
1 2 3 4 5 6 7 8 9 10 11 12 13 14 15 16 17 18 19 20 21 22 23 24 25 26 27 28 29 30 31 32 33 34 35 36 37 38 39 40 41 42 43 44 45 46 47 48 49 50 51 52 53 54 55 56 57 58 59 60 61 62 63 64 65 66 67 68 69 70 71 72 73 74 75 76 77 78 79 80 81 82 83 84 85 86 87 88 89 90 91 92 93 94 95 96 97 98 99 100 101 102 103 104 105 106 107 108 109 110 111 112 113 114 115 116 117 118 119 120 121 122 123 124 125 126 127 128 129 130 131 132 133 134 135 136 137 138 139 140 141 142 143 144 145 146 147 148 149 150 151 152 153 154 155 156 157 158 159 160 161 162 163 164 165 166 167 168 169 170 171 172 173 174 175 176 177 178 179 180 181 182 183 184 185 186 187 188 189 190 191 192 193 194 195 196 197 198 199 200 201 202 203 204 205 206 207 208 209 210 |
terraform { required_providers { instaclustr = { source = "instaclustr/instaclustr" version = "~> 2.0" } } } # ================================================================= # Variables # ================================================================= variable "instaclustr_terraform_key" { description = "Instaclustr API key" type = string sensitive = true } variable "my_ip_address" { description = "Your IP address for firewall rules (CIDR format)" type = string } # ================================================================= # Provider # ================================================================= provider "instaclustr" { terraform_key = var.instaclustr_terraform_key } # ================================================================= # Kafka Cluster # ================================================================= resource "instaclustr_kafka_cluster_v3" "kafka" { name = "pipeline-kafka" description = "Kafka for data pipeline" kafka_version = "4.1.1" sla_tier = "NON_PRODUCTION" auto_create_topics = true allow_delete_topics = true client_to_cluster_encryption = false private_network_cluster = false pci_compliance_mode = false default_number_of_partitions = 3 default_replication_factor = 3 data_centre { cloud_provider = "AWS_VPC" name = "AWS_VPC_US_EAST_1" network = "10.0.0.0/16" region = "US_EAST_1" number_of_nodes = 3 node_size = "KFK-DEV-t4g.small-5" } } # ================================================================= # ClickHouse Cluster # ================================================================= resource "instaclustr_clickhouse_cluster_v2" "clickhouse" { name = "pipeline-clickhouse" description = "ClickHouse for real-time analytics" clickhouse_version = "25.8.11" sla_tier = "NON_PRODUCTION" private_network_cluster = false data_centre { cloud_provider = "AWS_VPC" name = "AWS_VPC_US_EAST_1" network = "10.6.0.0/16" region = "US_EAST_1" node_size = "CLK-DEV-m7i.large-50" shards = 1 replicas = 3 } } # ================================================================= # Kafka Connect Cluster # ================================================================= resource "instaclustr_kafka_connect_cluster_v2" "connect" { name = "pipeline-connect" description = "Kafka Connect for streaming to ClickHouse" kafka_connect_version = "4.1.1" sla_tier = "NON_PRODUCTION" private_network_cluster = false data_centre { cloud_provider = "AWS_VPC" name = "AWS_VPC_US_EAST_1" network = "10.2.0.0/16" region = "US_EAST_1" number_of_nodes = 3 node_size = "KCN-DEV-t4g.medium-30" replication_factor = 3 } target_cluster { managed_cluster { kafka_connect_vpc_type = "KAFKA_VPC" target_kafka_cluster_id = instaclustr_kafka_cluster_v3.kafka.id } } } # ================================================================= # Firewall Rules # ================================================================= # Kafka: Allow Kafka Connect + your IP resource "instaclustr_cluster_network_firewall_rules_v2" "kafka_firewall" { cluster_id = instaclustr_kafka_cluster_v3.kafka.id firewall_rule { network = "10.2.0.0/16" # Kafka Connect network type = "KAFKA" } firewall_rule { network = var.my_ip_address type = "KAFKA" } } # ClickHouse: Allow Kafka Connect + your IP resource "instaclustr_cluster_network_firewall_rules_v2" "clickhouse_firewall" { cluster_id = instaclustr_clickhouse_cluster_v2.clickhouse.id firewall_rule { network = "10.2.0.0/16" type = "CLICKHOUSE" } firewall_rule { network = "10.2.0.0/16" type = "CLICKHOUSE_WEB" } firewall_rule { network = var.my_ip_address type = "CLICKHOUSE" } firewall_rule { network = var.my_ip_address type = "CLICKHOUSE_WEB" } } # Kafka Connect: Allow your IP resource "instaclustr_cluster_network_firewall_rules_v2" "connect_firewall" { cluster_id = instaclustr_kafka_connect_cluster_v2.connect.id firewall_rule { network = var.my_ip_address type = "KAFKA_CONNECT" } } # ================================================================= # Outputs # ================================================================= # Kafka output "kafka_cluster_id" { value = instaclustr_kafka_cluster_v3.kafka.id } output "kafka_cluster_status" { value = instaclustr_kafka_cluster_v3.kafka.status } output "kafka_bootstrap_servers" { value = join(",", [for node in instaclustr_kafka_cluster_v3.kafka.data_centre[0].nodes : "${node.public_address}:9092"]) } # ClickHouse output "clickhouse_cluster_id" { value = instaclustr_clickhouse_cluster_v2.clickhouse.id } output "clickhouse_cluster_status" { value = instaclustr_clickhouse_cluster_v2.clickhouse.status } output "clickhouse_endpoints" { value = [for node in instaclustr_clickhouse_cluster_v2.clickhouse.data_centre[0].nodes : node.public_address] } output "clickhouse_web_ui" { value = [for node in instaclustr_clickhouse_cluster_v2.clickhouse.data_centre[0].nodes : "https://${node.public_address}:8443"] } # Kafka Connect output "kafka_connect_cluster_id" { value = instaclustr_kafka_connect_cluster_v2.connect.id } output "kafka_connect_cluster_status" { value = instaclustr_kafka_connect_cluster_v2.connect.status } output "kafka_connect_endpoints" { value = [for node in instaclustr_kafka_connect_cluster_v2.connect.data_centre[0].nodes : "${node.public_address}:8083"] } |
terraform.tfvars
|
1 2 |
instaclustr_terraform_key = "your-api-key-here" my_ip_address = "YOUR.IP.ADDRESS.HERE/32" |
Understanding the new components
ClickHouse: The analytics engine
|
1 2 3 4 5 6 7 8 9 10 |
resource "instaclustr_clickhouse_cluster_v2" "clickhouse" { name = "pipeline-clickhouse" clickhouse_version = "25.8.11" ... data_centre { network = "10.6.0.0/16" shards = 1 replicas = 3 } } |
ClickHouse is a columnar database, which means it stores data by column rather than by row. This makes it extraordinarily fast for analytical queries—the kind that scan millions of rows but only need a few columns.
A few configuration notes:
shards = 1: We’re using a single shard for simplicity. Production deployments shard data across multiple nodes for horizontal scaling.replicas = 3: Three copies of the data for fault tolerance. If a node fails, queries keep working.network = "10.6.0.0/16": A separate CIDR block from Kafka. Each cluster lives in isolation.
|
1 2 3 4 5 6 7 8 9 10 |
resource "instaclustr_clickhouse_cluster_v2" "clickhouse" { name = "pipeline-clickhouse" clickhouse_version = "25.8.11" ... data_centre { network = "10.6.0.0/16" shards = 1 replicas = 3 } } |
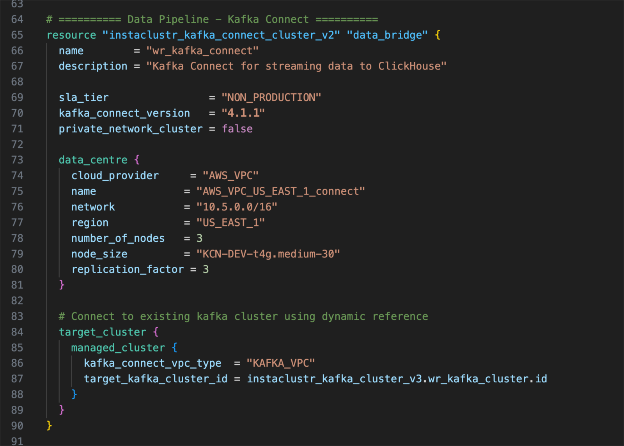
Kafka Connect: The data bridge
|
1 2 3 4 5 6 7 8 9 10 11 |
resource "instaclustr_kafka_connect_cluster_v2" "connect" { name = "pipeline-connect" kafka_connect_version = "4.1.1" ... target_cluster { managed_cluster { kafka_connect_vpc_type = "KAFKA_VPC" target_kafka_cluster_id = instaclustr_kafka_cluster_v3.kafka.id } } } |
The critical piece here is the target_cluster block. This tells Kafka Connect which Kafka cluster to connect to. Notice the Terraform reference:
|
1 2 3 4 5 6 7 8 9 10 11 12 13 |
target_kafka_cluster_id = instaclustr_kafka_cluster_v3.kafka.id resource "instaclustr_kafka_connect_cluster_v2" "connect" { name = "pipeline-connect" kafka_connect_version = "4.1.1" ... target_cluster { managed_cluster { kafka_connect_vpc_type = "KAFKA_VPC" target_kafka_cluster_id = instaclustr_kafka_cluster_v3.kafka.id } } } |
This creates an implicit dependency: Terraform won’t create the Connect cluster until Kafka exists. You don’t need to manage ordering manually—Terraform figures it out from the references.
The kafka_connect_vpc_type = "KAFKA_VPC" setting places Kafka Connect in the same VPC as Kafka, enabling private communication without traversing the public internet.
Firewall rules: Security by design
Look at how the firewall rules create a directed data flow:
|
1 2 3 4 5 6 7 8 9 10 11 |
# Kafka allows traffic from Kafka Connect's network firewall_rule { network = "10.2.0.0/16" # Kafka Connect type = "KAFKA" } # ClickHouse allows traffic from Kafka Connect's network firewall_rule { network = "10.2.0.0/16" # Kafka Connect type = "CLICKHOUSE" } |
Kafka Connect is the only thing that needs to talk to both systems.
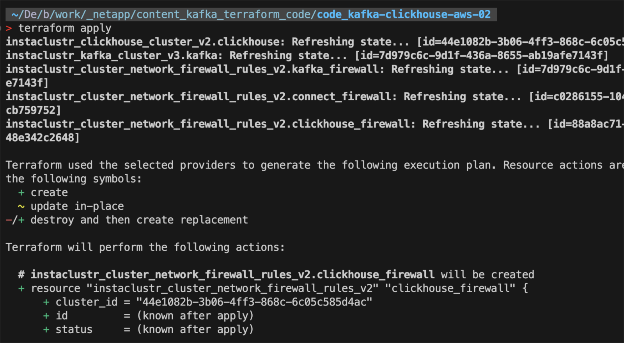
Deploy the pipeline
Running these commands will provision all 3 clusters, your pipeline VPC, subnets, route tables, and an EC2 test instance pre-loaded with the Kafka CLI. Think of the Terraform configuration as a recipe—it describes exactly what you want built, and these commands hand that recipe to AWS and Instaclustr to provision everything.
|
1 2 3 |
terraform init terraform plan terraform apply |
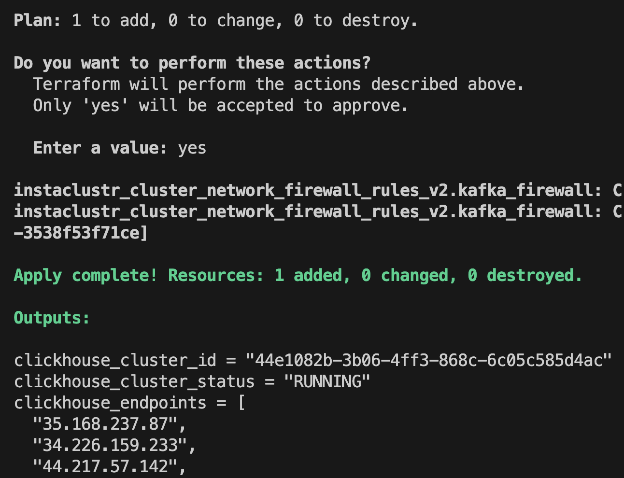
This deployment takes 20-30 minutes. Terraform creates the resources in dependency order: Kafka first, then ClickHouse and Kafka Connect in parallel, then all the firewall rules.
When complete, you’ll see outputs for all three clusters:
|
1 2 3 |
kafka_bootstrap_servers = "100.29.129.26:9092,98.95.193.141:9092,100.51.10.12:9092" clickhouse_endpoints = ["35.168.237.87", "34.226.159.233", "44.217.57.142"] kafka_connect_endpoints = ["34.237.72.188:8083", "44.205.132.50:8083", "3.225.226.67:8083"] |
Verify the deployment
Check Kafka Connect
Kafka Connect exposes a REST API. Verify it’s running:
|
1 |
curl http://<CONNECT_ENDPOINT>/connectors |
You should see an empty array [] — no connectors deployed yet, but the cluster is healthy.
Check ClickHouse
Connect using the ClickHouse client:
|
1 2 3 4 |
clickhouse-client --host <CLICKHOUSE_ENDPOINT> \ --user icclickhouse \ --password <PASSWORD_FROM_CONSOLE> \ --secure |
Run a test query:
|
1 |
SELECT version(); |
You should see the ClickHouse version confirming the connection works.
Handling Terraform state issues
During deployment, you might encounter a 404 error if a cluster is recreated:

This happens when Terraform’s state file references a resource that no longer exists in Instaclustr. The fix is to remove the orphaned reference from state:
|
1 |
terraform state rm instaclustr_cluster_network_firewall_rules_v2.kafka_firewall |
Then run terraform apply again. Terraform will recreate the firewall rules for the current cluster.
This is a normal part of working with Terraform and external providers. The state file is Terraform’s view of reality—sometimes it needs correction.
What we’ve built
At this point, you have:
- A 3-broker Kafka cluster for event ingestion
- A 3-replica ClickHouse cluster for analytics
- A 3-worker Kafka Connect cluster ready for connectors
- Firewall rules securing communication between them
All from ~150 lines of Terraform.
The infrastructure is ready. In part 3, we’ll add AWS VPC integration and switch Kafka Connect to VPC_PEERED mode – giving each cluster its own network so that we can connect your own AWS resources to all 3 over private networking.
Clean up
If you’re done for now, run:
|
1 |
terraform destroy |
This removes all three clusters and their firewall rules. When you’re ready to continue with part 3, run terraform apply again with the new settings we’ll discuss in part 3.
Key takeaways
- Kafka Connect eliminates custom consumer code—use connectors instead of writing data movement logic
- Each cluster gets its own network—isolation by design, with firewall rules controlling communication
- Terraform references create implicit dependencies—the
target_kafka_cluster_idreference ensures correct ordering - ClickHouse is purpose-built for analytics—columnar storage makes it orders of magnitude faster for aggregation queries than row-based databases
Why managed infrastructure? Building a streaming pipeline is one challenge. Keeping it running in production is another. Running Kafka, ClickHouse, and Kafka Connect yourself means your team owns the operations too—version upgrades, security patches, and on-call rotations. Instaclustr handles that so your team can stay focused on what the pipeline does, not on keeping it alive. The Terraform configuration in this series is a good example of that division: you simply describe what you want, and Instaclustr provisions and operates it from there.
See you in part 3, where we connect all of this to your AWS infrastructure, move the entire pipeline into your own AWS account, and connect everything over private networking.