How Is OpenSearch used with Kubernetes?
OpenSearch is a search and analytics suite that emerged as a community-driven effort to provide open-source tools. It is known for its scalability and diverse feature set, including analytics and visualization capabilities. When combined with Kubernetes, OpenSearch offers a platform that can automate deployment, scaling, and operation of containerized applications while managing containerized workloads efficiently.
Kubernetes orchestrates the provisioning of nodes and balancing loads, which is especially useful for OpenSearch clusters that demand dynamic scaling. Deploying OpenSearch on Kubernetes leverages the container orchestration capabilities of Kubernetes, providing reliability and scalability.
Kubernetes manages the lifecycle of OpenSearch containers, monitors their health, and enables rapid scaling to accommodate increased workloads. This relationship allows for environment consistency through containerization, aligning with DevOps practices.
Pros of running OpenSearch on Kubernetes
Running OpenSearch on Kubernetes provides several advantages, improving the deployment and management of OpenSearch clusters. Key benefits include:
- Automated scaling: Kubernetes enables dynamic scaling of OpenSearch clusters to handle fluctuating workloads. This ensures optimal resource utilization and consistent performance during traffic spikes.
- Resilience and high availability: Kubernetes automates failover and recovery processes, maintaining high availability for OpenSearch. It detects failures and replaces unhealthy pods, ensuring continuity of operations.
- Simplified management: Kubernetes simplifies the orchestration of OpenSearch containers through automated deployment, monitoring, and updates. This reduces manual effort and operational overhead.
- Infrastructure agnosticism: OpenSearch on Kubernetes can run across diverse environments, including on-premises, cloud, or hybrid setups. This flexibility makes it easier to align deployments with business needs.
- Resource optimization: Kubernetes allows efficient allocation of resources such as CPU and memory to OpenSearch nodes. This leads to cost-effective use of infrastructure without compromising performance.
- Integration: OpenSearch benefits from Kubernetes’ ecosystem, integrating easily with monitoring and logging tools, like Prometheus and Fluentd, for end-to-end observability.
Cons of deploying OpenSearch on Kubernetes
Deploying OpenSearch on Kubernetes also comes with its own set of challenges. These include:
- Complex configuration: Setting up OpenSearch on Kubernetes requires expertise in both systems. Configuring stateful workloads and persistent storage for OpenSearch can be intricate.
- Resource management: Balancing resource allocation across OpenSearch nodes in Kubernetes is critical. Mismanagement can lead to bottlenecks or underutilized resources.
- Storage considerations: OpenSearch demands reliable and high-performance storage, but configuring persistent volumes (PVs) in Kubernetes to meet these requirements can be challenging.
- Networking issues: Ensuring network connectivity for cluster nodes in Kubernetes is vital. Misconfigured networking can lead to communication issues between OpenSearch nodes.
- Scaling limitations: Although Kubernetes provides scaling features, scaling OpenSearch clusters effectively requires a deep understanding of both OpenSearch and Kubernetes’ limitations.
- Monitoring and troubleshooting: Debugging issues in a distributed setup like Kubernetes can be complex, especially when OpenSearch spans multiple nodes and regions.
Related content: Read our blog Why pay for a managed services when I could just use a Kubernetes operator
Tips from the expert

Kassian Wren
Open Source Tech Evangelist
Kassian Wren is an Open Source Technology Evangelist specializing in OpenSearch. They are known for their expertise in developing and promoting open-source technologies, and have contributed significantly to the OpenSearch community through talks, events, and educational content
In my experience, here are tips that can help you better deploy and manage OpenSearch on Kubernetes:
- Optimize StatefulSets for resilience: Use Kubernetes StatefulSets to manage OpenSearch nodes for better handling of persistent storage and predictable pod naming, ensuring smooth recovery during failures. Always configure proper pod affinity/anti-affinity rules to distribute nodes across different physical or virtual machines.
- Use appropriate storage backends: Choose high-performance storage solutions like SSD-backed Persistent Volumes (PVs) for data nodes to ensure low-latency operations. For critical workloads, consider usingKubernetes CSI plugins for reliable cloud-native storage integration.
- Segment workloads with node pools: Divide OpenSearch roles (e.g., master, data, ingest) into separate node pools. This improves scalability, performance, and fault isolation. Dedicate nodes with higher CPU/memory for data pools and optimize disk size for ingest-heavy workloads.
Quick start: Running OpenSearch on Kubernetes with the OpenSearch operator
The OpenSearch operator simplifies deploying and managing OpenSearch clusters on Kubernetes. Here’s a step-by-step guide to setting up a basic OpenSearch cluster using the operator. The instructions below are adapted from the OpenSearch documentation.
Prerequisites
On your local machine, add an OpenSearch Operator repo and install the operator using Helm. For example, on an ARM64 system, execute these commands:
|
1 2 3 4 5 |
helm repo add opensearch-operator https://opster.github.io/opensearch-k8s-operator-chart/ helm install opensearch-operator opensearch-operator/opensearch-operator |
Step 1: Create a Custom Resource Definition (CRD) for OpenSearch
The OpenSearch cluster is configured via a CRD that defines its specifications. Start by creating a file, cluster.yaml, with the following content:
|
1 2 3 4 5 6 7 8 9 10 11 12 13 14 15 16 17 18 19 20 21 22 23 24 25 26 27 28 29 30 31 32 33 34 35 |
apiVersion: opensearch.opster.io/v1 kind: OpenSearchCluster metadata: name: my-first-cluster namespace: default spec: general: serviceName: my-first-cluster version: 2.3.0 dashboards: enable: true version: 2.3.0 replicas: 1 resources: requests: memory: "1Gi" cpu: "400m" limits: memory: "1Gi" cpu: "400m" nodePools: - component: nodes replicas: 3 diskSize: "5Gi" nodeSelector: resources: requests: memory: "2Gi" cpu: "700m" limits: memory: "2Gi" cpu: "700m" roles: - "cluster_manager" - "data" |
This file defines a simple OpenSearch cluster with three master nodes, one dashboard instance, and minimal resource requests.
Step 2: Deploy the cluster
Apply the configuration using kubectl:
|
1 |
kubectl apply -f cluster.yaml |

Monitor the progress of the deployment with:
|
1 |
watch -n 2 kubectl get pods |
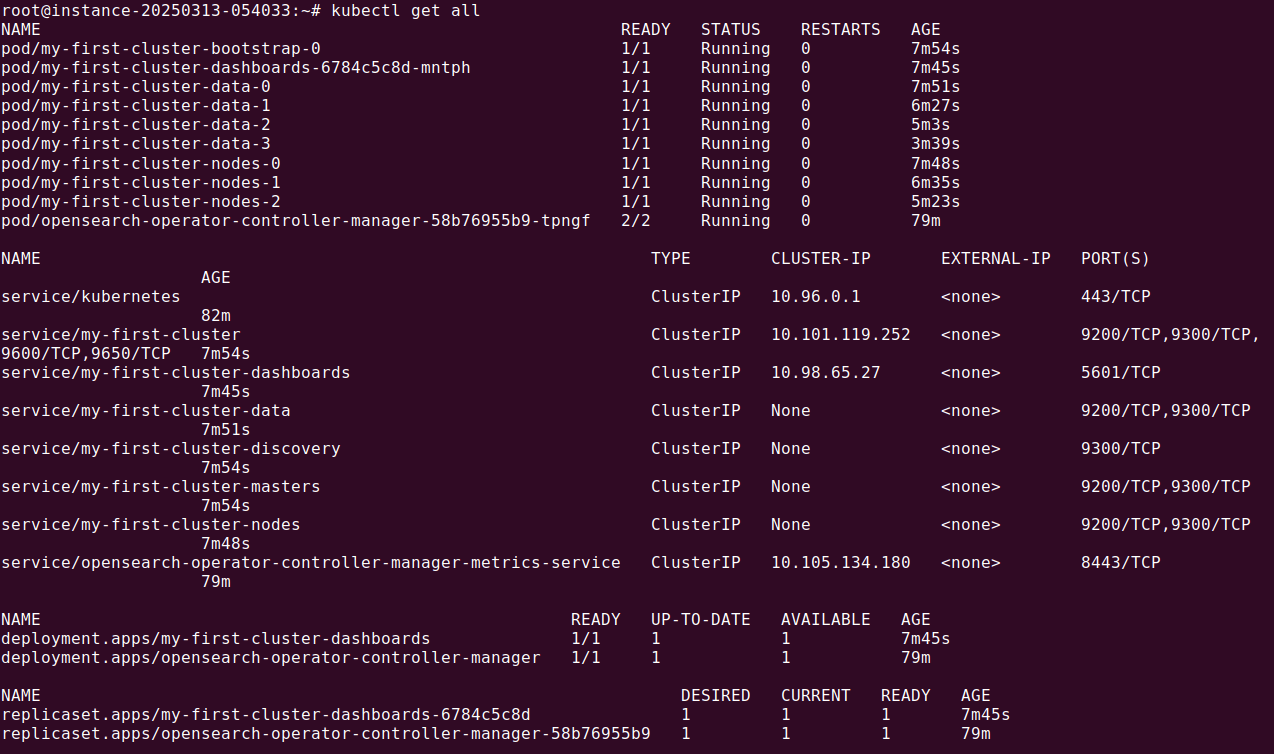
Initially, a bootstrap pod (e.g., my-example-cluster-bootstrap-0) will start for master discovery. Then, three master node pods and one dashboard pod will be created. After all pods are ready (this may take 1-2 minutes), the cluster is operational.
Step 3: Access OpenSearch
To connect to the dashboard:
- Forward the dashboard service port:
1kubectl port-forward svc/my-example-cluster-dashboards 5601
- Open
http://localhost:5601in the browser and log in using the default credentials (admin/admin).
To access the REST API:
- Forward the OpenSearch service port:
1kubectl port-forward svc/my-example-cluster 9200
![tutorial terminal screenshot]()
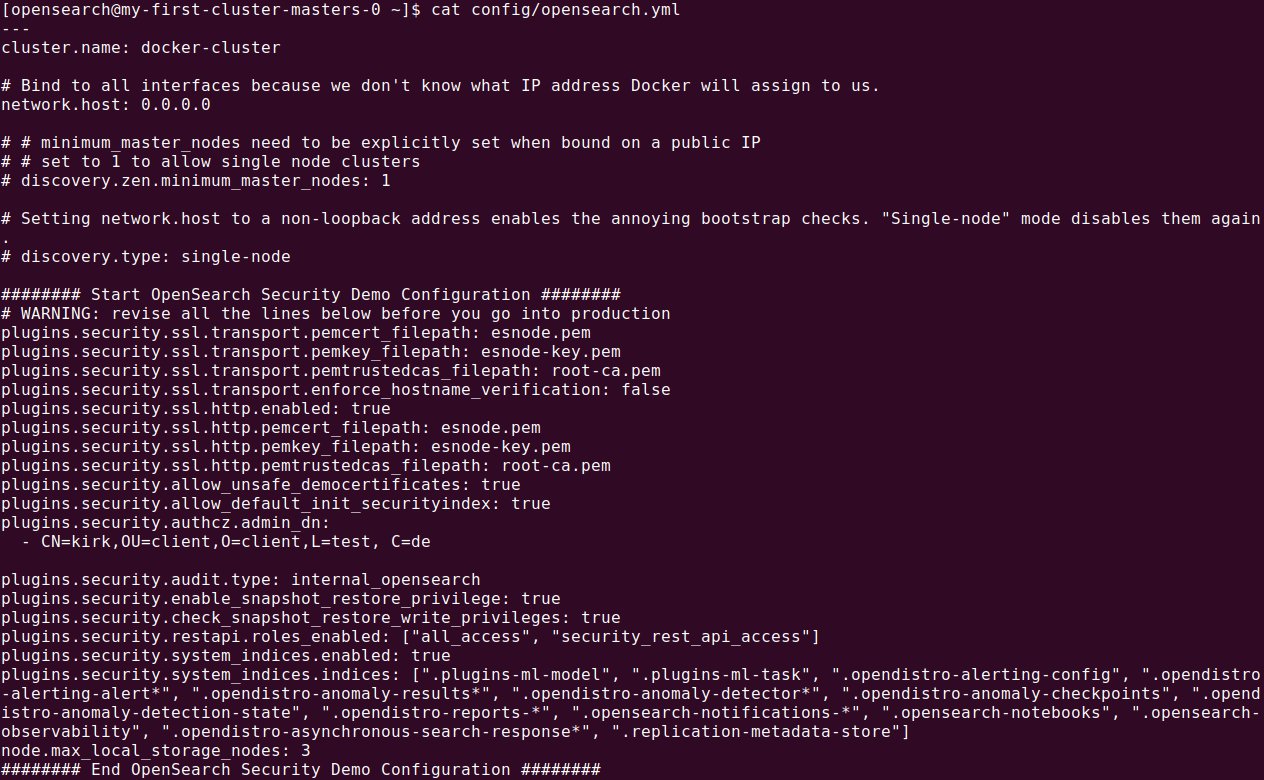
- Run the following command to verify the cluster:
1curl -k -u admin:admin https://localhost:9200/_cat/nodes?v
![tutorial terminal screenshot]()


Step 4: Cleanup
To delete the cluster:
|
1 |
kubectl delete -f cluster.yaml |

For a full cleanup, remove persistent volumes created for the cluster:
|
1 2 |
kubectl delete pvc -l opster.io/opensearch-cluster=my-example-cluster |

Tutorial: OpenSearch on Kubernetes configurations
Here is an overview of some additional configurations.
Data persistence
By default, the OpenSearch operator provisions persistent storage for node pools using the default StorageClass. Developers can override this behavior by specifying an alternative storage class, access modes, or by using other storage types like emptyDir or hostPath. However, hostPath is not recommended due to potential scheduling conflicts. If using hostPath, configure affinity rules to prevent multiple pods from scheduling on the same Kubernetes node.
For example, to specify a custom storage class and access mode:
|
1 2 3 4 5 6 7 8 9 10 11 12 |
nodePools: - component: masters replicas: 3 diskSize: "5Gi" roles: - "cluster_manager" - "data" persistence: pvc: storageClass: exampleclass accessModes: - ReadWriteOnce |
Alternatively, developers can use ephemeral storage with emptyDir:
|
1 2 3 4 5 6 7 8 9 10 |
nodePools: - component: masters replicas: 4 diskSize: "40Gi" persistence: emptyDir: {} spec: general: drainDataNodes: true |
If using emptyDir, set spec.general.drainDataNodes to true. This ensures that shards are drained before operations like rolling upgrades or restarts.
Configuring the OpenSearch YAML
The operator generates the opensearch.yml configuration file automatically based on the custom resource definition (CRD). To include custom settings, use the additionalConfig field.
Note: opensearch.yml is located inside the OpenSearch container’s config folder.
For example, to add general or node pool-specific configurations:
|
1 2 3 4 5 6 7 8 9 |
spec: general: additionalConfig: custom.config.option: customvalue nodePools: - component: masters additionalConfig: custom.node.pool.option: customvalue |
Note: opensearch.yml is located inside the OpenSearch container’s config folder.
The operator merges these settings with its own generated configuration. However, core settings like node.name, cluster.name, and network parameters cannot be overridden. Modifications to additionalConfig require reinstallation or the use of the cluster settings API for runtime changes.
Configuring the Dashboards YAML
The opensearch_dashboards.yml or (you can add it to your cluster file’s dashboard section) file can also be customized using the additionalConfig field under the dashboards section:
|
1 2 3 4 5 6 |
spec: dashboards: additionalConfig: opensearch_security.auth.type: "proxy" opensearch.requestHeadersWhitelist: | ["securitytenant", "Authorization", "x-forwarded-for"] |
Ensure the configuration is valid to avoid deployment failures.
Configuring TLS
OpenSearch communication is encrypted by default using demo TLS certificates. For production environments, developers can either let the operator generate certificates or provide their own.
Node Transport Security:
Configure TLS for communication between nodes via spec.security.tls.transport.
|
1 2 3 4 5 6 |
spec: security: tls: transport: generate: true perNode: true |
Node HTTP/REST API Security:
Enable HTTPS for the REST API via spec.security.tls.http.
|
1 2 3 4 5 |
spec: security: tls: http: generate: true |
Dashboards HTTP:
Secure OpenSearch Dashboards with TLS:
|
1 2 3 4 5 |
spec: dashboards: tls: enable: true generate: true |

Providing custom certificates requires creating Kubernetes secrets with the necessary files and setting the secret names in the CRD.
Securityconfig
The OpenSearch operator uses the opensearch-security plugin for authentication and authorization. By default, it uses a demo security configuration. To replace this, provide a Kubernetes secret containing all the required configuration files:
|
1 2 3 4 5 6 7 |
spec: security: config: securityConfigSecret: name: my-security-config adminCredentialsSecret: name: admin-credentials |
It’s essential to include all security files (e.g., internal_users.yml) in the secret and ensure the credentials match the setup.
Nodepools and scaling
OpenSearch clusters are built with node pools, each representing a group of nodes with roles and resources. For example:
|
1 2 3 4 5 6 7 8 9 10 11 12 13 |
spec: nodePools: - component: masters replicas: 4 diskSize: "40Gi" roles: - "master" - "data" - component: data replicas: 4 diskSize: "20Gi" roles: - "data" |
Scaling is straightforward: adjust the replicas field to add or remove nodes in a pool. StatefulSets manage each node pool, ensuring persistent storage and unique identities.
Related content: Read our guide to OpenSearch security
Instaclustr’s OpenSearch integration with Kubernetes
The choice between a self managed Kubernetes operator and a managed service like NetApp Instaclustr for OpenSearch Kubernetes boils down to balancing complexity, expertise, and operational efficiency. While Kubernetes operators offer automation for day-to-day tasks, they often introduce hidden costs, such as the need for deep technical expertise, edge case management, and handling the complexities of both the operator and the core technology.
On the other hand, a managed service like NetApp Instaclustr provides a proven operational environment, 24/7 expert support, and built-in security and compliance measures. It eliminates the steep learning curve and operational overhead, allowing businesses to focus on innovation rather than infrastructure. With a managed service, you gain access to a team that has already navigated the challenges and edge cases, ensuring reliable and efficient operations.
Ultimately, for organizations seeking to maximize uptime, reduce risk, and streamline their OpenSearch Kubernetes deployments, a managed service offers unparalleled value and peace of mind.
What makes Instaclustr’s integration stand out?
- Expert management: The Instaclustr team handles the complexity providing a fully managed service, ensuring OpenSearch deployment on Kubernetes remains optimal and secure at all times.
- Full open source commitment: The Instaclustr integration is built on Open Source principles, keeping users free from licensing fees and vendor lock-in.
- End-to-end monitoring: Instaclustr provides full visibility into clusters with integrated monitoring tools. From performance metrics to anomaly detection, Instaclustr ensures OpenSearch on Kubernetes runs like clockwork.
- Dedicated support: Instaclustr includes a highly skilled support team available 24/7 to guide users every step.
For more information: