The missing piece
In parts 1 and 2, we built a complete streaming pipeline: Kafka for ingestion, Kafka Connect for data movement, and ClickHouse for analytics. Everything worked, but it ran over the public internet. That is fine for a proof of concept, but it’s not how you want production traffic to behave. You want applications talking to brokers and analytics over private addresses and routes that you control.
Why Bring Your Own Cloud (BYOC) changes the network story
This article adds AWS VPC integration using Instaclustr’s Bring Your Own Cloud (BYOC) model. The clusters run in your AWS account. This gives you not just better security posture, but something more useful for learning: you can see the VPCs, subnets, and peering connections in your own AWS console and reason about exactly where packets go.
Here is how we’ll prove it—one JSON message into Kafka, one row out of ClickHouse—entirely over private networking. So, Terraform will handle the infrastructure and you’ll handle the commands.
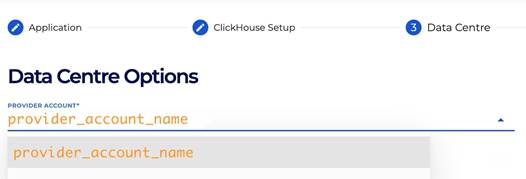
To opt in, set the provider_account_name property in each cluster’s data_centre block so the Instaclustr API knows which linked account to use.
What we’re building
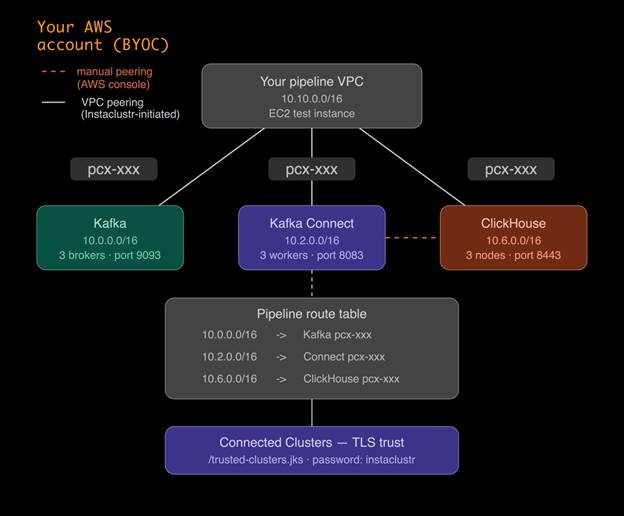
This deployment creates four non-overlapping VPCs: your pipeline VPC, plus one each for Kafka, Kafka Connect, and ClickHouse. They need to be non-overlapping because VPC peering and route tables require unambiguous destinations—overlapping CIDRs break routing.
| Resource | CIDR | Role |
| Your VPC | 10.10.0.0/16 | App + EC2 test host |
| Kafka | 10.0.0.0/16 | Brokers |
| Kafka Connect | 10.2.0.0/16 | Connect workers |
| ClickHouse | 10.6.0.0/16 | Analytics |
Kafka Connect VPC mode
Kafka Connect can run in two VPC modes, and the choice matters for this architecture.
In KAFKA_VPC mode, Connect lives inside Kafka’s VPC. That is simpler operationally but Connect does not get its own network that you can independently peer to ClickHouse’s VPC.
In VPC_PEERED mode, Connect gets its own VPC. That is what we use here, because it lets you peer the Connect VPC to both Kafka and ClickHouse independently so data can move privately across all three components. AWS VPC peering is not transitive—there is no automatic “hop through Kafka”—so Connect needs its own direct peering to ClickHouse.
Note that kafka_connect_vpc_type is immutable. If you pick the wrong mode, you have to replace the Connect cluster, not update it in place.
AWS SSO before Terraform
If your organization uses AWS SSO, run aws sso login --profile before every Terraform session. Expired SSO credentials surface as a generic “no valid credential sources” error, not a login prompt.
If Terraform still cannot find credentials after logging in, export them directly:
|
1 |
export $(aws configure export-credentials --profile --format env) |
This puts the credentials into environment variables that Terraform picks up automatically. You will need to re-run this export whenever your session expires.
Before you deploy: Check your AWS VPC quota
This deployment creates four VPCs in your AWS region. The default AWS limit is five VPCs per region. If you have other VPCs in the account—including any leftovers from previous deployments—you may hit that ceiling, and Kafka Connect provisioning will fail with a capacity error.
Before running terraform apply, check your current VPC count in the AWS Console under VPC -> Your VPCs. If you are close to the limit, either delete unused VPCs or request a quota increase via AWS Service Quotas -> Amazon Virtual Private Cloud -> VPCs per Region. Quota increases to 10 or 20 are typically approved in minutes.
Terraform configuration
The full Terraform configuration for this article is available as a GitHub Gist linked below. Download it, save it as main.tf in a new working directory, and fill in the following values before running anything:
provider_account_name– The name of your linked AWS account in Instaclustr. You can find it in the Data Center dropdown.
![How to build a streaming analytics pipeline with Terraform and Instaclustr—Part 3: Integrating with AWS VPC screenshot]()
my_ip_address– your public IP in CIDR form (e.g.203.0.113.10/32) for firewall rules and SSH access.instaclustr_terraform_key– pass this viaterraform.tfvarsor theTF_VAR_instaclustr_terraform_keyenvironment variable. Do not commit it.aws_profile– your SSO profile name if you are not using exported credentials.
The configuration declares the three Instaclustr clusters with BYOC settings, sets Kafka Connect to VPC_PEERED mode, opens the necessary firewall rules between VPCs, and creates your pipeline VPC, subnets, route tables, and an EC2 test instance with the Kafka CLI pre-installed.
Terraform does not create the Kafka Connect -> ClickHouse peering—that is a manual step covered in the checklist below.
Deploy
From the directory containing main.tf, authenticate and run:
|
1 2 3 4 5 |
aws sso login --profile <profile> export $(aws configure export-credentials --profile <profile> --format env) terraform init terraform plan terraform apply |
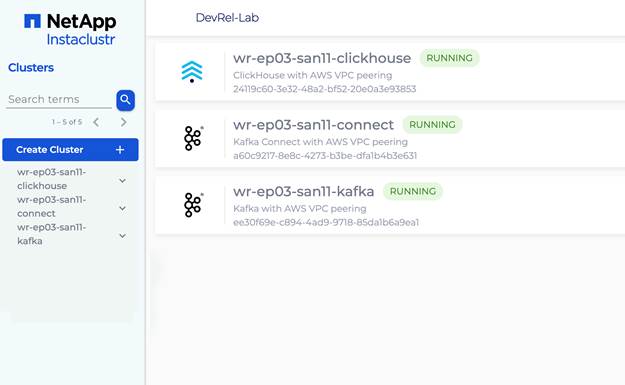
Cluster provisioning takes 15-20 minutes. When apply finishes, run terraform output to get all the values you need for the next steps, including a pre-filled VPC peering instructions block with your account ID, VPC ID, and route table ID.
Peering, trust, and proof
At this point, your clusters are running and your AWS infrastructure is in place. The next phase connects everything together: pairing the VPCS so that traffic stays private, installing TLS trust material so that Kafka Connect can verify ClickHouse’s certificate, and verifying the full path before sending any data through it. Follow these steps in order—each one depends on their previous one.
A. Pipeline VPC -> each cluster (three peerings)
In the Instaclustr console, do the following for each of the three clusters—Kafka, Kafka Connect, and ClickHouse:
- Open the cluster -> Settings -> VPC Peering -> Add VPC Peering.
- Enter your AWS account ID, pipeline VPC ID, VPC CIDR (10.10.0.0/16), and region from the Terraform output.
Then in the AWS console, go to VPC -> Peering Connections and accept all three pending requests.

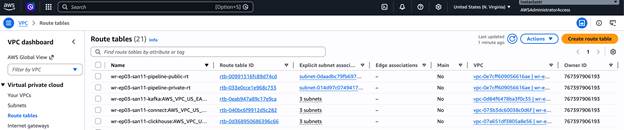
After accepting, go to VPC -> Route Tables, select the public route table whose ID matches aws_route_table_id from the Terraform output, and add three routes:
| Destination | Target |
| 10.0.0.0/16 | Kafka peering connection |
| 10.2.0.0/16 | Kafka Connect peering connection |
| 10.6.0.0/16 | ClickHouse peering connection |
This gives your pipeline VPC a route to each cluster. It does not give Connect a route to ClickHouse—that requires the next step.
B. Kafka Connect VPC -> ClickHouse VPC (one extra peering)
AWS VPC peering is not transitive. Even though Connect and ClickHouse are both peered to your pipeline VPC, they cannot reach each other through it. They need their own direct peering.
In the AWS console, go to VPC -> Peering Connections -> Create peering connection. Set the requester to the Kafka Connect VPC (10.2.0.0/16) and the accepter to the ClickHouse VPC (10.6.0.0/16). Both are in your account, so you can accept the request immediately.
Then add routes in both cluster route tables. Use the non-main route table in each VPC—the one with actual subnet associations, not the main table with only a local route.
Kafka Connect VPC route table—add:
| Destination | Target |
| 10.6.0.0/16 | The new peering connection |
ClickHouse VPC route table – add:
| Destination | Target |
| 10.2.0.0/16 | The same peering connection |
Do not add 10.2.0.0/16 to the Connect route table as a remote destination—that CIDR is local to the Kafka Connect VPC and cannot be routed externally.
C. Connected clusters
In the Instaclustr console, open the Kafka Connect cluster -> Connected Clusters. Select your ClickHouse cluster from the dropdown, leave Use Private IPs unchecked, and click Add. Wait until the status shows RUNNING.
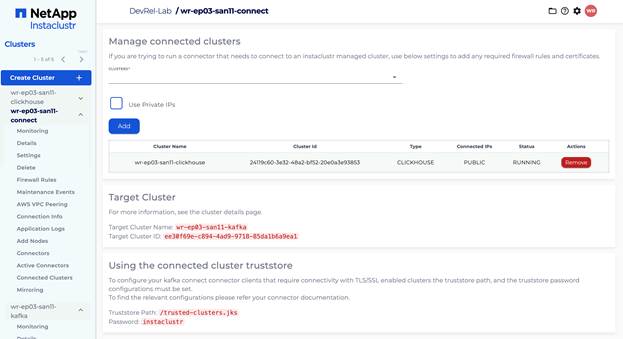
This step installs TLS trust material on the Connect nodes so they can verify ClickHouse’s certificate. The connector configuration uses the truststore at /trusted-clusters.jks with password instaclustr.
D. Verify connectivity from EC2
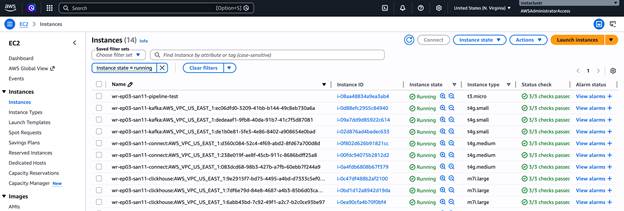
In the AWS console, go to EC2 -> Instances -> select the pipeline-test instance -> Connect -> EC2 Instance Connect -> Connect.
From the terminal, run:
|
1 2 |
nc -zv <KAFKA_PRIVATE_IP> 9093 nc -zv <CLICKHOUSE_PRIVATE_IP> 8443 |
Both should connect immediately. Use private IPs from the Terraform output.
End-to-end proof
Replace all placeholders with your actual values from the Instaclustr console and Terraform output.
1. Create the ClickHouse table:
|
1 2 3 |
curl -k "https://<CLICKHOUSE_PRIVATE_IP>:8443/" \ --user "icclickhouse:<CLICKHOUSE_PASSWORD>" \ --data "CREATE TABLE IF NOT EXISTS kafka_test (id UInt64, message String, timestamp DateTime) ENGINE = MergeTree() ORDER BY id" |
An empty response means success.
2. Create the Kafka topic:
|
1 2 3 4 5 6 7 |
/opt/kafka/bin/kafka-topics.sh \ --bootstrap-server <KAFKA_PRIVATE_IP>:9093 \ --create \ --topic clickhouse-test \ --partitions 3 \ --replication-factor 3 \ --command-config <(echo -e "security.protocol=SASL_PLAINTEXT\nsasl.mechanism=SCRAM-SHA-256\nsasl.jaas.config=org.apache.kafka.common.security.scram.ScramLoginModule required username=\"ickafka\" password=\"<KAFKA_PASSWORD>\";") |
3. Register the ClickHouse sink connector:
For the hostname field, use the public domain name from the ClickHouse Connection Info page – listed under “Domain Names” and formatted like ip-x-x-x-x..cnodes.io. Do not use the private IP or the raw public IP. The connector uses this value for TLS certificate verification, and it must match exactly.
|
1 2 3 4 5 |
curl -X POST https://<KAFKA_CONNECT_PRIVATE_IP>:8083/connectors \ --insecure \ -u "ic_kc_user:<KAFKA_CONNECT_PASSWORD>" \ -H "Content-Type: application/json" \ -d '{"name":"clickhouse-sink","config":{"connector.class":"com.clickhouse.kafka.connect.ClickHouseSinkConnector","tasks.max":"1","topics":"clickhouse-test","hostname":"<CLICKHOUSE_DOMAIN_NAME>","port":"8443","ssl":"true","ssl.truststore.location":"/trusted-clusters.jks","ssl.truststore.password":"instaclustr","username":"icclickhouse","password":"<CLICKHOUSE_PASSWORD>","database":"default","topic2TableMap":"clickhouse-test=kafka_test"}}' |
Check the status after about 15 seconds:
|
1 2 3 4 |
curl -s https://<KAFKA_CONNECT_PRIVATE_IP>:8083/connectors/clickhouse-sink/status \ --insecure \ -u "ic_kc_user:<KAFKA_CONNECT_PASSWORD>" \ -w "\n" 2>&1 |
You want "state": "RUNNING" on both the connector and the task.
4. Produce one row:
|
1 2 3 4 5 6 |
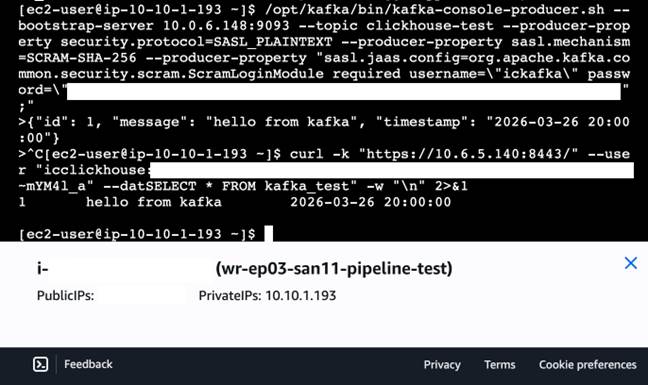
/opt/kafka/bin/kafka-console-producer.sh \ --bootstrap-server <KAFKA_PRIVATE_IP>:9093 \ --topic clickhouse-test \ --producer-property security.protocol=SASL_PLAINTEXT \ --producer-property sasl.mechanism=SCRAM-SHA-256 \ --producer-property "sasl.jaas.config=org.apache.kafka.common.security.scram.ScramLoginModule required username=\"ickafka\" password=\"<KAFKA_PASSWORD>\";" |
At the > prompt, type the following line and press Enter. Type it directly—do not paste from another source, as surrounding text may get sent to the topic along with your message:
|
1 |
{"id": 1, "message": "hello from kafka", "timestamp": "2026-03-16 20:00:00"} |
Then Ctrl+C to exit. The producer sends every line at the prompt verbatim to the topic. If any stray text gets in alongside the JSON, the connector will fail to parse the record. If that happens, delete and recreate the topic and connector, then produce a clean message.
5. Query ClickHouse:
|
1 2 3 4 |
curl -k "https://<CLICKHOUSE_PRIVATE_IP>:8443/" \ --user "icclickhouse:<CLICKHOUSE_PASSWORD>" \ --data "SELECT * FROM kafka_test" \ -w "\n" 2>&1 |
You should see one row back—proof that the full private path works end to end.
Troubleshooting
Connection to ClickHouse is not active
Check three things:
- the Kafka Connect -> ClickHouse peering exists and both route tables have the correct routes;
- the connector hostname is the domain name, not an IP address;
- Connected Clusters status is RUNNING.
ProviderOverCapacityException: maximum number of VPCs has been reached
You have hit the AWS VPC limit for the region. Check your VPC count in the AWS console, delete any unused VPCs, and request a quota increase via AWS Service Quotas before redeploying.
Connector task FAILED with Cannot parse input: expected '{'
Stray non-JSON text was sent to the Kafka topic alongside your message. Delete the topic, recreate it, delete and recreate the connector, then produce a clean JSON message.
No valid credential sources
Your SSO session expired. Re-run aws sso login and re-export credentials.
ec2:CreateVpc not authorized
Terraform is using the wrong account or role. Confirm with aws sts get-caller-identity --profile.
Version X is invalid
The ClickHouse or Kafka version string in main.tf does not match what Instaclustr currently supports. Check the console for valid version strings, update main.tf, and re-apply.
DependencyViolation on destroy
Delete the manual Connect -> ClickHouse peering connection in the AWS console before running terraform destroy. Terraform does not know about it and cannot delete it.
Tearing down the infrastructure
When you are done experimenting, clean up all resources to avoid ongoing charges. Because the Kafka Connect -> ClickHouse peering was created manually outside of Terraform, it needs to be deleted first before Terraform can cleanly remove the rest.
- AWS Console -> VPC -> Peering Connections -> delete the Kafka Connect -> ClickHouse peering you created manually.
- Run
terraform destroy.
What we built
Across the three parts of this series: Kafka for ingestion, Kafka Connect as the bridge, ClickHouse for analytics. This part added the private networking layer. BYOC puts cluster VPCs in your account so peering is something you can inspect and reason about. VPC_PEERED mode gives Connect its own address space so it can attach independently to both Kafka and ClickHouse. The manual Connect -> ClickHouse peering is not a workaround—it is AWS non-transitive peering showing up exactly as designed.
The result is a terraform apply for everything Terraform can own, a small set of console steps for the edges it cannot model, and a single-row query as proof that the data plane, control plane, and trust layer all line up.
Key takeaways
- BYOC puts cluster VPCs in your account, making peering a first-class part of the deployment you can inspect and debug.
- VPC_PEERED is the Connect mode required for separate Kafka, Connect, and ClickHouse VPCs. It cannot be changed in place.
- Peering is pairwise – plan the full graph, including the direct Connect -> ClickHouse link.
- The connector hostname must be the ClickHouse domain name, not an IP address, for TLS to work correctly.
- SSO credentials need to be explicitly refreshed before every Terraform session.
- Check your AWS VPC quota before deploying—this setup requires four VPCs and the default limit is five.
That wraps up the series. If you want to take this further, Instaclustr supports the full range of managed open source infrastructure—Kafka, ClickHouse, PostgreSQL, OpenSearch, Cassandra, and more. Start your free trial or request a demo at www.instaclustr.com.