If you’re interested in viewing the metrics from your Instaclustr clusters along with the applications that use those clusters in one place, there are a number of ways you can do so. I touched on one option of using Instaclustr’s Prometheus endpoint, Prometheus, and Grafana in a previous blog post. However, you might be interested in using a Managed Service to store and aggregate the metrics to improve the observability of your platform. There are multiple options in this space, and one of them is New Relic. New Relic stores metrics and allows for querying and the creation of dashboards.
Our support documentation, Send Metrics to New Relic via Instaclustr’s Prometheus Endpoint, explains how to configure a Prometheus server to send metrics to New Relic’s observation platform using the Remote Write functionality of Prometheus. However, another lesser-known method when using only Remote Write is the ability to use the Grafana Agent, a pared-down version of Prometheus. Grafana Agent is designed to collect and forward metrics only—saving the overhead of administering a full Prometheus instance. This blog will explain the process of setting up and configuring the Grafana Agent on Amazon’s Elastic Container Service (ECS) as an alternate way to pass your metrics from Instaclustr to New Relic.
Grafana Agent
New Relic supports receiving Prometheus logs using a method called Remote Write. Remote Write is a configuration whereby Prometheus scrapes your metrics and then sends them to a remote server (as well as storing them locally). The remote server could be another Prometheus server in a Federated Prometheus setup configured for redundancy and scaling, or it could be a managed service such as New Relic or Amazon Managed Service for Prometheus
This method is a fine setup and will achieve our goal, however it requires you to manage your Prometheus server at a more detailed level, perhaps tuning it to store less data locally as you are only sending remotely. To send our metrics to New Relic, Prometheus is being used as a transient server only. We never directly query the metrics on the Prometheus server as they are sent straight to New Relic for storage and analysis, so it would be nice if we didn’t have to manage the Prometheus server’s storage or metric retention. This is where the Grafana Agent can come into play.
The Grafana agent is a stripped-down version of Prometheus designed for this very task. The Grafana Agent will scrape the Prometheus endpoints specified in the configuration file, and then Remote Write the collected metrics to another location, without needing to manage storage for the metrics alongside the server. You can probably tell from the name that Grafana Agent has been designed to send to Grafana’s managed cloud offering. The Grafana agent is released under an Apache 2.0 License, meaning we are free to use it for purposes other than sending to Grafana’s cloud offering. As Prometheus is well defined, both Instaclustr and New Relic support the specification properly, and the Grafana Agent uses the Prometheus Specification, we can use it to Remote Write metrics to New Relic.
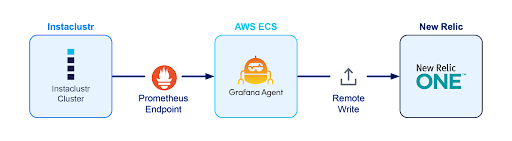
How the Grafana Agent sends metrics from Instaclustr to New Relic
In my previous blog I discussed setting up Prometheus on Amazon’s Elastic Container Service as a scalable way of running a Prometheus server. We can take a similar approach to setting up a scalable cloud-based container to Remote Write our Instaclustr Metrics to New Relic. We can build a custom Grafana Agent Docker container which includes our configuration settings. Then we can push that container to our custom container registry and deploy it on AWS ECS. The final result is a small and reasonably hands-off container solution to sending your metrics from Instaclustr to New Relic for analysis and observation.
Prerequisites
Before we begin, I suggest reading the previous blog to get a better idea of what will be accomplished during this blog, however it isn’t required as I’ll go through the steps again. You should ensure you’ve set up Docker and the AWS CLI on your local machine. You will also need to set up a new container registry to hold your image using the Amazon Elastic Container Repository (covered in the previous blog or by following the instructions on AWS).
Build and Push Docker Image
To start with, let’s build a configuration file to be used by the Grafana Agent. The Grafana Agent documentation page lays out a basic configuration, but we’ll need to modify this slightly to match our requirements. There will be 2 main components to our configuration file: the Prometheus Scrape configuration, which will scrape our Instaclustr Prometheus endpoint, and the Remote Write configuration required to send our scraped Prometheus metrics to New Relic.
First, let’s create the basic template we will require. Create a file called config.yaml and use the following template to start:
|
1 2 3 4 5 6 7 8 9 |
metrics: global: # Global Section from Instaclustr Scrape Config will go here configs: - name: agent scrape_configs: # Scrape config section from Instaclustr will go here remote_write: # Remote Write Section from New Relic will go here |
To fill out the first part of the template, let’s get our scrape config from the Instaclustr console. If you haven’t already, generate a Prometheus API key by logging into the Instaclustr Console > Selecting the Settings Cog > Account Settings > API Keys > Prometheus. Then, find a valid scrape config by going to the Connection Info tab of any running cluster > Scroll down to Prometheus > Scrape Config. Copy the Global Section and Scrape Config Section into the corresponding parts of the config file from above.
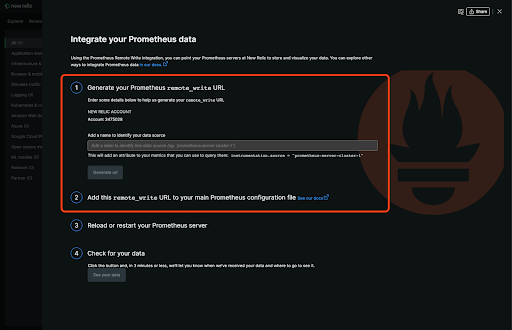
Next, we’ll get the details for New Relic to go in the template. Let’s log into our New Relic account and select the add data button. Search for Prometheus Remote Write integration. Then, follow the first two steps to create a name and generate a URL. Copy the Remote Write Configuration into your config file as well under the Remote Write section.
After putting this all together, your config.yaml file should end up looking something like this:
|
1 2 3 4 5 6 7 8 9 10 11 12 13 14 15 16 17 18 19 20 21 22 23 24 25 |
metrics: global: scrape_interval: 20s evaluation_interval: 20s configs: - name: agent scrape_configs: - job_name: instaclustr_prometheus scheme: https http_sd_configs: - url: https://<INSTACLUSTR_ACCOUNT_ID>.prometheus.monitoring.dev.instaclustr.com/discovery/v1/ basic_auth: #get from account settings page username: <API_USER_NAME> password: <PROMETHEUS_API_KEY> metrics_path: 'metrics/v2/query' basic_auth: #get from account settings page username: <API_USER_NAME> password: <PROMETHEUS_API_KEY> remote_write: - url: https://metric-api.newrelic.com/prometheus/v1/write?prometheus_server=<name> bearer_token: <GENERATED_BY_NEW_RELIC_AUTOMATICALLY> |
Build and Push Docker Image
We’ll now need to build the above configuration into a custom docker container and push it to our container repository. First, we will create a Dockerfile to tell Docker how to build our custom container. This Dockerfile will be very simple, as we’re just going to use the Grafana Agent docker image as a base and then copy in the configuration.
Create a file called Dockerfile (no extension required) in the same directory as your config.yaml file. Then add this as the contents:
|
1 2 |
FROM grafana/agent COPY './config.yaml' '/etc/agent/agent.yaml' |
This Dockerfile is super simple. All it does is set the base of our custom container as the Grafana Agent, and copies the configuration file for use inside the container.
We’re now ready to build and push to the AWS Elastic Container Repository. Log into the AWS Console and go to the repository you created in the Prerequisites Section of this blog there will be a button called View Push Commands. Select this and follow the instructions to push your container to AWS.
Set Up Elastic Container Service Cluster and Task
Now that your custom container is in the repository, we need to create a cluster on AWS Elastic Container Service (ECS) to run the container.
Creating an ECS Cluster
To create a new ECS cluster:
- Go to the ECS console and select Create Cluster.
- Select EC2 Linux + Networking
- Enter an identifiable cluster name, for example prometheus-demo-cluster
- Under instance configuration, set the Provisioning model to on demand, and the instance type to an appropriate size for your budget. I would choose a t3.small, however you may need more or less capacity depending on your Instaclustr cluster size. Take note of the Instance memory size also (find this at Amazon’s EC2 Instance Types page), as we’ll use it in a future step.
- Under networking select the default AWS VPC, rather than creating a new VPC, however as we don’t need to update the ingress rules, it shouldn’t be an issue if you do create a new one.
- Select a valid subnet, leave assign Auto IP as disabled.
- Select Create. This may take a few minutes while AWS provisions all of the required infrastructure in the background.
Creating a New Task Definition
Next, we will create a Task for the container to run. An ECS task tells ECS what containers to run and how to run them. As we’re not running multiple containers or exposing the container directly to the internet, this section isn’t too complicated. To create a task to run in our container:
- In the left-hand navigation menu on the ECS Dashboard, select Task Definitions and then Create New Task Definition.
- Select EC2, as we will be running our task on an EC2 based cluster.
- Enter a task name.
- Set the Network Mode to Bridge.
- Select Add container
- Enter a container name, keep it to something identifiable.
- Enter a limit for the memory. It needs to be less than the memory available to the EC2 instance selected for use with ECS.
- For the image, select the ECR image which you pushed in the previous section. You can get the link for this from the ECR Page in the AWS console.
- Scroll down and select create.
Starting the Container
Finally, start the container by running the task:
- Go to the ECS Dashboard and select the cluster that was just created.
- Click on Tasks, and then Run New Task.
- Select EC2 as the launch type.
- Under Task Definition > Family, select the Task Definition that was created in the previous step.
- Leave all other settings as default and select Run Task.
- Wait a few minutes and the task should begin running.
Provided everything was set up correctly, metrics will now be scraped from Instaclustr using the Prometheus protocol, and then using the Remote Write functionality of the Grafana Agent they will be written directly to New Relic.
To see the newly collected metrics, log into your New Relic account, and go to the Data Explorer tab. Scroll down the metrics in the left sidebar and you should see Instaclustr metrics appearing. They can be identified by their name, which begins with ic_ . If you see the metrics then the work is done. A good metric to test is the ic_node_osload, select this one to see the Operating System load for the cluster. If you wish to see individual nodes, select the Group By filter and select nodeId.

This is all that is required for setup. You can now use New Relic to analyze your metrics, including building dashboards and charts, or creating alarms and notifications for certain cluster conditions.
Final Words
The above method is a fairly low overhead way of collecting metrics and sending them from Instaclustr to New Relic. The ECS method allows you to take a more hands-off approach in regard to managing the transfer of Prometheus metrics to New Relic. Once set up this configuration shouldn’t need too much maintenance and should be reasonably robust. However, if required, the ECS cluster can be scaled to improve performance and throughput. This project is just one approach in which metrics can be shipped from the Instaclustr Prometheus endpoint, and other options can be considered for your specific network and security architecture.