Welcome to Part 3 in our series about user interfaces (UI) to help you visualize and monitor data within your Instaclustr for Apache Kafka® cluster!
In our previous posts, we explored akhq.io (in Part 1) and UI for Apache Kafka (in Part 2), as well as how to configure the console and connect them to an Instaclustr for Apache Kafka cluster.
Now in Part 3, we will follow a similar pattern but with an analysis on a third console we found interesting: Kafdrop.
What Is Kafdrop?
Kafdrop is a web UI for viewing Kafka topics and browsing consumer groups.
The tool displays information such as brokers, topics, partitions, consumers, and messages. Kafdrop serves as a lightweight application that runs on Spring Boot and is easy to configure, supporting SASL and TLS-secured brokers. (Source: Kafdrop documentation).
Kafdrop is an open source project offered by Obsidian Dynamics with more than 5,000 stars and 47 releases from over 60 contributors at the time of publication. The latest version is 4.0.1, released in November 2023.
What are some key aspects to Kafdrop?
Based on Kafdrop’s documentation, the console supports features such as:
- Viewing Kafka Brokers—you can view topic and partition assignments, as well as controller status.
- Viewing Topics—including partition count, replication status, and custom configuration of each topic.
- Browsing messages—that are in any of the following formats: JSON, plain text, Avro and Protobuf encoding.
- Viewing consumer groups—per-partition parked offsets, combined and per-partition lag
- Creating new topics
- Viewing ACLs
- Support for Azure Event Hubs
Are there any limitations to using Kafdrop?
While the console offers information regarding the connected Apache Kafka cluster and includes optional configurations for Schema Registry, it lacks features such as:
- Configuring multiple Apache Kafka clusters within the console: While the main dashboard presents information regarding the Apache Kafka cluster’s topics and brokers, it does not allow you to have more than one cluster within the configuration.
- If you want to configure a different cluster, you need to run the console application, from scratch, removing the old cluster’s connection information and using the new one’s instead.
- You cannot configure a new cluster within the console, which means that once you have your application up and running, all you can do is visualize the cluster information.
- Kafka® Connect is not supported: While the console offers configurations for Schema Registry, Kafka Connect is not something that can be integrated into the console.
Why should I configure an Instaclustr for Apache Kafka cluster within Kafdrop?
Because Instaclustr for Apache Kafka makes it easy for you to spin up, monitor and manage a cluster, while Kafdrop makes it easy to connect to it and visualize the information within your Instaclustr for Apache Kafka cluster.
Instaclustr console’s big advantage is the SaaS (Software as a Service) solution it offers. With just a few clicks on the Instaclustr console, our customers can provision an Instaclustr for Apache Kafka cluster in matters of minutes. They can easily monitor their Instaclustr for Apache Kafka cluster and connect to it, simply by following the page examples.
Similarly, by following the Connection Info steps within the Instaclustr console, one can connect an Instaclustr for Apache Kafka cluster to the Kafdrop console, which will display all that information.
How can I configure it?
Here’s a short list of prerequisites:
- You need a running Instaclustr for Apache Kafka cluster.
- You need to have your IP address attached to the Firewall Rules section within the Instaclustr for Apache Kafka cluster (see the snip below)—this should be accessible if your cluster is in a RUNNING state.
- You need to be able to access the Connection Info examples for your cluster via the Instaclustr console—this should be accessible if your cluster is in a RUNNING state.
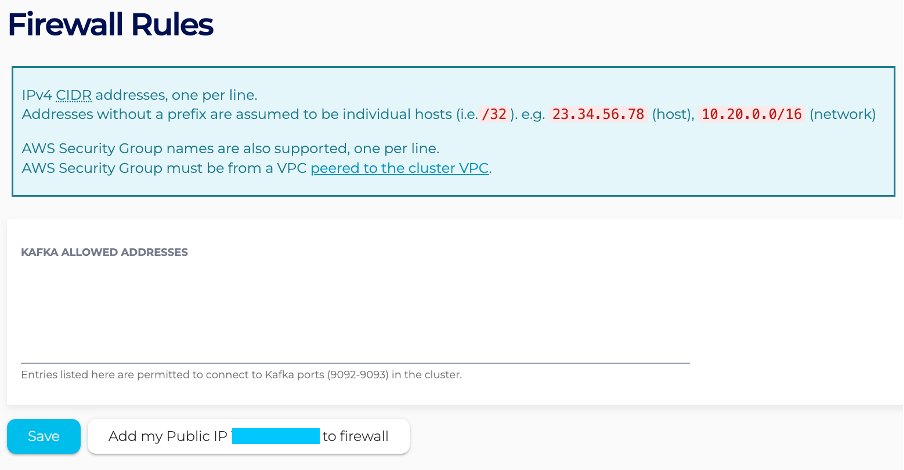
Figure 1: Adding your IP address to the Kafka Allowed Addresses field within the Firewall Rules tab of your Instaclustr for Apache Kafka cluster – Instaclustr console.
If this is your first time using the Instaclustr console, simply sign up for a free trial to easily provision your first cluster.
Configuring the Kafdrop Console
You need to first get the Docker image up and run your Kafdrop container. You can also run it in Kubernetes or directly from JAR; for the purposes of this tutorial, we chose to move forward with the Docker approach.
We start this by pulling the Docker image from DockerHub. This can be done by running the Docker pull command:
|
1 |
docker pull obsidiandynamics/kafdrop |
(source: DockerHub).
Once the image is pulled, you need to run the Docker container.
How do I run the Docker Container for Kafdrop?
This is a good question; as we mentioned earlier, Kafdrop supports one cluster per application run. The Docker container run command will include environment variables that will set the Apache Kafka’s cluster connection information.
Basically, if you want to connect to an Apache Kafka cluster via Kafdrop, your launching command should have at least these next few lines:
|
1 2 3 |
docker run -d --rm -p 9000:9000 \ -e KAFKA_BROKERCONNECT=<host:port,host:port> \ obsidiandynamics/kafdrop |
The KAFKA_BROKERCONNECT environment variable will contain the list of <host:port> for each Kafka broker we want to connect to. Once the application is launched, you can access the web UI at https://localhost:9000.
How do I configure my cluster within Kafdrop?
Launching the application should follow a pattern like the one below:
|
1 2 3 4 5 |
docker run -d --rm -p 9000:9000 \ -v $(pwd)/kafka.properties:/tmp/kafka.properties:ro \ -e KAFKA_BROKERCONNECT=<node1 public IP>:9092,<node2 public IP>,<node 3 public IP>:9092 \ -e KAFKA_PROPERTIES_FILE=/tmp/kafka.properties \ obsidiandynamics/kafdrop:latest |
The nodes’ individual public IP addresses can be retrieved from the Details page of your Instaclustr for Apache Kafka cluster via Instaclustr console, or from the Connection Info page.
NOTE: 9092 is Apache Kafka’s listening port for client connections.
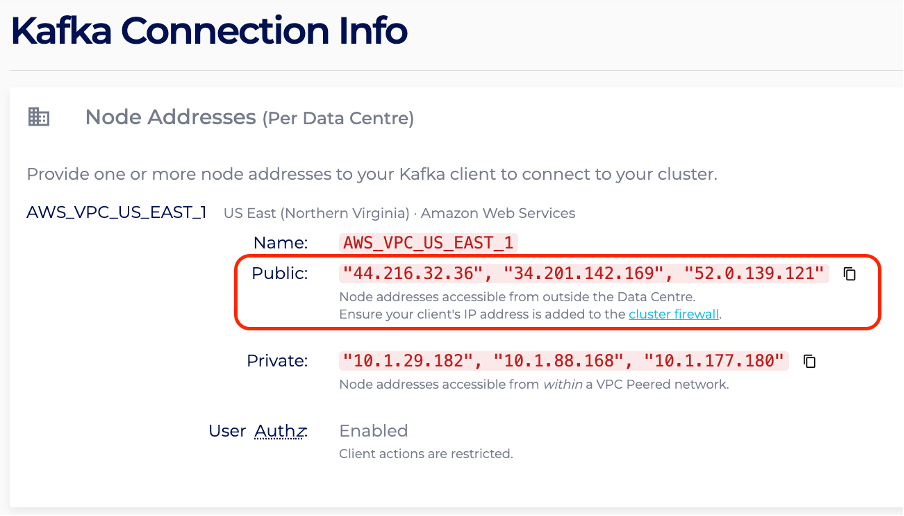
Figure 2: Nodes’ individual public IP addresses via Connection Info page – Instaclustr console.
Through a quick glance to the Connection Info page for your cluster via the Instaclustr console, you might have noticed some examples similar to the ones below:
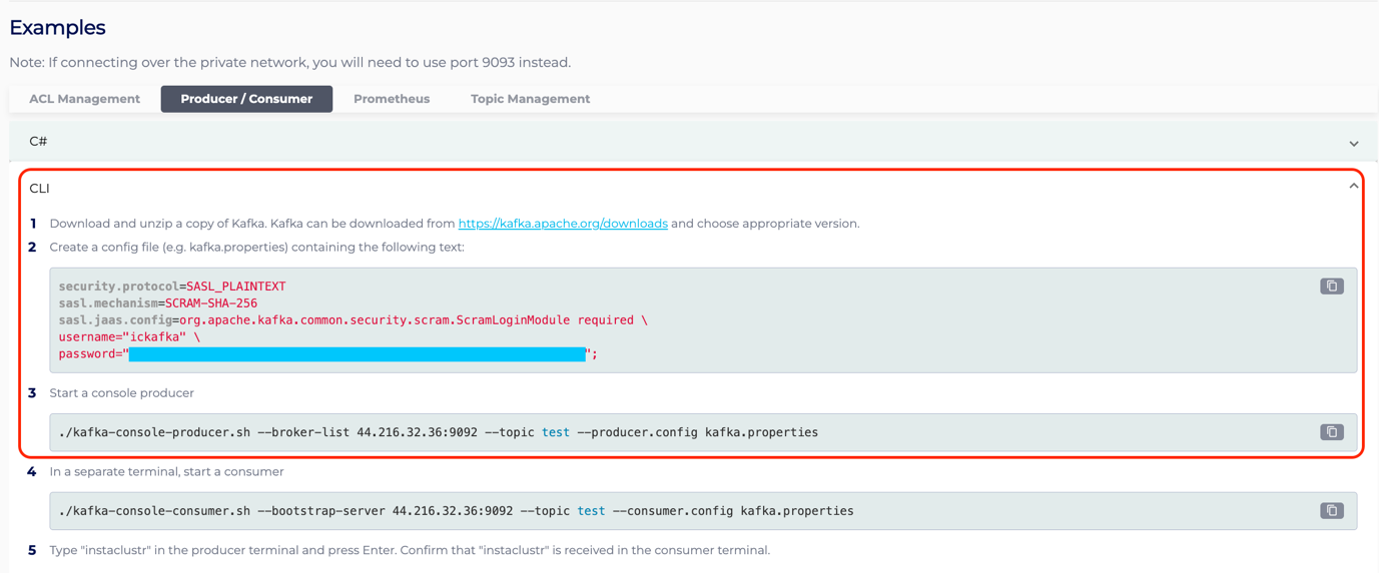
Figure 3: Connection Info examples – Instaclustr console.
These connection steps will be helpful when creating your kafka.properties file. The kafka.properties file that you need to create, will contain configurations such as SASL mechanism and jaas.conf details for Instaclustr for Apache Kafka clusters that connect via Password Authentication or it will contain SSL details for TLS brokers.
The code line:
|
1 |
-v $(pwd)/kafka.properties:/tmp/kafka.properties:ro \ |
within the Docker launching command will take the path to the kafka.properties file and store its content into an internal location where the Instaclustr for Apache Kafka properties file will be written to. KAFKA_PROPERTIES_FILE environment variable will access that internal location when running the command. Once the container is up and running (you might need to wait a couple of minutes, so no rush), you should see a dashboard that looks like the one below:
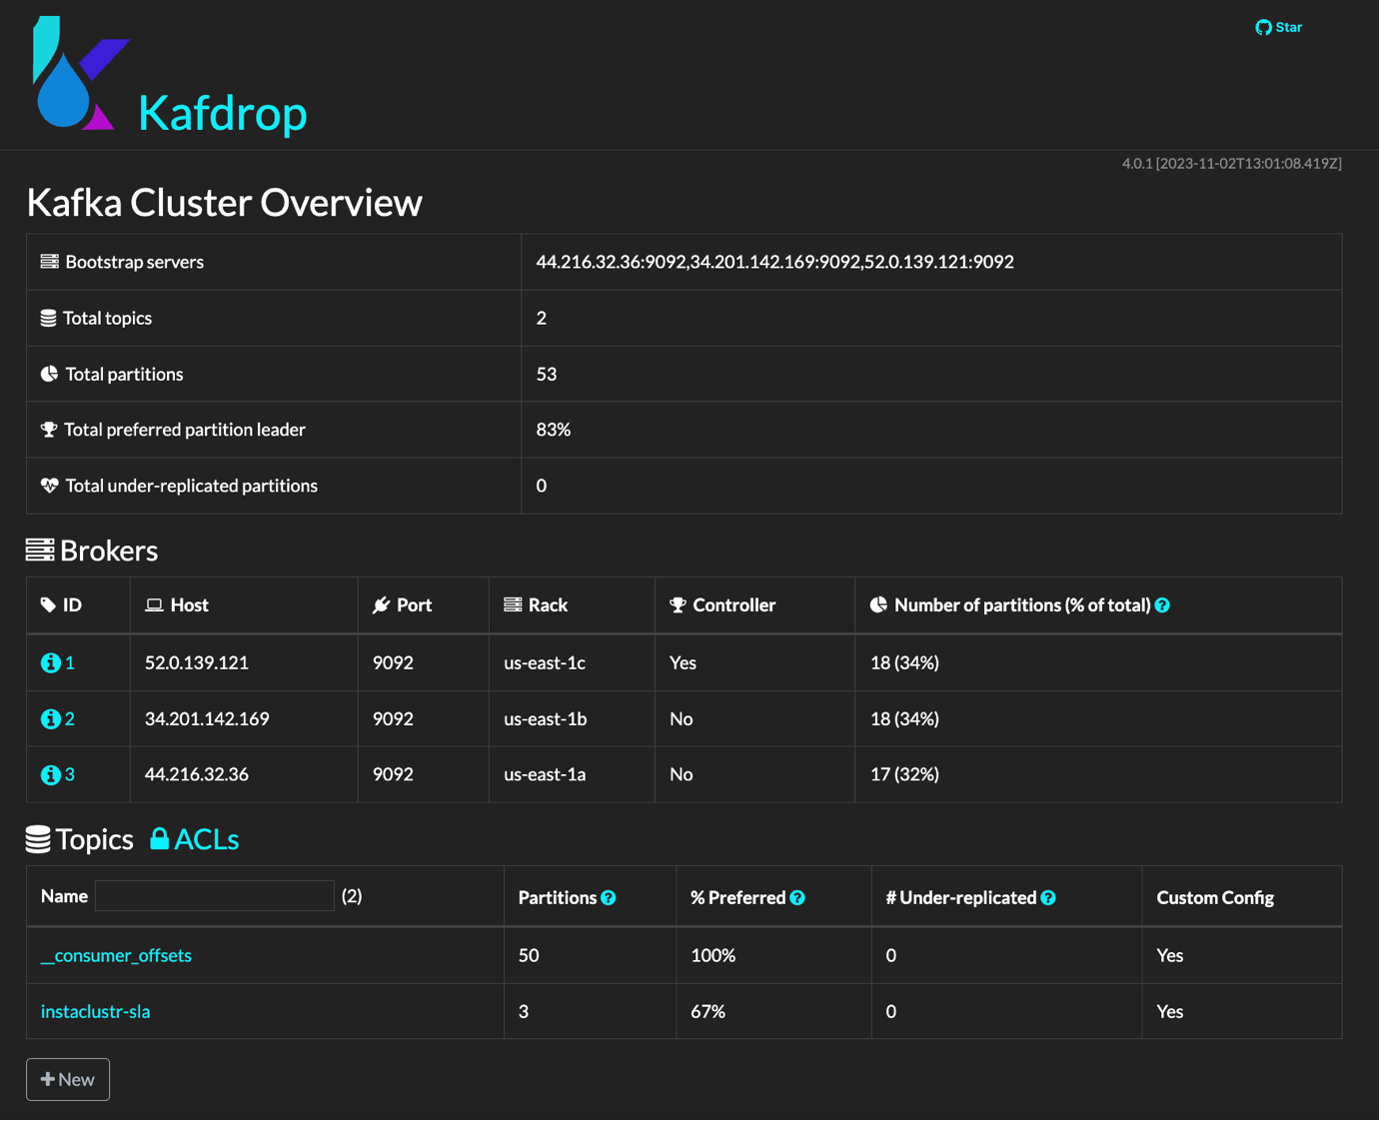
Figure 4: Kafdrop Console
What does Kafdrop include?
The main page contains information about the Instaclustr for Apache Kafka Cluster Overview, Brokers details, Topics listing and a link to the cluster’s ACLs.
One thing to keep in mind is that if you want to get more information about some of the details displayed on the Kafdrop console, you can hover over the question mark icon and read the tooltip as shown below:

Figure 5: How to find tooltips—Kafdrop console.
Instaclustr for Apache Kafka cluster overview
The overview section contains information about the bootstrap servers, total number of topics, partitions, preferred partition leader, and under-replicated partitions.
Instaclustr for Apache Kafka Brokers
The Brokers section describes each broker’s ID, host, port, rack, and number of partitions. It also mentions which broker is the Active Controller.
You can access each broker’s individual information simply by clicking on the information icon right next to the broker’s ID. This will display more in-depth information about the broker and how are the broker partitions assigned to it based on the cluster’s topics.
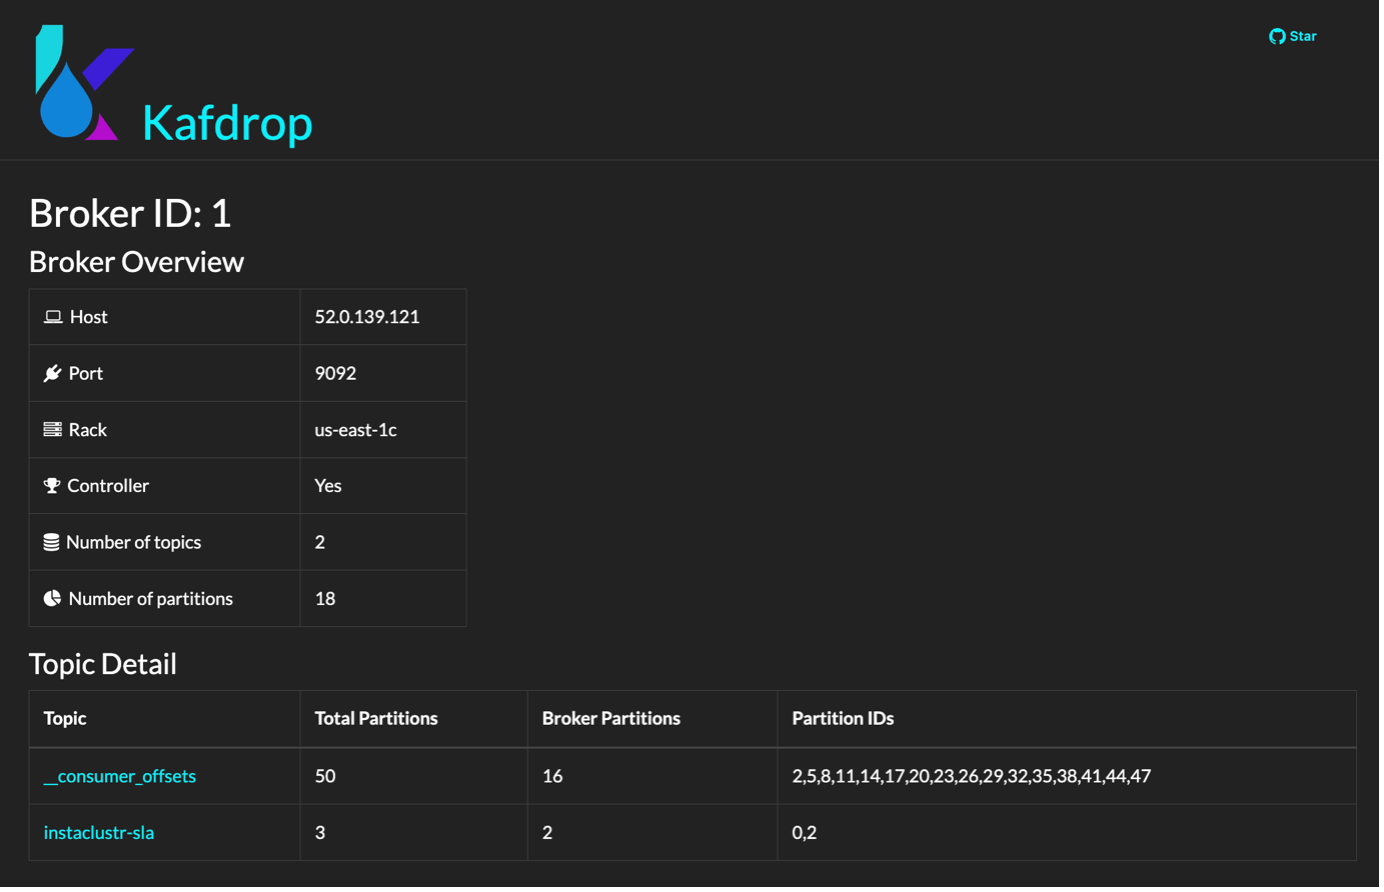
Figure 6: Individual Broker information—Kafdrop console.
Instaclustr for Apache Kafka Topics
Within Topics table, you can easily see:
- The topics within your Instaclustr for Apache Kafka cluster,
- How many topics are in total based on the number in the parentheses,
- The number of partitions for each topic,
- The percent of partitions where the preferred broker has assigned leadership (% Preferred column),
- The number of under-replicated partitions (# Under-replicated column),
- Whether or not that topic has a custom configuration.
You can add new topics via Kafdrop console by clicking on the + New button:
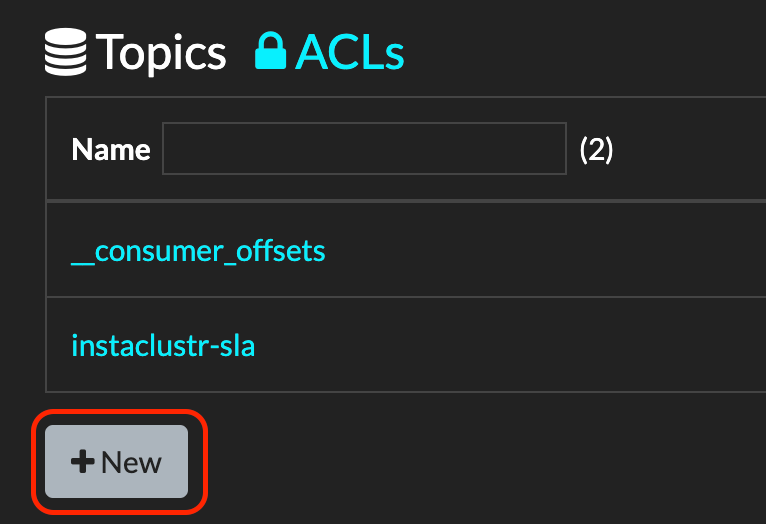
Figure 7: Create new topics button—Kafdrop console.
This will open a form where you need to specify the topic name, the number of partitions, and the replication factor for that topic. No other custom configuration can be added to the topic creation form.
Once you click on the + Create button, the form fields will be reset to their default values and a text message containing a link to the newly created topic’s page will be displayed underneath the button.
In the example below, I created a topic called test.
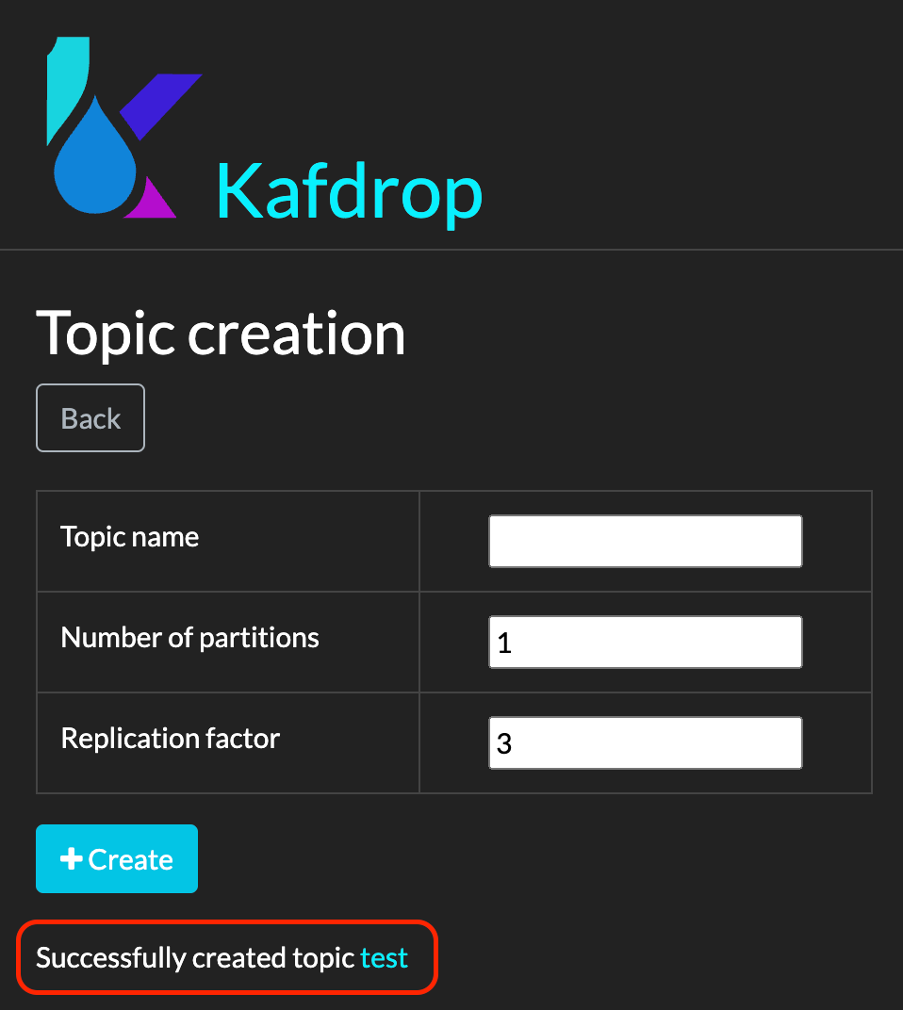
Figure 8: Create test topic example via Topic creation form—Kafdrop console.
Once you click on the test topic link, you will access the individual topic’s page. On this page you can see a topic overview, the partition details, configurations, and consumers. Since this topic was created via the Kafdrop console, no custom topic configuration was allowed.
However, a topic such as instaclustr-sla that was automatically created when you provisioned your Instaclustr for Apache Kafka cluster, will show configurations and consumer groups as shown here:
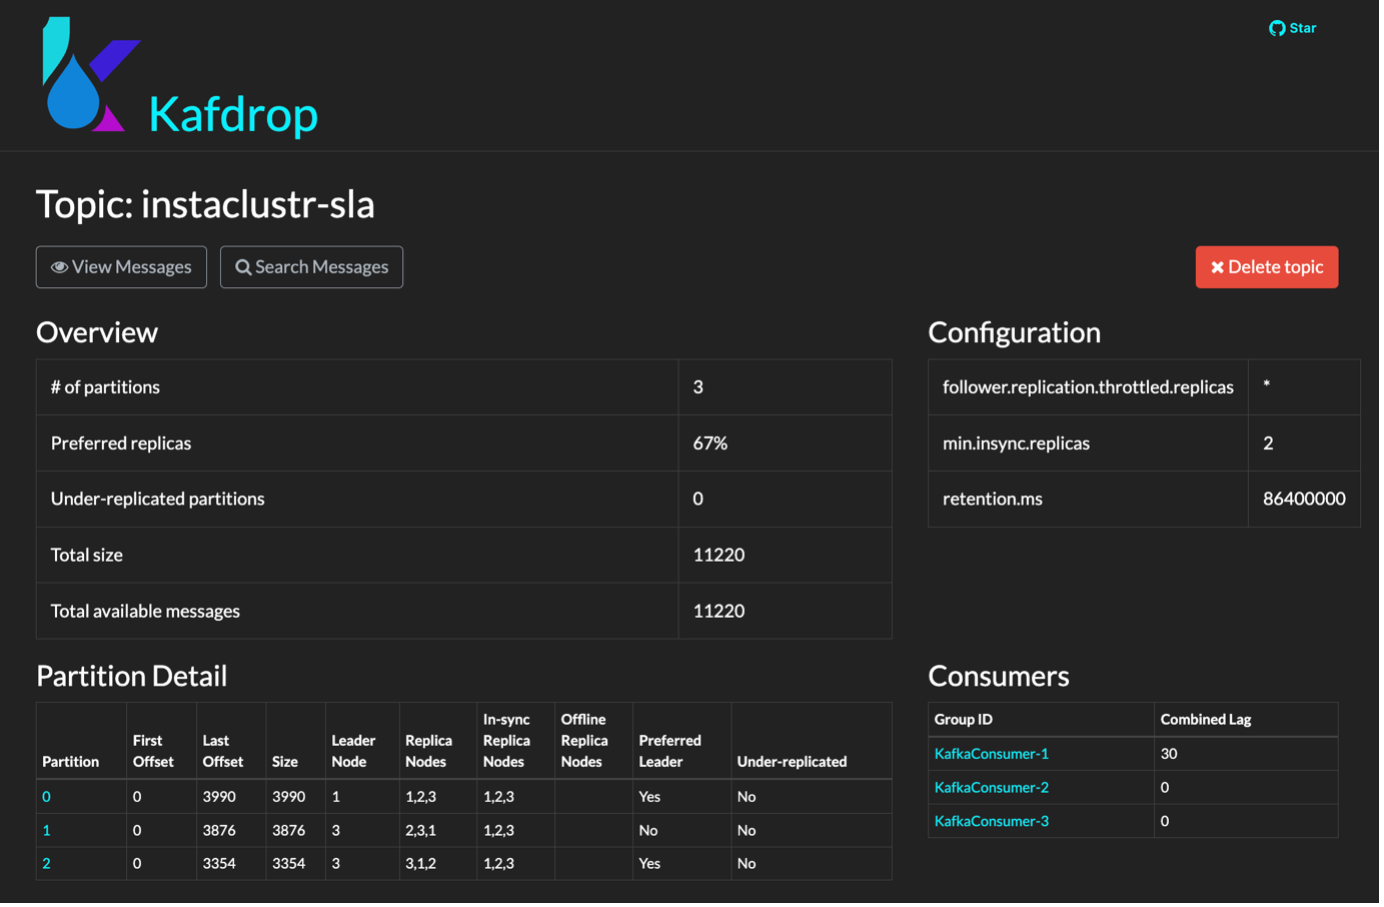
Figure 9: Individual topic page for instalcustr-sla topic—Kafdrop console.
You can view and search for messages within the topic, you can delete the topic via x Delete topic button, visualise the messages by partitions (click on the desired partition ID) or visualize consumers individually (click on the desired consumer group ID).
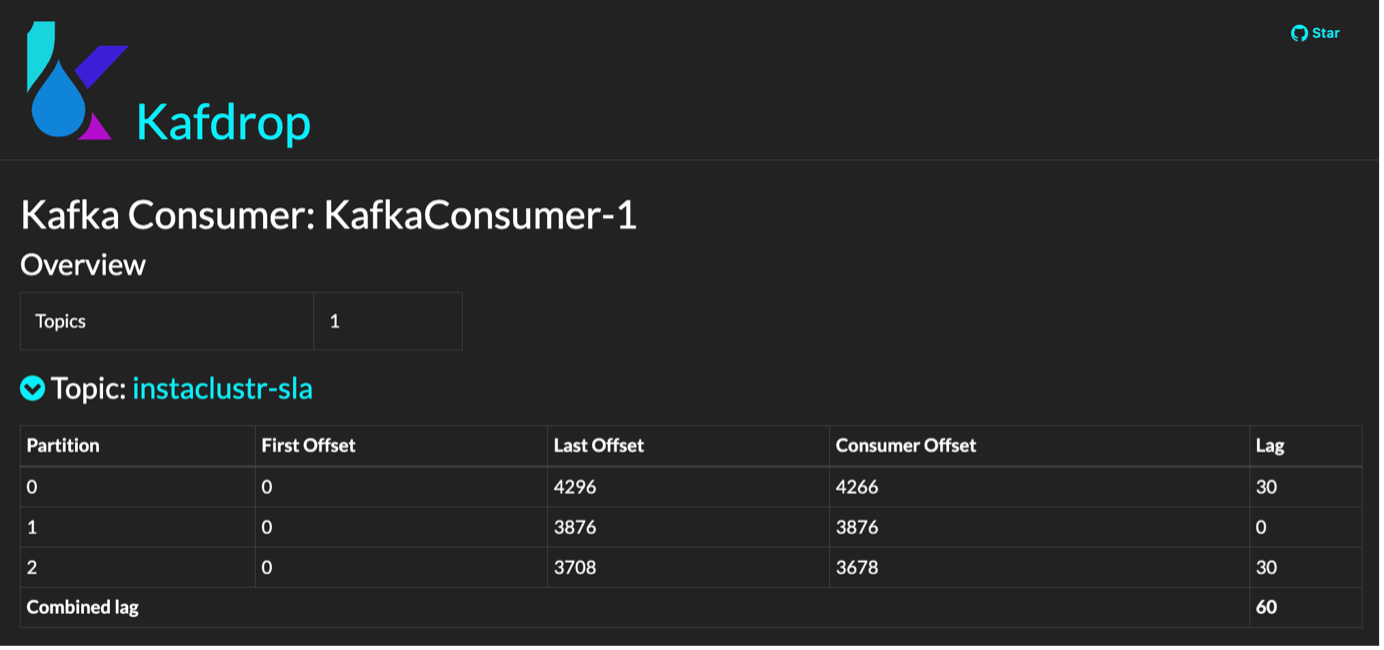
Figure 10: Individual Instaclustr for Apache Kafka consumer group—Kafdrop console.
Instaclustr for Apache Kafka ACLs
Last, but not least, right next to the Topics header on the Kafdrop console overview page, there is a link to the cluster’s ACLs.
Clicking on that link will take you to the ACLs page, which contains a table that describes the pattern name of the ACL, the principal user, resource-, pattern-, operation-, and permission-types, as well as the ACL hosts.

Figure 11: Instaclustr for Apache Kafka cluster’s ACLs—Kafdrop console.
How can I add Schema Registry to it?
First things first, your cluster needs to have a Schema Registry enabled. So, if you want to provision an Instaclustr for Apache Kafka cluster with Karapace Schema Registry enabled, make sure to check our documentation.
Now that your Instaclustr for Apache Kafka cluster with Karapace Schema Registry add-on is in RUNNING state, the only thing that you need to change is to add another couple of lines to your launching command for running the Kafdrop Docker container.
It should look like this:
|
1 2 3 4 5 6 7 |
docker run -d --rm -p 9000:9000 \ -v $(pwd)/kafka.properties:/tmp/kafka.properties:ro \ -e KAFKA_BROKERCONNECT==<node1 public IP>:9092,<node2 public IP>,<node 3 public IP>:9092 \ -e KAFKA_PROPERTIES_FILE=/tmp/kafka.properties \ -e SCHEMAREGISTRY_CONNECT=<Karapace Schema Registry URL> \ -e SCHEMAREGISTRY_AUTH=<Karapace Schema Registry username>:< Karapace Schema Registry password> \ obsidiandynamics/kafdrop:latest |
You can retrieve your Karapace Schema Registry connection details from the Connection Info page of your Instaclustr for Apache Kafka cluster. Click on the Karapace Schema Registry tab within the Connection Info page and look for the addon’s credentials and URL as shown below.
NOTE: Remember to have your public IP address attached to the Firewall Rules page for your cluster within the Instaclustr console. The IP address must be added to both the designated Instaclustr for Apache Kafka field and the Karapace Schema Registry one within the Firewall Rules page.
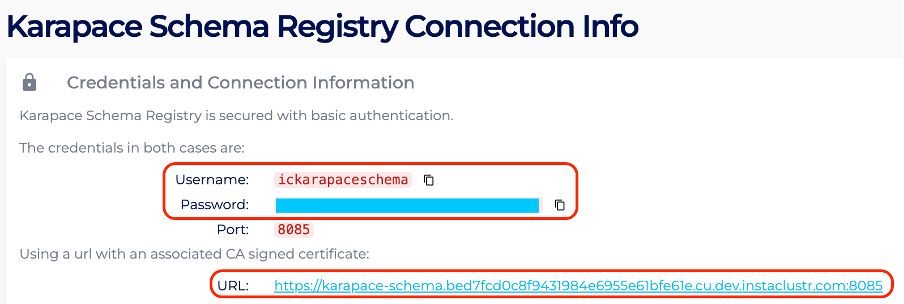
Figure 12: Karapce Schema Registry Connection Info page – Instaclustr console.
For the purpose of this tutorial, we will run the first couple of Connection Info examples in order to visualize the registered schemas in the Kafdrop console. The schemas will be stored in the cluster’s _schemas topic.
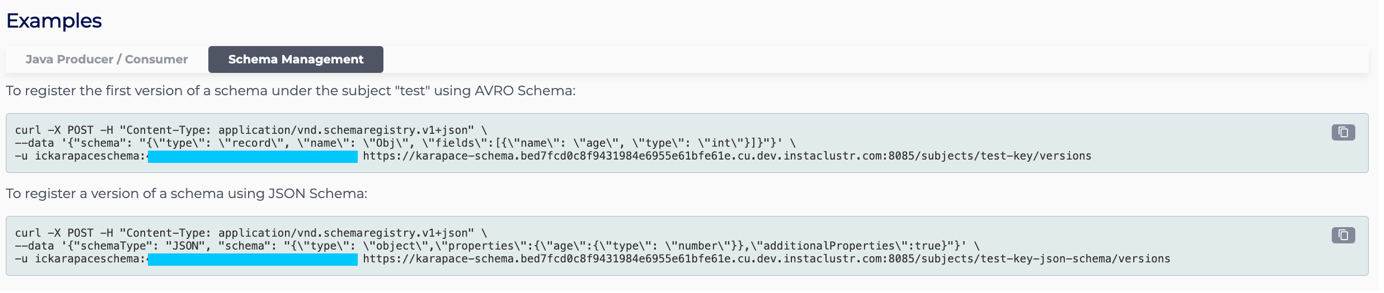
Figure 13: Karapace Schema Registry Connection Info examples – Instaclustr console.
Launch the Kafdrop console with the updated command and look for the _schemas topic in the Topics table of the console. This will take you to the individual topic page.
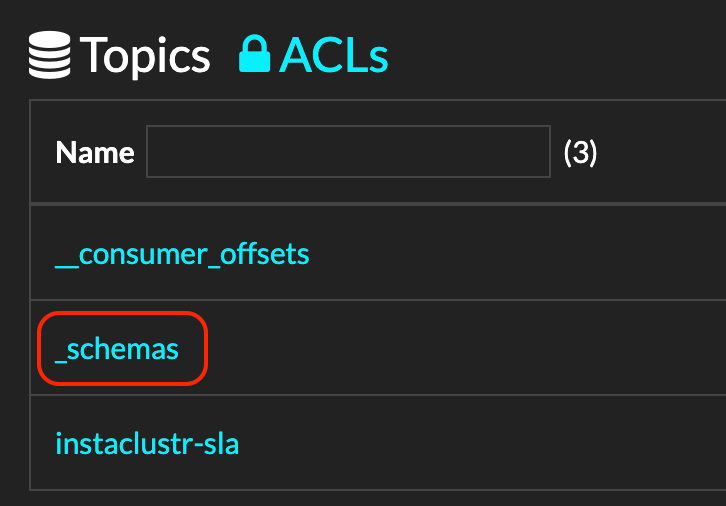
Figure 14: Look for _schemas topic in the Topics table – Kafdrop console.
Click on the View Messages button on the top-left side of the individual topic’s page and check the schemas that were registered in that topic.
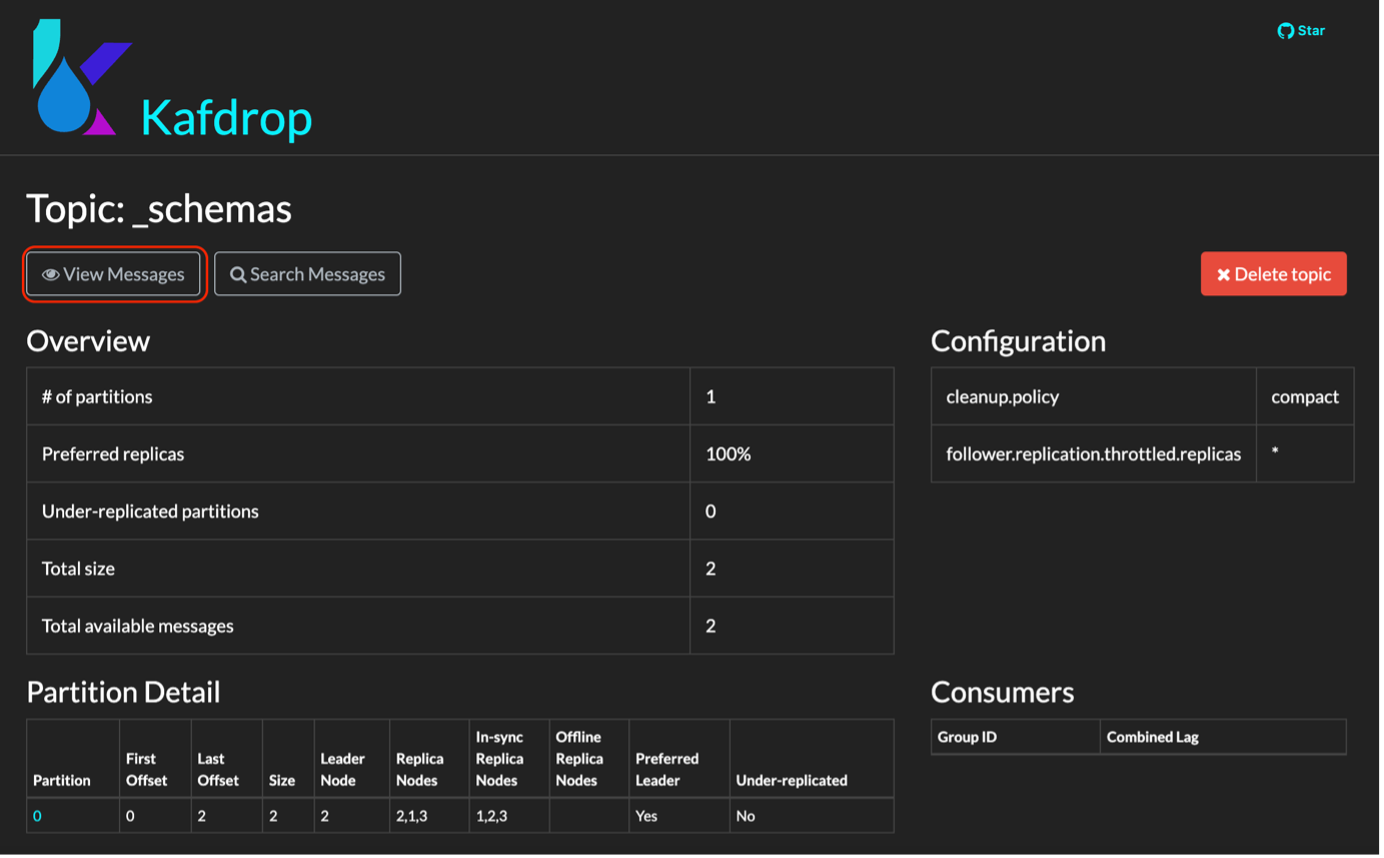
Figure 15: _schemas topic page – Kafdrop console.
It should display something like this:
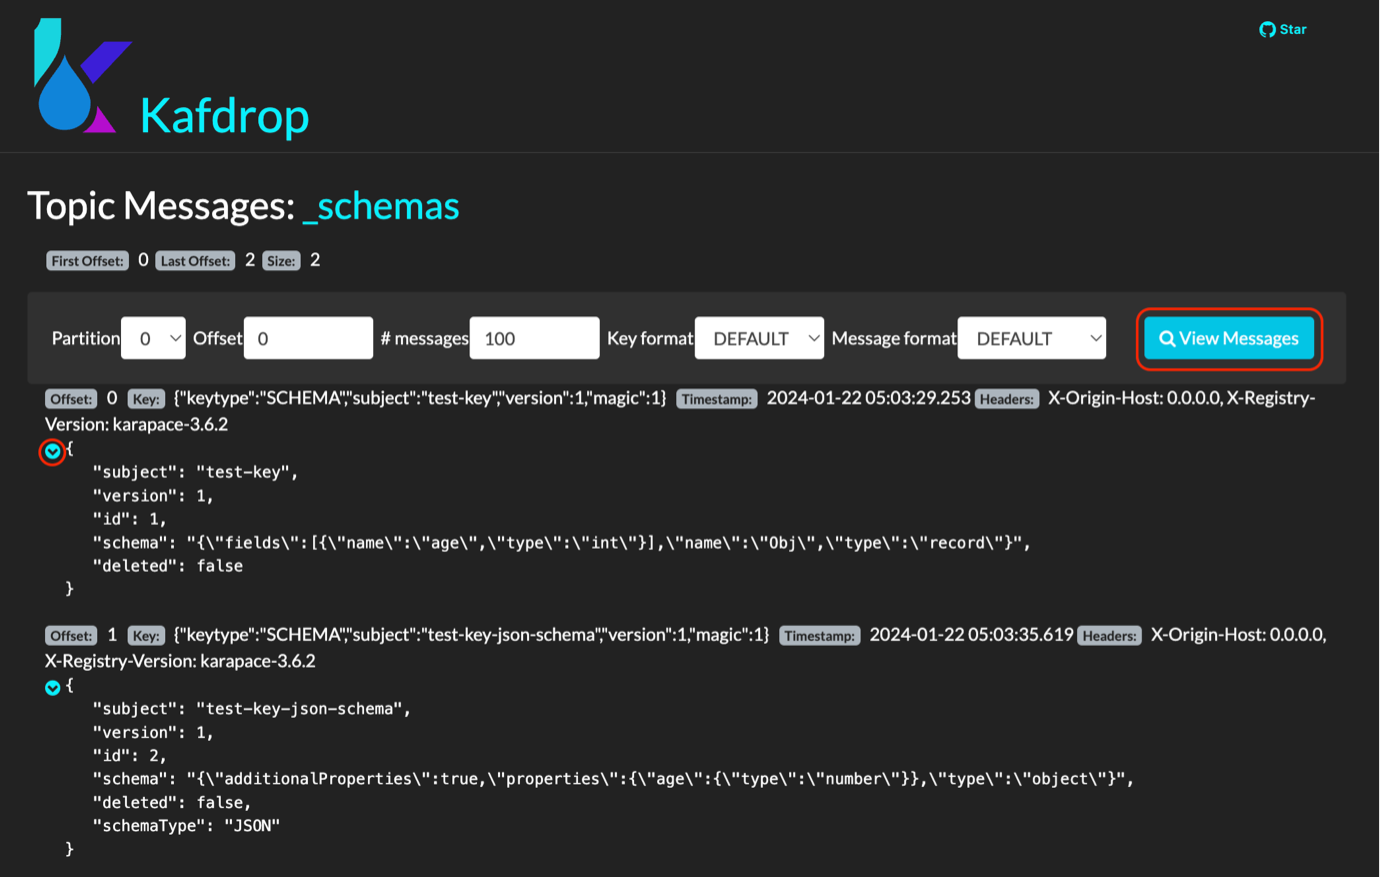
Figure 16: Karapace Schema Registry Connection Info examples displayed in Kafdrop console.
As you can see, both the ARVO and JSON schemas are displayed (which makes sense because this is what you registered through the Connection Info examples from the Instaclustr console—see Figure 13 again).
You also get to see them displayed in a nice and readable manner. The console displays details such as schema version, Karapace Schema Registry version, but you only get to see them displayed like that if you click on the dropdown icon on the left side of each schema.
NOTE: Unless you click on the View Messages button on the right, no message will be displayed once you get redirected to the individual topic’s page. You can refine the type of messages you want to see simply by changing the search variables on the grey panel.
You did it!
We hope you enjoyed our step-by-step instructions on how to use Kafdrop with our Instaclustr for Apache Kafka offering.
Ready to try it out yourself on the Instaclsutr console? Don’t miss the opportunity test it with a free trial!
Follow along in the Kafka UI series:
- Part 1: How to Use AKHQ with Instaclustr for Apache Kafka
- Part 2: How to Use UI for Apache Kafka® with Instaclustr for Apache Kafka
***
Please note that content provided on this page is purely for informational purposes and does not constitute a recommendation, endorsement or approval of any kind with respect to Third-Party Sites, any information, software, products, services, or materials found there or any results that may be obtained from using them.