Welcome to Part 2 in our series about user interfaces (UI) to help you visualize and monitor data within your Instaclustr for Apache Kafka® cluster!
In our last post, we talked about akhq.io and how to configure the console and connect it to an Instaclustr for Apache Kafka cluster. If AKHQ doesn’t seem to be the best fit for your use case, then we have another option to consider: UI for Apache Kafka.
In this blog, we will examine all the details of UI for Apache Kafka and how to best integrate it with both Instaclustr for Apache Kafka and Instaclustr for Karapace Schema Registry. And just like in the previous post, we will spin up some clusters together via the Instaclustr console.
What is UI for Apache Kafka?
UI for Apache Kafka is a free, open source web UI to monitor and manage Apache Kafka clusters. It is a simple tool that makes your data flows observable, helps you find and troubleshoot issues faster, and deliver optimal cluster performance.
With UI tools like UI for Apache Kafka, it is easy to track key metrics like brokers, topics, partitions, production, and consumption (source: UI for Apache Kafka).
What are some key aspects to UI for Apache Kafka?
Based on their documentation, UI for Apache Kafka offers:
- Multi-Cluster Management: monitor and manage all your clusters in one place.
- Performance Monitoring with Metrics Dashboard: track key Kafka metrics with a lightweight dashboard.
- Apache Kafka Brokers View: view topic and partition assignments, as well as controller status.
- Apache Kafka Topics View: view partition count, replication status, and custom configuration.
- Consumer Groups View: view per-partition parked offsets, combined and per-partition lag.
- Messages Browsing: browse messages with JSON, plain text, and Avro encoding.
- Dynamic Topic Configuration: create and configure new topics with dynamic configuration.
- Configurable Authentication: secure your installation with optional Github, Gitlab or Google OAuth 2.0.
- Custom serialization/deserialization plugins: use a ready-to-go SerDe for your data like AWS Glue or Smile, or code your own!
- Role based access control: manage permissions to access the UI with granular precision.
- Data masking: obfuscate sensitive data in topic messages.
Are there any limitations I should be aware of?
- No support for removing clusters: If we configure an Apache Kafka cluster in the console, there is no way to remove it from the dashboard (as of this writing). Let’s say we delete that cluster; since we cannot remove it, it will appear as an offline cluster and potentially confusing the user about the state of their Apache Kafka cluster.
- No built-in validation for connection configuration: There is no built-in validation when submitting the connection configuration of your Apache Kafka cluster. Instead, there is a Validate button that will validate the connection, which users should always remember to click. Misconfiguring the cluster may result in unhealthy or offline cluster status, and in some cases, it may even break the UI altogether.
- Connection issues in certain scenarios: Apache Kafka clusters that integrate with both Kafka® Connect and Schema Registry may encounter configuration and connection issues, especially if they use TLS or mTLS. While these display separate fields for keystores, the UI displays just one field for a single truststore that is used for all of them. However, we did find a workaround: merging the truststores using Java Keytool results in a single file that can later be attached in the Truststore field during cluster configuration.
Why should I configure an Instaclustr for Apache Kafka cluster within the UI for Apache Kafka?
This is an easy one: while Instaclustr for Apache Kafka is specifically designed for deploying, managing, and monitoring all components of the data infrastructure, UI for Apache Kafka is specialized in displaying that data. Basically, you get the best of both worlds.
Instaclustr’s console offers Connection Info examples for your Instaclustr for Apache Kafka cluster but does not display Kafka data to the level you would get from Kafka-specific UIs. Its main purpose is to provide an easy way to manage your cluster.
On the other side of the spectrum is the UI for Apache Kafka, which will not offer you the means to provision and manage an Apache Kafka cluster but will help you in visualizing the data within your cluster.
Can you show me how to do that?
Absolutely.
We will start by running the console in a Docker container and then configure the following clusters to understand the console’s main features:
- Instaclustr for Apache Kafka
- Instaclustr for Apache Kafka with Karapace Schema Registry add-on
Ready? Let’s dive in!
UI for Apache Kafka Console Setup
- Run the pre-built UI for Apache Kafka Docker image in a terminal through the command below:
|
1 |
docker run -it -p 8080:8080 -e DYNAMIC_CONFIG_ENABLED=true provectuslabs/kafka-ui |
- Access the web UI via https://localhost:8080/.
You should get something like this when accessing the web UI:
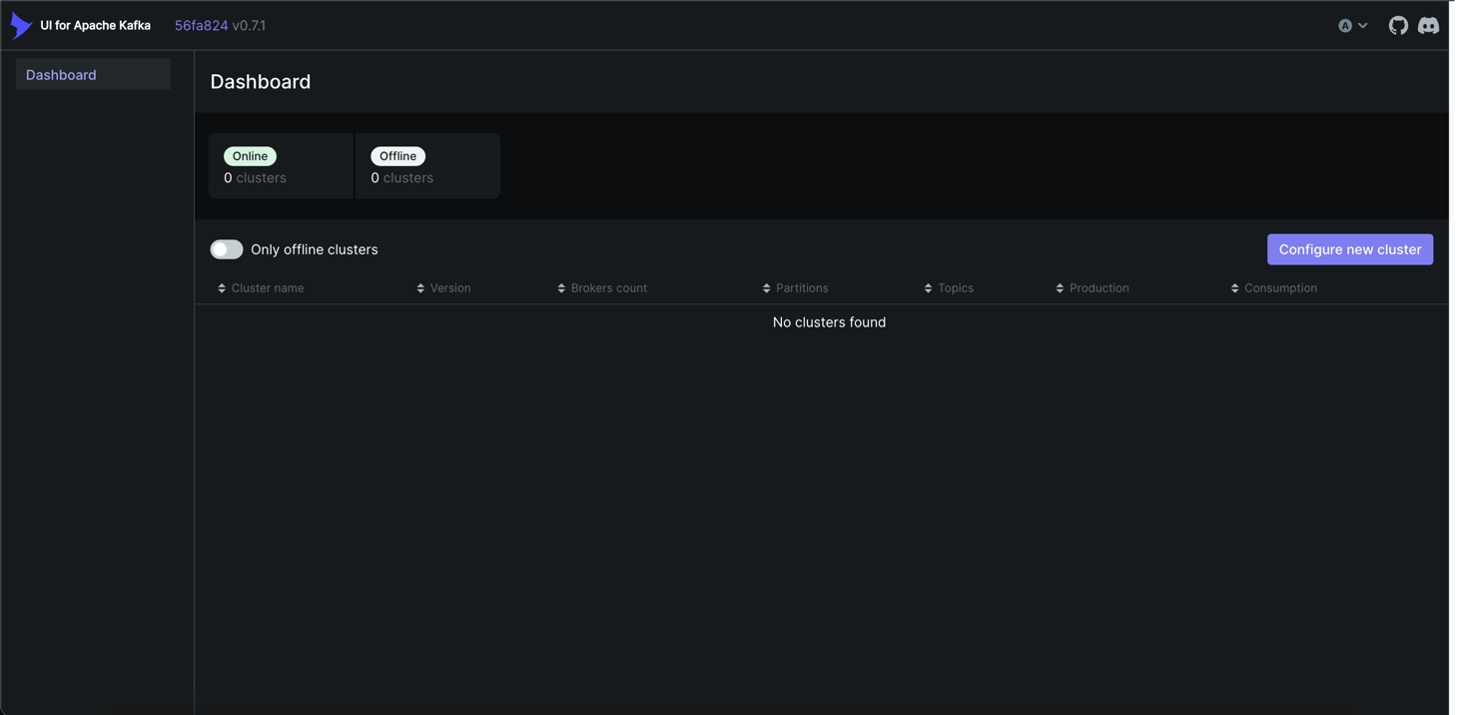
Figure 1: UI for Apache Kafka Console
Not bad, right? Mine is on the dark theme because I’m a dark theme type of person, but feel free to customize it as you like it from the dropdown on the top-right corner.
![]()
Figure 2: Console Theme Dropdown – UI for Apache Kafka
At this moment of writing, the latest version of UI for Apache Kafka is 0.7.1 (released June 2023), but there are more than 20 versions available from nearly 180 contributors. This is one of the main advantages of using an open source tool: there will always be frequent updates that will improve the user experience.
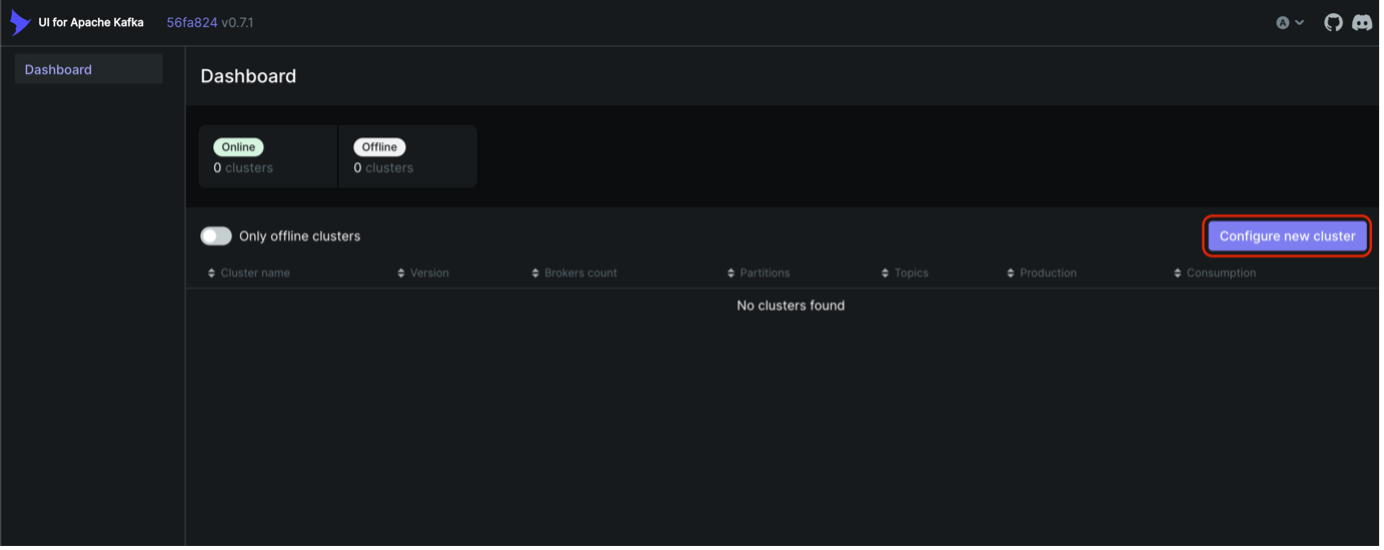
Now let’s talk about the UI itself:
- The main page is a dashboard that lists all the configured Apache Kafka clusters. The clusters will be listed as table rows in the page or as a list in the dashboard panel on the left.
- There will be 2 types of clusters: online clusters (connected as they should be to your Apache Kafka cluster) and offline clusters (misconfigured, unhealthy, or deleted clusters).
- You can configure a cluster by clicking Configure new cluster on the right, which will access a configuration form as shown below (you’ll learn more about this form in the next sections).
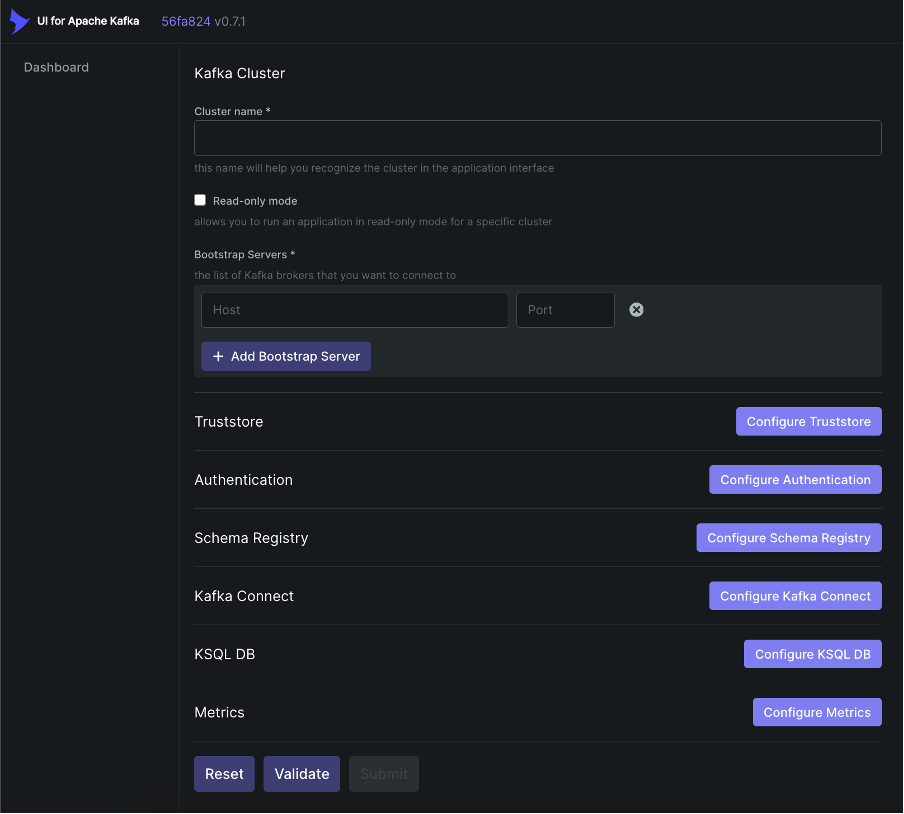
Figure 3: Configure an Apache Kafka Cluster within the UI for Apache Kafka Console
Configuring Instaclustr for Apache Kafka within UI for Apache Kafka
We first need to provision the Instaclustr for Apache Kafka cluster (if you’ve already done this, then feel free to skip ahead to Step 2).
If this is your first time using the Instaclustr console, simply sign up for a free trial and easily provision your first cluster.
- Provision Instaclustr for Apache Kafka Cluster
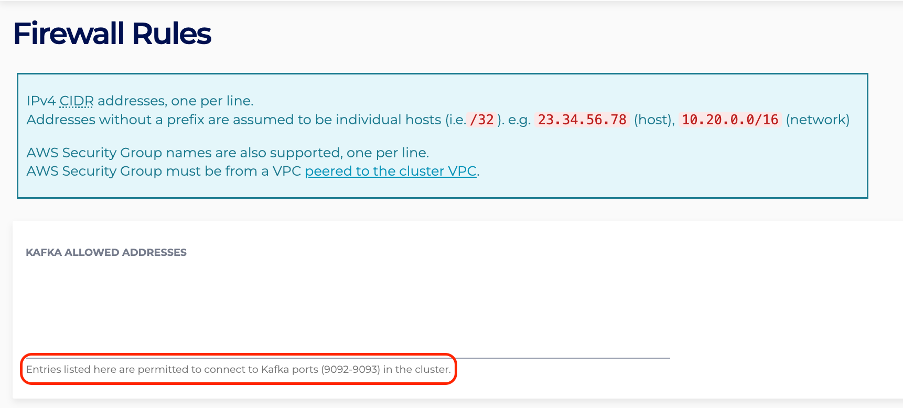
The Instaclustr documentation provide steps in how to easily spin up an Instaclustr for Apache Kafka cluster within our console. At this stage, you should be able to access both the Connection Info and Firewall Rules pages. They contain information that is crucial to a proper cluster configuration within the UI for Apache Kafka console. NOTE: It is important to have your own IP address attached to your cluster’s Firewall Rules as this will allow UI for Apache Kafka to connect to your Instaclustr for Apache Kafka cluster. This can be done via console on cluster creation or via the cluster’s Firewall Rules page (see Connecting to an Apache Kafka Cluster for more information). - UI for Apache Kafka Cluster Configuration
Configure a New Apache Kafka Cluster
Click on Configure new cluster and start filling in the configuration form.
Figure 4: Configure new cluster Button – UI for Apache Kafka Console
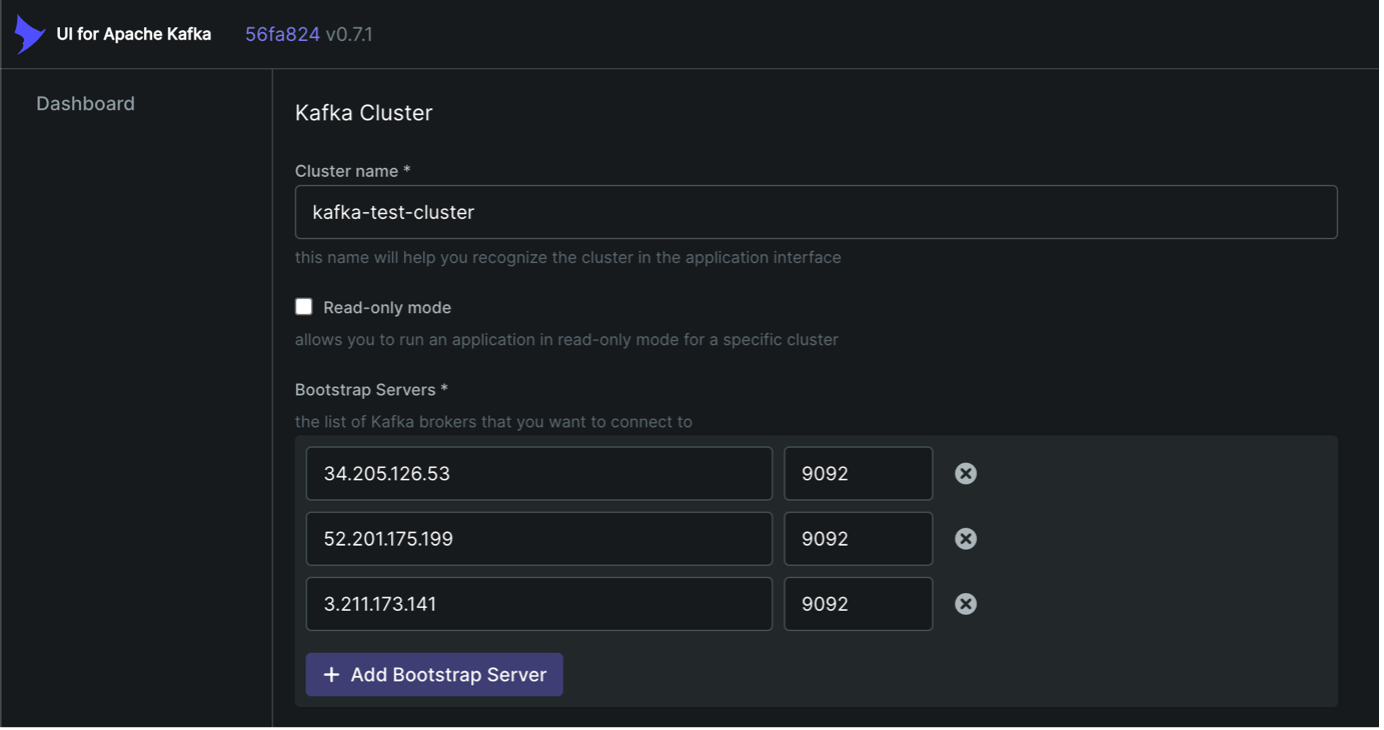
We should start by naming the cluster and adding the bootstrap servers in order to connect to our Instaclustr for Apache Kafka cluster.
Cluster Details and Connection Information
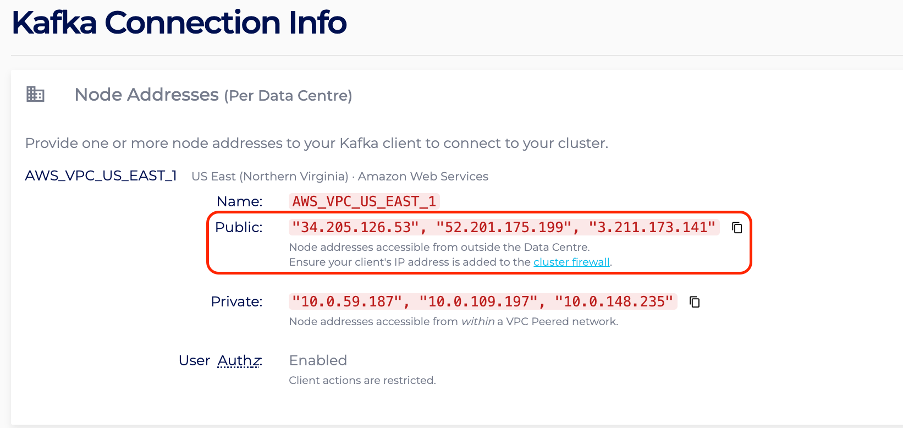
You can get all your connection information on the Connection Info page of your cluster. The bootstrap servers represent a list of Apache Kafka brokers that you want to connect.
For our demo, we will need the public IP addresses of our Instaclustr for Apache Kafka cluster (see the Connection Info page – fig. 6) and the Apache Kafka port, which is 9092 (see the Firewall Rules page – fig. 7).
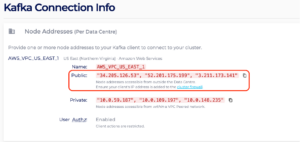
Figure 5: Public IP Addresses for Instaclustr for Apache Kafka Cluster – Instaclustr Console
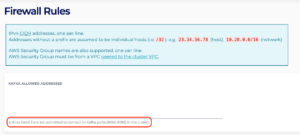
Figure 6: Kafka Ports for Instaclustr for Apache Kafka Clusters – Instaclustr Console
NOTE: It is important to have your own IP address attached to your cluster’s Firewall Rules because this will allow UI for Apache Kafka to connect to your Instaclustr for Apache Kafka cluster. This can be done via console on cluster creation or via the cluster’s Firewall Rules page (see Connecting to an Apache Kafka Cluster for more information).
Configure Cluster Name and Bootstrap Servers
Your configuration form via UI for Apache Kafka console should now look like this:

Figure 7: Adding Bootstrap Servers – UI for Apache Kafka
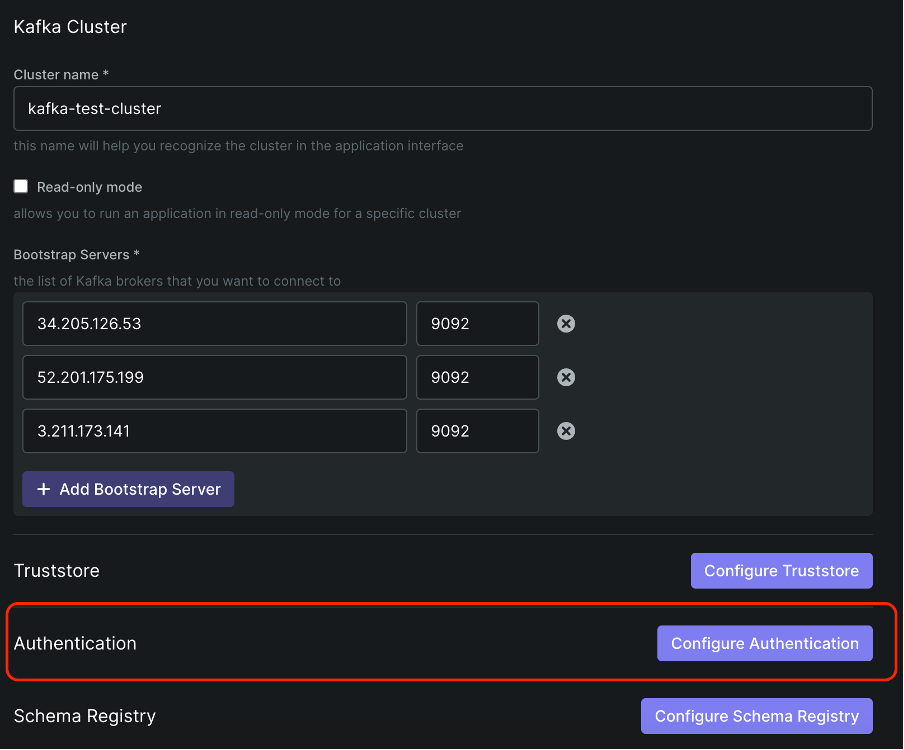
Configure Cluster Authentication
Before we submit the configuration form, we need to configure the Authentication fields within the UI for Apache Kafka:

Figure 8: Add Authentication to the Configuration Form – UI for Apache Kafka
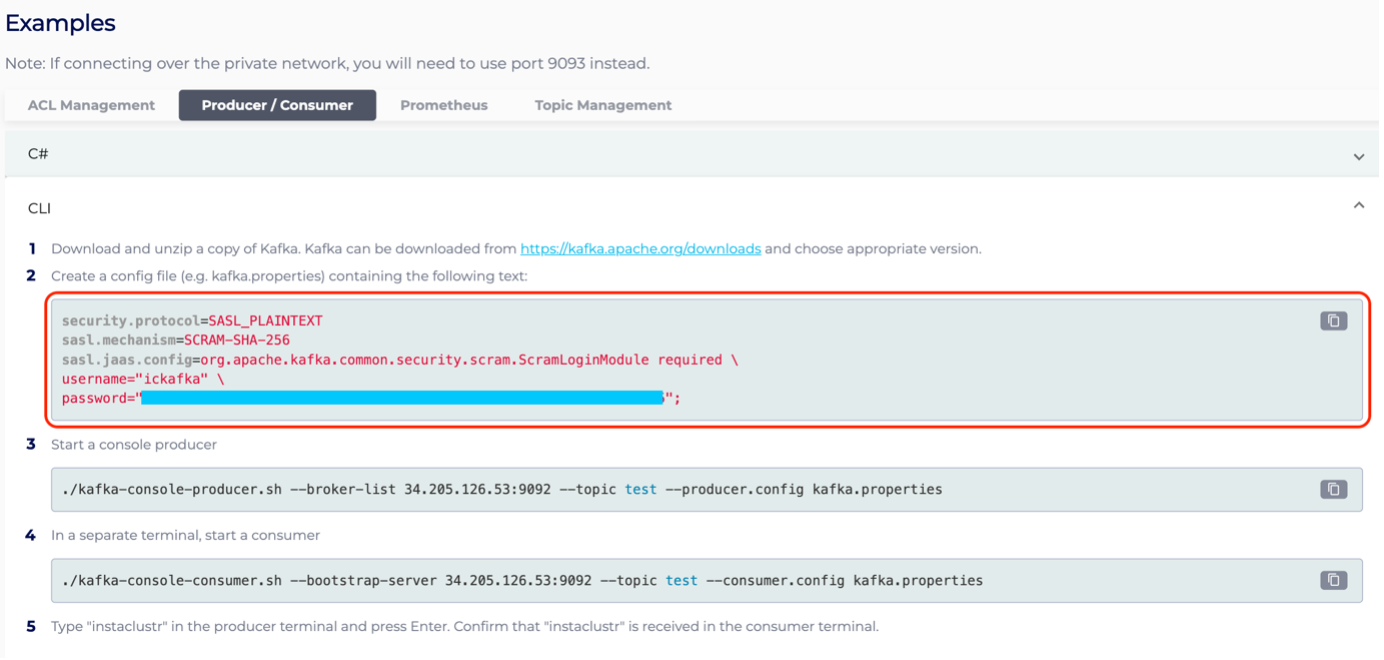
Once Configure Authentication is clicked, the form will ask you to choose an Authentication Method. For our case, it will be SASL/SCRAM-256. You can check the authentication method of your cluster via Instaclustr console in the Connection Info page, Examples section:
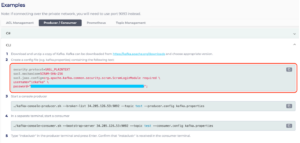
Figure 9: Instalcustr for Apache Kafka Properties – Instaclustr Console | Connection Info Page
Once the Authentication Method is selected, we need to add the Security Protocol. Based on the figure above, we need to select SASL_PLAINTEXT.
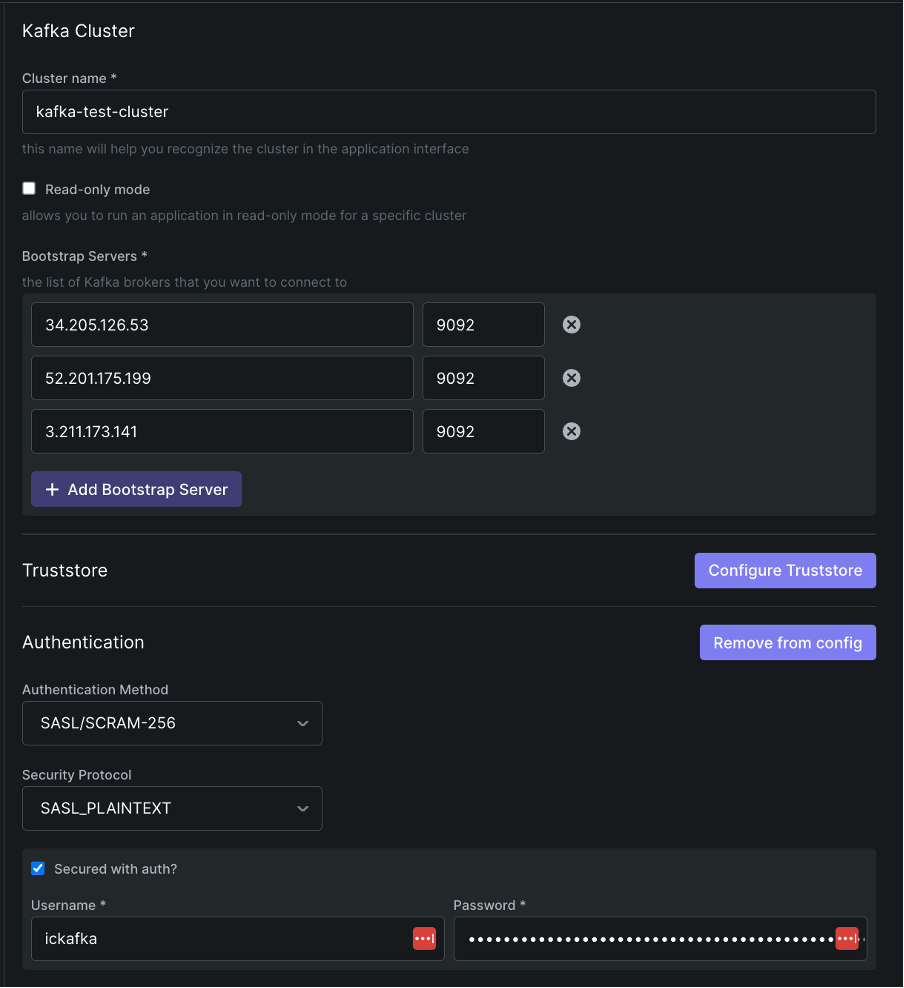
All Instaclustr for Apache Kafka clusters now have credentials for password authentication. These credentials can be retrieved from the Connection Info page of the Instaclustr for Apache Kafka cluster via Instaclustr console.:

Figure 10: Instaclustr for Apache Kafka Credentials – Instaclustr Console | Connection Info Page
We need to tick the Secured with auth? checkbox within our configuration form in the UI for Apache Kafka console and fill in the username and password accordingly:
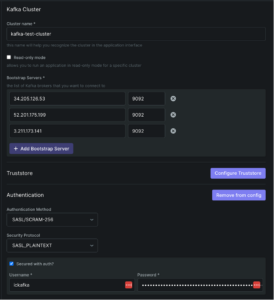
Figure 11: Configuration Form for Instaclustr for Apache Kafka Cluster – UI for Apache Kafka Console
Validate your Cluster Connection

Figure 12: Reset, Validate and Submit Buttons from Configuration Form – UI for Apache Kafka Console
NOTE: Before you click Submit, we advise you to ALWAYS Validate it first. Misconfiguring the cluster may result in unhealthy/offline cluster status or breaking the UI altogether (the UI for Apache Kafka console might crash).
There are 3 buttons that should be taken into consideration at the bottom of the validation form:
- Reset: This resets the form to the last known configuration (or no configuration at all if this is the first time you are configuring this cluster).
- Validate: This validates the connection between your and the UI for Apache Kafka console. It is extremely important to click (see the note above) because it will let you know whether the configuration is done properly–the validation notification will be displayed on the bottom-right side of the web console:

Figure 13: Validation Notification – UI for Apache Kafka Console
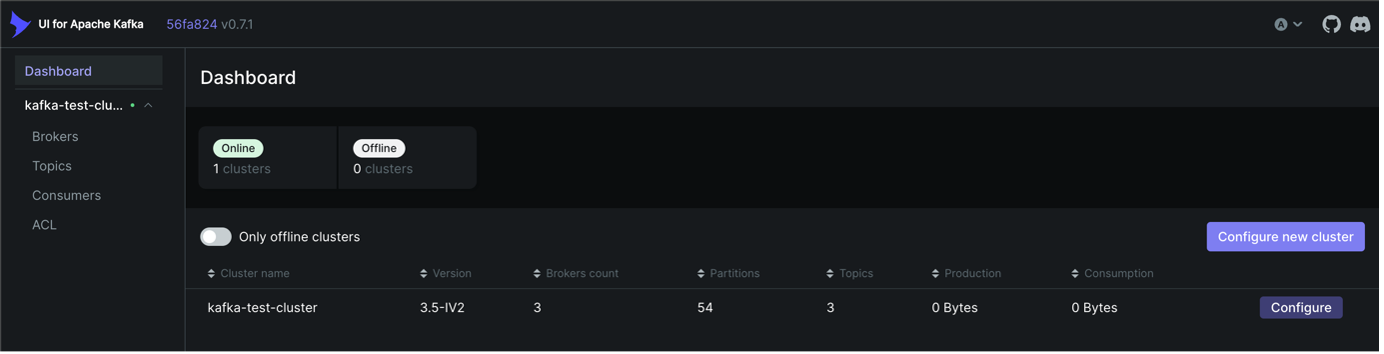
- Submit: Once the connection is validated, you can submit the configuration form, resulting in your cluster being added to the UI for Apache Kafka dashboard:
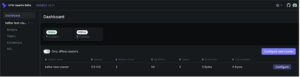
Figure 14: Instaclustr for Apache Kafka Added to UI for Apache Kafka Dashboard
- Let’s Test It Out!
Some things to note here:
- You can reconfigure the cluster by clicking Configure on the right side of the cluster entry.
- If the cluster configuration is done properly, the cluster will be listed as Online; otherwise, it will be Offline.
- More than one cluster configurations are possible since the Configure new cluster button on the right is still enabled.
- You can visualize information regarding Brokers, Topics, Consumers and ACL to every configured cluster:

Figure 15: options for visualizing information
- Each configured cluster will signal the cluster’s state through a coloured scheme:
- green – healthy clusters.
- yellow – checking cluster’s configuration.
- red – offline cluster.
Browse Through Instaclustr for Apache Kafka Data
The snips below will give you an idea of how the information is displayed within the UI for Apache Kafka console.
Take a look at the Topics tab: it displays information about all the topics within the Instaclustr for Apache Kafka cluster. We selected the option to have the internal topics displayed as well (see the topics marked with IN):

Figure 16: Topics Tab – UI for Apache Kafka
We can add topics within the UI for Apache Kafka via the + Add a Topic button or see each topic individually by clicking on its corresponding table row.
Let’s have a look at the test-console topic. We will add 3 partitions to it and leave the rest of the configurations set as default:

Figure 17: Creating test-console Topic – UI for Apache Kafka
Once you click Create topic, you will be redirected to the topic’s page. Here you can access information related to the topic configuration (Overview), Messages and Consumer. You can also configure the topic’s Settings and view the topic’s Statistics after the topic analysis is done.

Figure 18: test-console Topic’s Page – UI for Apache Kafka
One interesting thing we can also do is produce and consume within the Instaclustr for Apache Kafka cluster’s topics. Click on Produce Message on the top-right corner of your test-console topic’s page and fill in the form on the right as shown below:

Figure 19: Producing a Message in the test-console Topic – UI for Apache Kafka
Once you submit the form by clicking the Produce Message button, you can see your messages displayed within the Messages tab of your test-console topic’s page:

Figure 20: Messages within the test-console Topic Page – UI for Apache Kafka
Configuring Schema Registry into Instaclustr for Apache Kafka Configuration
Let’s say that your Instaclustr for Apache Kafka cluster has Schema Registry add-on enabled. You can easily integrate it into your UI for Apache Kafka cluster configuration. Here’s how:
- Provision Kafka with Karapace Schema Registry
You need to first provision an Instacluster for Apache Kafka cluster with the Karapace Schema Registry bundle enabled (step-by-step instructions here). If this is already enabled, then move onto the next step. - UI for Apache Kafka Cluster Configuration
My Instaclustr for Apache Kafka cluster already has Karapace Schema Registry enabled, so I will continue configuring the cluster by clicking Configure. If you spun up a new Instacluster for Apache Kafka, please refer to the previous section to configure the Instaclustr for Apache Kafka cluster and then continue as shown below Figure 21: Adding Karapace Schema Registry Properties to Existing Instaclustr for Apache Kafka Cluster Configuration – UI for Apache Kafka
Schema Registry Configuration Form
Once you reach the configuration form (and complete the Kafka Cluster and Authentication fields), you need to click Configure Schema Registry:

This should add a few new fields to our Schema Registry configuration section, like URL, Is Schema Registry secured with auth?, Keystore Location and Keystore Password:

Figure 23: Schema Registry Configuration Form – UI for Apache Kafka
Get Karapace Schema Registry Connection Information
Now let’s see what kind of configurations we find in the Instaclustr console for Karapace Schema Registry.
Go to your Instaclustr for Apache Kafka cluster that has Karapace Schema Registry add-on bundle enabled and access the Connection Info page. On the top of the page, select the Karapace Schema Registry tab and have a look at the Credentials and Connection Information section:

Figure 24: Karapace Schema Registry Connection Info Page – Instaclustr Console
Two things to note:
- Instaclustr for Karapace Schema Registry is secured with basic authentication.
- Instaclustr for Karapace Schema Registry uses a url with an associated CA (Certificate Authority) signed certificate.
What does this all mean?
For the first point, this means we need to check the Is Schema Registry secured with auth? checkbox in the UI for Apache Kafka configuration form (fig. 24) and fill in the username and password with the credentials displayed in the Connection Info page of the Instaclustr console (fig. 25).
With the second point, the truststore of the Instaclustr for Karapace Schema Registry is associated with the URL within the Connection Info page, so we don’t have to specifically add it to the UI for Apache Kafka configuration.
Configure Schema Registry
Your Schema Registry configuration form should look something like this:

NOTE: Read the Firewall Rules page of your Instaclustr for Apache Kafka cluster within the Instaclustr console and make sure that your IP address is listed under both sections: Kafka Allowed Addresses and Karapace Schema Registry Allowed Addresses.
Not having your IP address attached to the Firewall Rules of your cluster will not allow the UI for Apache Kafka console to connect to your Instaclustr for Apache Kafka cluster with Karapace Schema Registry bundle enabled.

Figure 25: Cluster Dropdown Displays Schema Registry – UI for Apache Kafka
Remember to always Validate your connection before submitting the configuration form within the UI for Apache Kafka console. Misconfiguring the cluster may result in unhealthy/offline cluster status or breaking the UI altogether (the UI for Apache Kafka console might crash).
- Let’s Test It Out!


If you configured your cluster correctly, the UI for Apache Kafka will display Schema Registry in your cluster’s dropdown (see fig. 27). Clicking on it will redirect you to the Schema Registry page:
 Figure 26: Schema Registry Page – UI for Apache Kafka
Add Schema Registry Subjects via Instaclustr Console
Since no schemas are available to display, we will need to add some. You can either add one by using the + Create Schema button or use the examples within the Instaclustr console (Karapace Schema Registry Connection Info | Examples).
Let’s run the first two examples from the Instaclustr console in a terminal window:

Figure 27: Karapace Schema Registry Connection Info | Examples – Instaclustr Console
Browse Through Karapace Schema Registry Subjects
Your Schema Registry page from the UI for Apache Kafka console should display the following schemas: one Arvo schema called test-key and one JSON schema called test-key-json-schema :

Figure 28: Schema Registry Page After Running the Connection Info Examples – UI for Apache Kafka
You can access the Schema Registry details by clicking on one of the table rows. This will redirect you to the subject’s page which contains information about the Actual version (you can edit the schema with the Edit Schema button). The Compare Versions button allows you to compare 2 different schema versions; you can also view different schema versions by clicking on one of the Old versions rows:

Figure 29: Schema Registry Details – UI for Apache Kafka
And there you have it!
We hope you feel more confident in how to use Kafka UI with our Instaclustr for Apache Kafka offering.
Ready to try it out yourself on the Instaclsutr console? Don’t miss the opportunity test it with our free trial!
Follow Along in the UI Series:
***
Please note that content provided on this page is purely for informational purposes and does not constitute a recommendation, endorsement or approval of any kind with respect to Third-Party Sites, any information, software, products, services, or materials found there or any results that may be obtained from using them.

Master Apache Kafka with expert insights
Struggling to strike the perfect balance between performance, scalability, and reliability in your Kafka ecosystem? Whether you're optimizing for zero downtime or maximizing resource efficiency, this guide has you covered.