Using the Karapace Schema Registry
This example shows how to use the Karapace Schema Registry to store data schemas for Kafka topics which we will generate using Apache Avro. The example will also demonstrate how to use the Schema Registry to produce and consume generated Apache Avro objects using an Instaclustr Kafka cluster.
Creating an Apache Kafka cluster with the Karapace Schema Registry add-on
Instaclustr now offers Karapace Schema Registry as an add-on for our Instaclustr for Apache Kafka Managed Service. To take advantage of this offering, you can now select ‘Karapace Schema Registry’ as an option when creating a new Apache Kafka cluster.
Note: Karapace Schema Registry cannot be used together with either Kafka Schema Registry (Old) or Kafka REST Proxy (Old). This is enforced through the console as well our API, and Terraform Provider. For example, on the console, enabling Karapace causes Kafka Schema Registry as well as Kafka REST Proxy to be disabled, and vice-versa.

If you wish to add the Karapace Schema Registry to an existing Apache Kafka cluster, or wish to migrate from Kafka Schema Registry to Karapace Schema Registry on an existing cluster, please contact [email protected].
Note: You can enable the Karapace Schema Registry add-on on a Kafka cluster with PCI enabled. However, for such clusters, you must design your applications to comply with PCI DSS standards and local regulations. i.e. Cardholder data (CHD), Sensitive Authentication Data (SAD), Personally Identifiable Information (PII) or other sensitive data must not be included in the message schema for your Kafka topics. Keeping sensitive data out of schema helps prevent accidental data leakage or data loss.
For definitions of what is considered Cardholder Data (CHD) or Sensitive Authentication Data (SAD), or Personally Identifiable Information, please refer to the PCI DSS standard (for CHD and SAD) and local regulations governing PII.
Using the Karapace Schema Registry
Now that the Karapace Schema Registry is up and running, you can use it in your applications to store data schemas for your Kafka topics. The following example is a Java application that uses the Karapace Schema Registry and Apache Avro to produce and consume some simulated product order events.
Allow access to your client application
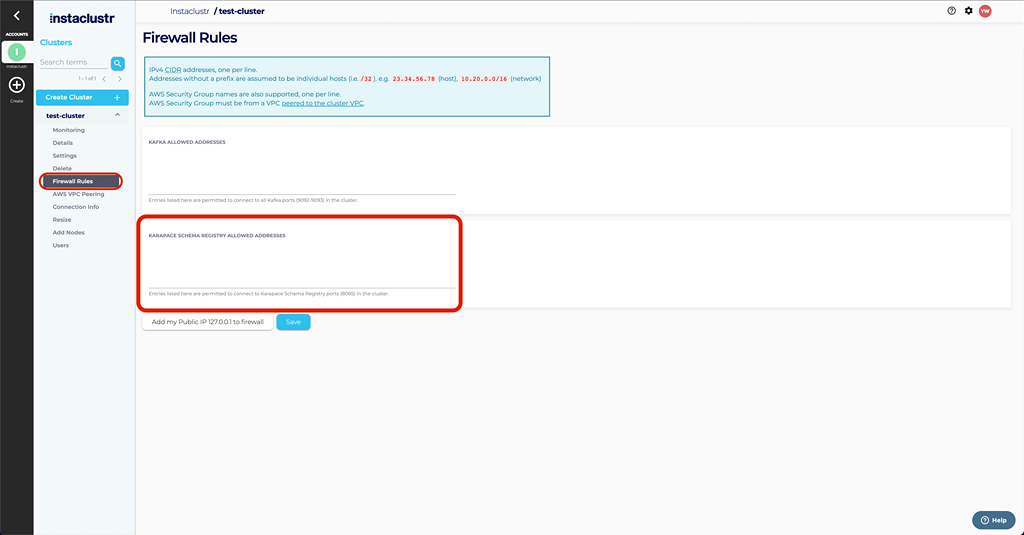
Before you can access our Karapace schema registry application, you need to open the firewall to your client application IP address. Once your cluster is up and running, go to Firewall Rules and add your client IP address to the Karapace Schema Registry Allowed Addresses.
Client Dependencies
Add the kafka_2.12, avro, and kafka-avro-serializer packages to your application. These packages are available via Maven (kafka_2.12, avro, kafka-avro-serializer). To add the following dependencies using Maven, add the following to your pom.xml file:
|
1 2 3 4 5 6 7 8 9 10 11 12 13 14 15 16 17 18 19 20 21 22 23 24 |
<repositories> <repository> <id>confluent</id> <url>https://packages.confluent.io/maven/</url> </repository> </repositories> <dependencies> <dependency> <groupId>io.confluent</groupId> <artifactId>kafka-avro-serializer</artifactId> <version>6.0.0</version> </dependency> <dependency> <groupId>org.apache.kafka</groupId> <artifactId>kafka_2.12</artifactId> <version>2.8.1</version> </dependency> <dependency> <groupId>org.apache.avro</groupId> <artifactId>avro</artifactId> <version>1.10.0</version> </dependency> </dependencies> |
You will also need the avro-tools utility in order to compile the data schema into a Java class. The avro-tools utility is available here.
Create the Avro Schema
Before you can produce or consume messages using Avro and the Karapace Schema Registry you first need to define the data schema. Create a file orderEventSchema.avsc with the following content:
|
1 2 3 4 5 6 7 8 9 10 11 12 13 14 15 16 17 18 19 20 21 22 23 24 25 26 |
{ "namespace": "orderEventSchema.avro", "type": "record", "name": "OrderEvent", "fields": [ { "name": "id", "type": "int" }, { "name": "timestamp", "type": { "type": "string", "logicalType": "timestamp-millis" } }, { "name": "product", "type": "string" }, { "name": "price", "type": "float" } ] } |
This file specifies a simple OrderEvent data serialization schema for product orders, with each OrderEvent containing an id, timestamp, product name, and price. For more information on the Avro serialization format see the documentation here.
Generate the Avro Object Class
With the schema file created, use the avro-tools utility to compile the schema file into an actual Java class:
|
1 |
java -jar ~/Downloads/avro-tools-1.8.2.jar compile schema orderEventSchema.avsc src/main/java/ |
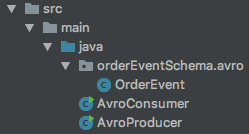
Note: The src/main/java file path at the end of the command can be located wherever you want so long as you make sure the generated class will be accessible by your application code. An example file structure is:
Create Kafka Topic
Use the guide here to create a new topic called orders.
Producing Avro Objects
Client configuration
Before creating a Kafka producer client, you first need to define the configuration properties for the producer client to use. In this example we provide only the required properties for the producer client. See here for the full list of configuration options.
The Connection Info page in the Instaclustr Console has these example settings pre-configured with your cluster’s IP addresses, username and password.
If your cluster has client ⇆ broker encryption enabled, create a new file named producer.properties with the following content, ensuring the password, truststore location, and bootstrap servers list are correct:
|
1 2 3 4 5 6 7 8 9 10 11 12 13 14 |
bootstrap.servers=<broker ip 1>:9092,<broker ip 2>:9092,<broker ip 3>:9092 schema.registry.url=https://ickarapaceschema:<karapace-schema-registry-password>@karapace-schema.<assigned-hosted-zone-id>.cnodes.io:8085 basic.auth.credentials.source=URL key.serializer=io.confluent.kafka.serializers.KafkaAvroSerializer value.serializer=io.confluent.kafka.serializers.KafkaAvroSerializer ssl.enabled.protocols=TLSv1.2,TLSv1.1,TLSv1 ssl.truststore.location=truststore.jks ssl.truststore.password=instaclustr ssl.protocol=TLS security.protocol=SASL_SSL sasl.mechanism=SCRAM-SHA-256 sasl.jaas.config=org.apache.kafka.common.security.scram.ScramLoginModule required username="ickafka" password="<password>"; |
If your cluster does not have client ⇆ broker encryption enabled, create a new file named producer.properties with the following content, ensuring the password and bootstrap servers list are correct:
|
1 2 3 4 5 6 7 8 9 10 |
bootstrap.servers=<broker ip 1>:9092,<broker ip 2>:9092,<broker ip 3>:9092 schema.registry.url=https://ickarapaceschema:<karapace-schema-registry-password>@karapace-schema.<assigned-hosted-zone-id>.cnodes.io:8085 basic.auth.credentials.source=URL key.serializer=io.confluent.kafka.serializers.KafkaAvroSerializer value.serializer=io.confluent.kafka.serializers.KafkaAvroSerializer security.protocol=SASL_PLAINTEXT sasl.mechanism=SCRAM-SHA-256 sasl.jaas.config=org.apache.kafka.common.security.scram.ScramLoginModule required username="ickafka" password="<password>"; |
Make sure the password and bootstrap servers list are correct.
Important Notes:
- To connect to your Kafka cluster over the private network, use port 9093 instead of 9092.
- Instaclustr’s implementation of Karapace Schema Registry is configured with basic authentication credentials in the format ‘user:password@karapace-schema-registry-url:8085’
basic.auth.credentials.source=URLis necessary for this basic authentication to work correctly.
Java Code
Now that the configuration properties have been set up you can create a Kafka producer.
First, load the properties:
|
1 2 3 4 5 6 7 |
Properties props = new Properties(); try { props.load(new FileReader("producer.properties")); } catch (IOException e) { e.printStackTrace(); } |
Once you’ve loaded the properties you can create the producer itself:
|
1 |
KafkaProducer<String, OrderEvent> producer = new KafkaProducer<>(props); |
Next, create some OrderEvents to produce:
|
1 2 3 4 5 6 7 8 9 10 11 12 13 14 15 16 |
ArrayList<OrderEvent> orderEvents = new ArrayList<>(); orderEvents.add(OrderEvent.newBuilder() .setId(1) .setTimestamp(getTimestamp()) .setProduct("Black Gloves") .setPrice(12).build()); orderEvents.add(OrderEvent.newBuilder() .setId(2) .setTimestamp(getTimestamp()) .setProduct("Black Hat") .setPrice(30).build()); orderEvents.add(OrderEvent.newBuilder() .setId(3) .setTimestamp(getTimestamp()) .setProduct("Gold Hat") .setPrice(35).build()); |
Where the getTimestamp() function is:
|
1 2 3 |
public static String getTimestamp(){ return new Timestamp(System.currentTimeMillis()).toString(); } |
Now turn each OrderEvent into a ProducerRecord to be produced to the orders topic, and send them:
|
1 2 3 4 5 |
for (OrderEvent orderEvent : orderEvents) { ProducerRecord<String, OrderEvent> record = new ProducerRecord<>("orders", orderEvent); producer.send(record); System.out.println("sent " + record); } |
Finally, use the producer’s flush() method to ensure all messages get sent to Kafka:
|
1 |
producer.flush(); |
Full code example:
|
1 2 3 4 5 6 7 8 9 10 11 12 13 14 15 16 17 18 19 20 21 22 23 24 25 26 27 28 29 30 31 32 33 34 35 36 37 38 39 40 41 42 43 44 45 46 47 48 49 50 51 52 53 54 55 56 57 58 59 60 |
import orderEventSchema.avro.OrderEvent; import org.apache.kafka.clients.producer.KafkaProducer; import org.apache.kafka.clients.producer.ProducerRecord; import java.io.FileReader; import java.io.IOException; import java.sql.Timestamp; import java.util.ArrayList; import java.util.Properties; public class AvroProducer { // Return the current date and time as a String public static String getTimestamp(){ return new Timestamp(System.currentTimeMillis()).toString(); } public static void main(String[] args) { // Load the properties file Properties props = new Properties(); try { props.load(new FileReader("producer.properties")); } catch (IOException e) { e.printStackTrace(); } // Create the producer from the properties KafkaProducer<String, OrderEvent> producer = new KafkaProducer<>(props); // Create some OrderEvents to produce ArrayList<OrderEvent> orderEvents = new ArrayList<>(); orderEvents.add(OrderEvent.newBuilder() .setId(1) .setTimestamp(getTimestamp()) .setProduct("Black Gloves") .setPrice(12).build()); orderEvents.add(OrderEvent.newBuilder() .setId(2) .setTimestamp(getTimestamp()) .setProduct("Black Hat") .setPrice(30).build()); orderEvents.add(OrderEvent.newBuilder() .setId(3) .setTimestamp(getTimestamp()) .setProduct("Gold Hat") .setPrice(35).build()); // Turn each OrderEvent into a ProducerRecord for the orders topic, and send them for (OrderEvent orderEvent : orderEvents) { ProducerRecord<String, OrderEvent> record = new ProducerRecord<>("orders", orderEvent); producer.send(record); System.out.println("sent " + record); } // Ensure all messages get sent to Kafka producer.flush(); } } |
Consuming Avro Objects
Client configuration
As in the producer example, before creating a Kafka consumer client you first need to define the configuration properties for the consumer client to use. In this example we provide only the required properties for the consumer client. See here for the full list of configuration options.
If your cluster has client ⇆ broker encryption enabled, create a new file named consumer.properties with the following content, ensuring the password, truststore location, and bootstrap servers list are correct:
|
1 2 3 4 5 6 7 8 9 10 11 12 13 14 15 |
bootstrap.servers=<broker ip 1>:9092,<broker ip 2>:9092,<broker ip 3>:9092 schema.registry.url=https://ickarapaceschema:<karapace-schema-registry-password>@karapace-schema.<assigned-hosted-zone-id>.cnodes.io:8085 basic.auth.credentials.source=URL group.id=avro key.deserializer=io.confluent.kafka.serializers.KafkaAvroDeserializer value.deserializer=io.confluent.kafka.serializers.KafkaAvroDeserializer ssl.enabled.protocols=TLSv1.2,TLSv1.1,TLSv1 ssl.truststore.location=truststore.jks ssl.truststore.password=instaclustr ssl.protocol=TLS security.protocol=SASL_SSL sasl.mechanism=SCRAM-SHA-256 sasl.jaas.config=org.apache.kafka.common.security.scram.ScramLoginModule required username="ickafka" password="<password>"; |
If your cluster does not have client ⇆ broker encryption enabled, create a new file named consumer.properties with the following content, ensuring the password and bootstrap servers list are correct:
|
1 2 3 4 5 6 7 8 9 10 11 |
bootstrap.servers=<broker ip 1>:9092,<broker ip 2>:9092,<broker ip 3>:9092 schema.registry.url=https://ickarapaceschema:<karapace-schema-registry-password>@karapace-schema.<assigned-hosted-zone-id>.cnodes.io:8085 basic.auth.credentials.source=URL group.id=avro key.deserializer=io.confluent.kafka.serializers.KafkaAvroDeserializer value.deserializer=io.confluent.kafka.serializers.KafkaAvroDeserializer security.protocol=SASL_PLAINTEXT sasl.mechanism=SCRAM-SHA-256 sasl.jaas.config=org.apache.kafka.common.security.scram.ScramLoginModule required username="ickafka" password="<password>"; |
Make sure the password and bootstrap servers list are correct.
Important Notes:
- To connect to your Kafka cluster over the private network, use port 9093 instead of 9092.
- Instaclustr’s implementation of Karapace Schema Registry is configured with basic authentication credentials in the format ‘user:password@karapace-schema-registry-url:8085’
basic.auth.credentials.source=URLis necessary for this basic authentication to work correctly.
Java Code
Now that the configuration properties have been setup you can create a Kafka consumer.
First, load the properties:
|
1 2 3 4 5 6 7 |
Properties props = new Properties(); try { props.load(new FileReader("consumer.properties")); } catch (IOException e) { e.printStackTrace(); } |
Once you’ve loaded the properties you can create the consumer itself:
|
1 |
KafkaConsumer<String, OrderEvent> consumer = new KafkaConsumer<>(props); |
Before you can consume messages, you need to subscribe the consumer to the topic(s) you wish to receive messages from, in this case the orders topic:
|
1 |
consumer.subscribe(Collections.singletonList("orders")); |
Finally, continually poll Kafka for new messages, and print each OrderEvent received:
|
1 2 3 4 5 6 7 8 9 10 11 |
try { while (true) { ConsumerRecords<String, OrderEvent> records = consumer.poll(1000); for (ConsumerRecord<String, OrderEvent> record : records) { System.out.println(record.value()); } } } finally { consumer.close(); } |
Full code example:
|
1 2 3 4 5 6 7 8 9 10 11 12 13 14 15 16 17 18 19 20 21 22 23 24 25 26 27 28 29 30 31 32 33 34 35 36 37 38 39 40 41 42 43 |
import orderEventSchema.avro.OrderEvent; import org.apache.kafka.clients.consumer.ConsumerRecord; import org.apache.kafka.clients.consumer.ConsumerRecords; import org.apache.kafka.clients.consumer.KafkaConsumer; import java.io.FileReader; import java.io.IOException; import java.util.Collections; import java.util.Properties; public class AvroConsumer { public static void main(String[] args) { // Load the properties file Properties props = new Properties(); try { props.load(new FileReader("consumer.properties")); } catch (IOException e) { e.printStackTrace(); } // Create the consumer from the properties KafkaConsumer<String, OrderEvent> consumer = new KafkaConsumer<>(props); // Subscribe the consumer to the orders topic consumer.subscribe(Collections.singletonList("orders")); // Continually poll Kafka for new messages, and print each OrderEvent received try { while (true) { ConsumerRecords<String, OrderEvent> records = consumer.poll(1000); for (ConsumerRecord<String, OrderEvent> record : records) { System.out.println(record.value()); } } } finally { consumer.close(); } } } |
Putting Them Together
Now that you have a consumer and producer set up, it’s time to combine them.
Start the Consumer
Start the consumer before starting the producer, because by default, consumers only consume messages that were produced after the consumer started.
Start the Producer
Now that the consumer is set up and ready to consume messages, you can start your producer.
If the consumer and producer are set up correctly the consumer should output the messages sent by the producer shortly after they were produced, for example:
|
1 2 3 |
{"id": 1, "timestamp": "2018-06-27 15:02:17.253", "product": "Black Gloves", "price": 12.0} {"id": 2, "timestamp": "2018-06-27 15:02:17.253", "product": "Black Hat", "price": 30.0} {"id": 3, "timestamp": "2018-06-27 15:02:17.253", "product": "Gold Hat", "price": 35.0} |
Transparent, fair, and flexible pricing for your data infrastructure: See Instaclustr Pricing Here