Welcome to Part 1 in our series about user interfaces (UI) to help you visualize and monitor data within your Instaclustr for Apache Kafka® cluster!
So, you’ve been using Apache Kafka® for a while now and are starting to wonder: how can I get the most out of it in a more user-friendly way? This is where user interfaces (UI for short) for Apache Kafka come into play. We did a bit of digging and found something that quickly caught our attention: akhq.io.
In this post, we will discuss exactly what AKHQ is, how it works, the pros and cons, and how it can be used alongside Instaclustr for Apache Kafka clusters.
First, let’s cover the basics:
What is Instaclustr for Apache Kafka?
Instaclustr for Apache Kafka is a fully managed service for Kafka provided by Instaclustr. You can easily spin up a Kafka cluster by following our documentation, as well as connect to it through our console. Don’t miss out on using our free trial for creating your first cluster – this blog will walk you through using Instaclustr for Apache Kafka and AKHQ together.
Why Should I Use a UI With Apache Kafka?
Utilizing a UI when working with Kafka offers you the capability to visualize and interact with topics, consumer groups, cluster node, metrics and more. The Instaclustr Console is designed to help the user in provisioning and monitoring Instaclustr for Apache Kafka clusters, as well as many other applications. The Instaclustr UI also offers examples on how to connect to your clusters and how to visualize the Kafka data.
While the focus of this blog post is AKHQ, there are several other tools you can use for Apache Kafka such as the Instaclustr Console, UI for Apache Kafka, Kafdrop, Lenses.io, or CMAK. Some of these tools we will similarly introduce to our readers in future blog posts, as they’re worth exploring, too.
Out of All These Options, Why AKHQ?
AKHQ is a versatile tool in exploring and managing data inside a Kafka cluster. Since it works with Kafka clusters, it allows you to connect with both SASL and SSL security protocols.
It is an application that is highly configurable, so you can add authentication and roles to the application when using it within an organization, or you can remove it when running it in Docker, Kubernetes, or as a stand-alone application.
The AKHQ documentation offers information for installing, configuration and how to connect your Kafka clusters to it. Most importantly for our customers, AKHQ is an open source project (licenced under Apache 2.0) with an active and engaged community.
Why Do I Need Another UI When Instaclustr for Apache Kafka Has a Console?
The Instaclustr Console is designed for easily provisioning and monitoring Instaclustr for Apache Kafka clusters. While the Connection Info page examples offer an overview on how to connect to your clusters (see the Connection Info tab in the left-hand side navigation options for your Instaclustr for Apache Kafka cluster), they do not display the Kafka data within the console. Hence, another UI specialized in data visualization is useful for such use cases.
What is AKHQ?
AKHQ, previously known as KafkaHQ, is an open source Kafka GUI (Graphical User Interface) for Apache Kafka. It can help with managing topics, consumers group, Schema Registry, Kafka® Connect, and more. A console such as AKHQ enables teams to search and explore data in Kafka clusters while supporting its administration and integration within their ecosystems (source: akhq.io).
Since its initial release in November 2018, AKHQ has been available under the Apache 2.0 and the JetBrains’ Open Source licences, has over 180 contributors, and has released almost 40 official versions (0.24.0 is the latest release at the time of this writing).
What Are Some Key Aspects of AKHQ?
- It allows you to centralize cluster management: It offers a multi-cluster vision, available in multi-cloud environments.
- It allows you to explore data: You can access, search, and get insights from topics.
- You can manage data: Topics, consumer groups, cluster configurations, users and ACLs are all easy to manage.
- You can integrate it with different Kafka add-on bundles: It offers compatibility with lightweight directory access protocol (LDAP), role-based access control (RBAC), Schema Registry, Kafka Connect and more.
What Are the Limitations of AKHQ?
Despite the many benefits that come with utilizing AKHQ, there are some drawbacks that you should consider.
One of AKHQ console’s limitations is that you cannot run the application unless you have a Kafka cluster to connect it to. Another disadvantage is that if you want to add new clusters, you need to update the configuration file again with the new connection properties. Not being able to connect the cluster through the console can be a major disadvantage, since manually configuring the console can introduce errors that are not so easily discovered.
Can I Use AKHQ With Instaclustr Managed Apache Kafka® Clusters?
Absolutely!
But Why Would I Use Both Consoles—the Instaclustr Console and AKHQ?
While the AKHQ console is good for displaying data, the Instaclustr console is really good at deploying, managing, and monitoring all components of the data infrastructure.
This means that the AKHQ console is specifically designed to display and modify Kafka data as well as visualizing the configuration properties. The Instaclustr console is a multi-application platform that is primarily designed to simplify the provisioning and monitoring of them, with limited Apache Kafka specific features. By combining them, you get a complex system that combines both the easy process of provisioning and monitoring an Instaclustr for Kafka cluster (the Instaclustr console) and the data visualization from it (the AKHQ console).
What Are the Steps for Using AKHQ With a Kafka Cluster?
Connecting an Instaclustr for Apache Kafka cluster with the AKHQ is pretty straightforward, and in this section we will demonstrate how to connect an Instaclustr for Apache Kafka cluster to the AKHQ console.
We will then dive into how to spin up the Instaclustr for Apache Kafka cluster, how to configure the AKHQ application (we used version 0.24.0, the latest version available at the time of this writing) to display the cluster’s data, and how to browse and modify that data within the AKHQ console.
Step 1. Provision an Instaclustr for Apache Kafka® Cluster
Remember that free trial cluster we talked about? Now’s the time to use it!
Go to our website and create a new account on our console. Follow the Creating an Apache Kafka Cluster documentation and create an Instaclustr for Apache Kafka cluster.
One important thing to keep in mind is that you need to have your IP address added to the Firewall Rules. This is necessary because when you are configuring the AKHQ application you are connecting to the Instaclustr for Apache Kafka cluster. This can be done via console in the setup steps or after the cluster reached the RUNNING state. By the end of the linked documentation, you should have a running Instaclustr for Apache Kafka cluster.
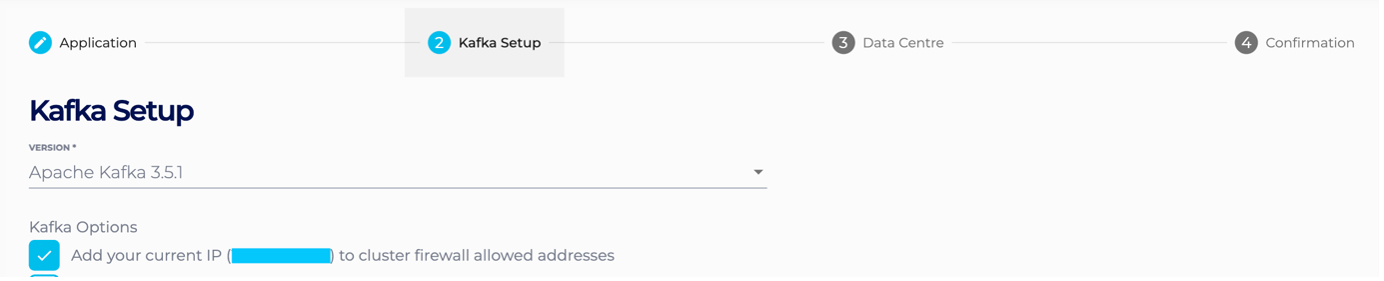
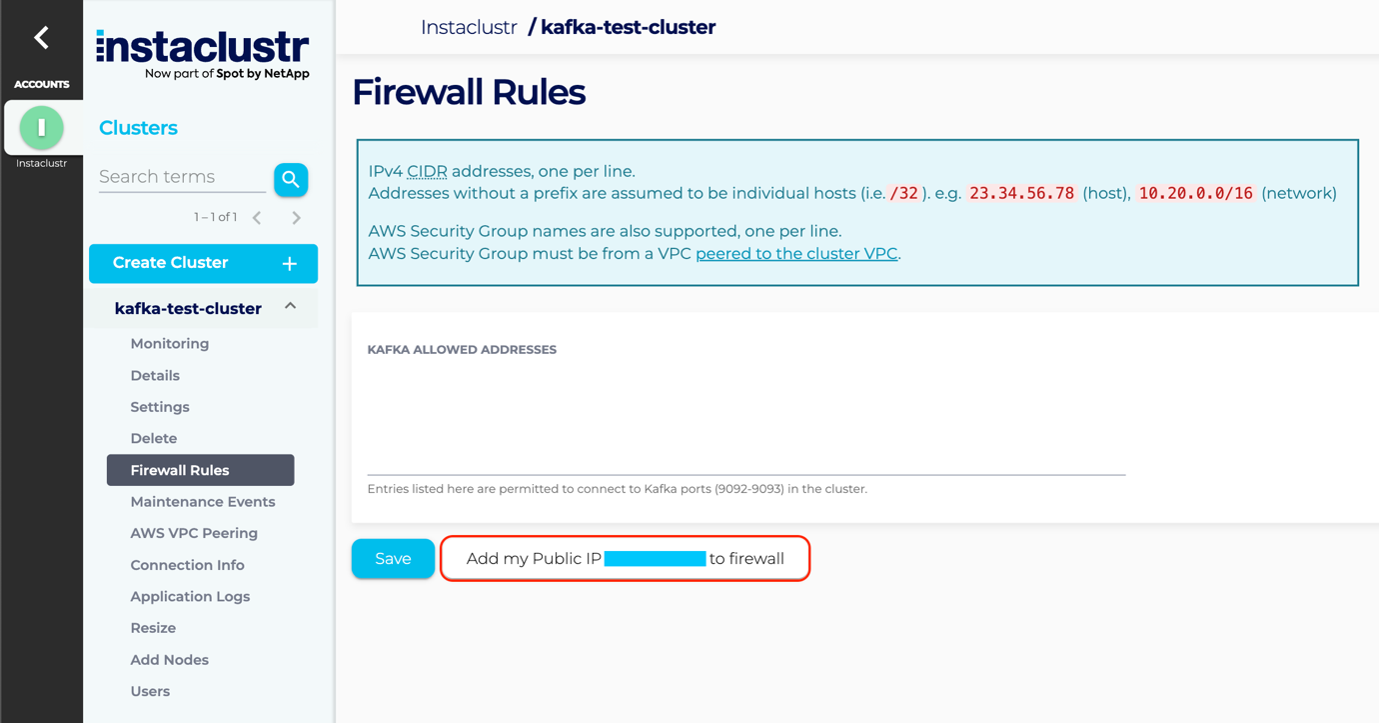
Figure 2: Add your IP address to Firewall Rules – Firewall Rules Page
Step 2. Prerequisites and Initial Setup
For this demo, we will configure a stand-alone AKHQ application with JWT authentication, multiple cluster connections, admin group user, and UI configuration. While AKHQ offers more individual user permissions (groups), we will be using the admin one to access all the available features of AKHQ.
There are a few more things you need to do before you can run your AKHQ application:
- Install Java 11 and download the latest jar file from AKHQ release page.
- Configure the application.yml file. This file will contain the GUI configuration for the AKHQ console (see the template provided in the next step).
- You cannot run your AKHQ application unless you have your akhq.connections configured properly (more about this in Step 4).
The AKHQ console’s primary goal is to display information, meaning that:
- If the akhq.connections are missing, you will not be able to run the application
- Without the right cluster properties, you will not be able to connect to and retrieve the information from the Instaclustr for Apache Kafka cluster.
Step 3. Configure the AKHQ Application (application.yml File)
As previously mentioned, the application.yml file contains all the required configurations for the AKHQ console to run. In order to get your AKHQ console running, you need to create an application.yml file in the directory of your AKHQ jar and configure it using the template file below.
NOTE: The Micronaut JWT Authentication is using a “secret” string to generate a JWT token. When configuring your application.yml file, don’t forget to change the secret string.
|
1 2 3 4 5 6 7 8 9 10 11 12 13 14 15 16 17 18 19 20 21 22 23 24 25 26 27 28 29 30 31 32 33 34 35 36 37 38 39 40 41 42 43 44 45 46 47 48 49 50 51 52 53 54 55 56 57 58 59 60 61 62 63 64 65 66 67 68 69 70 71 72 |
# Remember to change pleaseChangeMe to your own secret string micronaut: security: enabled: true token: jwt: signatures: secret: generator: secret: pleaseChangeMe akhq: connections: kafka-test-cluster: properties: bootstrap.servers: "44.220.7.249:9092,52.207.4.212:9092,3.232.172.144:9092" security.protocol: SASL_PLAINTEXT sasl.mechanism: SCRAM-SHA-256 sasl.jaas.config: org.apache.kafka.common.security.scram.ScramLoginModule required username="ickafka" password="<ickafka’s password>"; # You can change the user group as shown in the AKHQ documentation. For # this configuration file, we set the default user as admin. security: default-group: admin # More interesting configurations for the AKHQ console pagination: page-size: 25 # number of elements per page (default : 25) threads: 16 # Number of parallel threads to resolve page # Topic list display options (optional) topic: retention: 172800000 # default retention period when creating topic partition: 3 # default number of partition when creating topic replication: 3 # default number of replicas when creating topic internal-regexps: # list of regexp to be considered as internal (internal topic can't be deleted or updated) - "^_.*$" - "^.*_schemas$" - "^.*connect-config$" - "^.*connect-offsets$1" - "^.*connect-status$" stream-regexps: # list of regexp to be considered as internal stream topic - "^.*-changelog$" - "^.*-repartition$" - "^.*-rekey$" skip-consumer-groups: false # Skip loading consumer group information when showing topics skip-last-record: false # Skip loading last record date information when showing topics show-all-consumer-groups: false # Expand list of consumer groups instead of showing one. # Retry options for topic operations retry: topic-exists: # Delay between retries when checking for existence of newly created topics. This is needed as it might take the kafka broker a few seconds to create new topics. delay: "3s" # Topic display data options (optional) topic-data: size: 50 # max record per page (default: 50) poll-timeout: 1000 # The time, in milliseconds, spent waiting in poll if data is not available in the buffer. kafka-max-message-length: 1000000 # Max message length allowed to send to UI when retrieving a list of records in bytes. # Ui Global Options (optional) ui-options: topic: default-view: ALL # default list view (ALL, HIDE_INTERNAL, HIDE_INTERNAL_STREAM, HIDE_STREAM). Overrides default skip-consumer-groups: false # Skip loading consumer group information when showing topics. Overrides default skip-last-record: true # Skip loading last record date information when showing topics. Overrides default show-all-consumer-groups: true # Expand list of consumer groups instead of showing one. Overrides default. topic-data: sort: NEWEST # default sort order (OLDEST, NEWEST) (default: OLDEST). Overrides default |
NOTE: The AKHQ is highly configurable, which means that you can customize the pagination, UI options, and the way the Kafka topics are displayed. Make sure to check the AKHQ Configuration documentation for more details.
Step 4. Let’s put them together… Is it working?
The most important part about configuring the AKHQ application is adding the akhq.connections properties properly. These properties are used by AKHQ to connect to your Instaclustr for Apache Kafka cluster, so let’s have a look at our example.
As the kafka-test-cluster that we created in Step 1 above has reached RUNNING status, we can now access the Connection Info page on the Instaclustr console. This page contains the required properties for akhq.connections configuration:
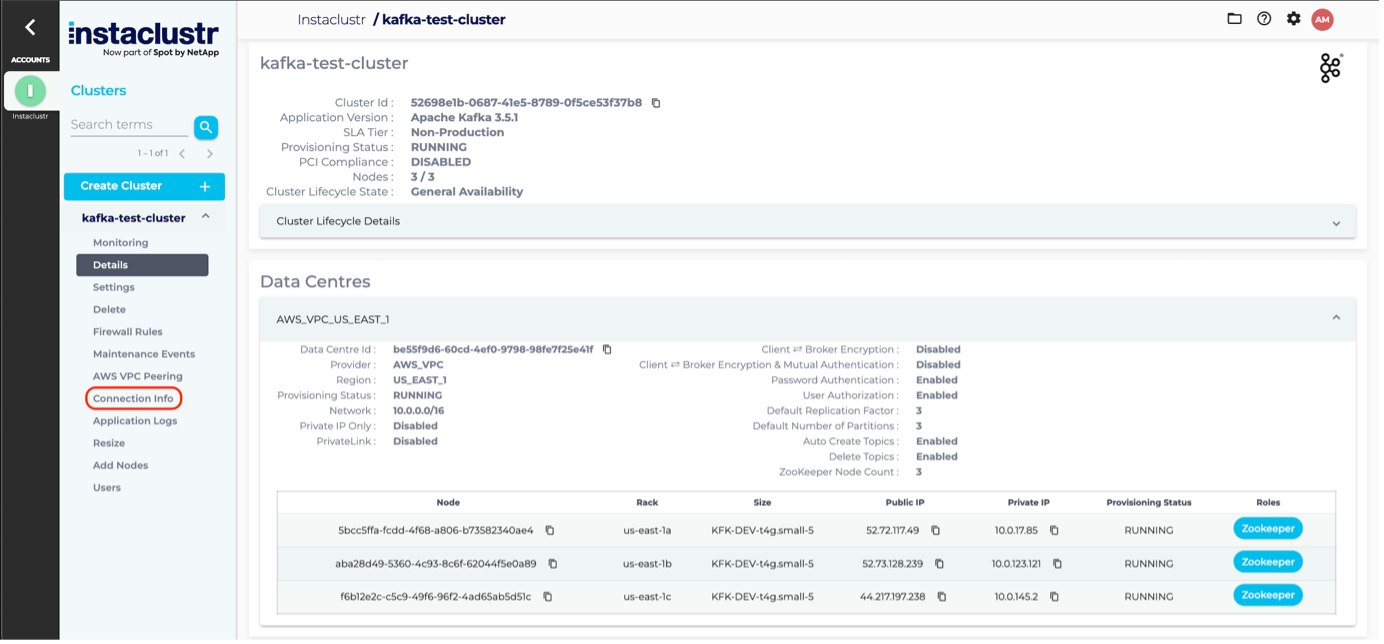
Figure 3: Accessing Connection Info Page via Instaclustr Console
After you open the Connection Info page, you should be able to retrieve the following information:
- the public IP addresses for the bootstrap servers
- the kafka.properties configurations from the Examples|CLI section
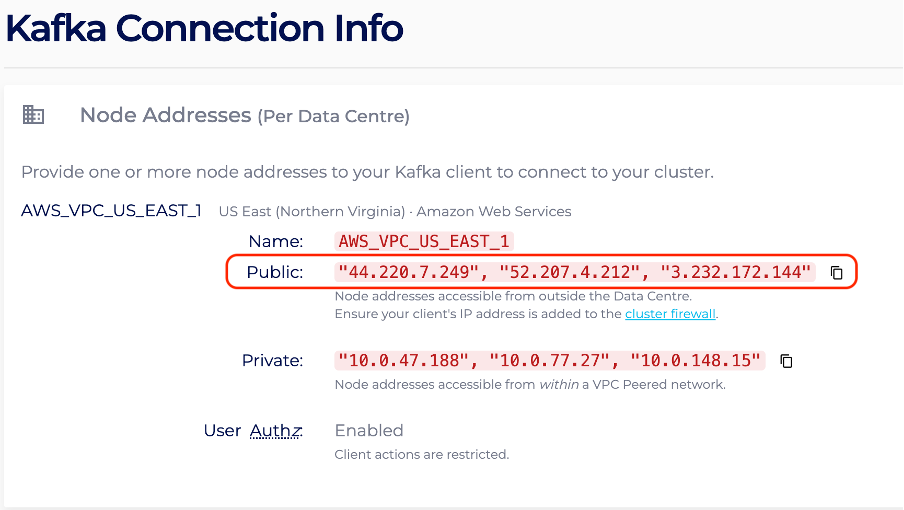
Figure 4: Public IP Addresses from Connection Info Page
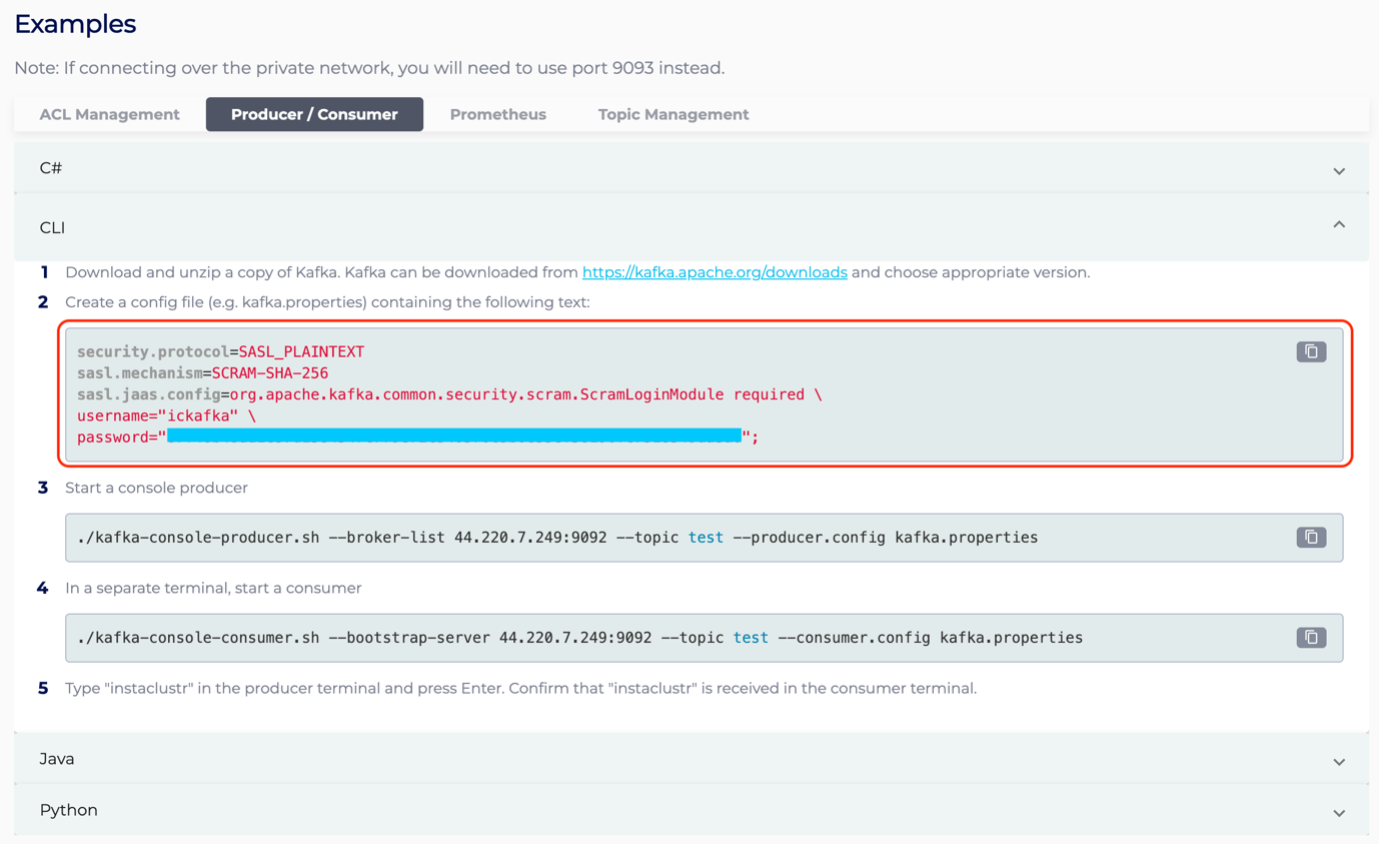
Figure 5: kafka.properties Configurations via Connection Info Page
These properties should be added in the application.yml file under akhq.connections, using the following pattern (we will use the example above):
|
1 2 3 4 5 6 7 8 |
akhq: connections: kafka-test-cluster: properties: bootstrap.servers: "44.220.7.249:9092,52.207.4.212:9092,3.232.172.144:9092" security.protocol: SASL_PLAINTEXT sasl.mechanism: SCRAM-SHA-256 sasl.jaas.config: org.apache.kafka.common.security.scram.ScramLoginModule required username="ickafka" password="<ickafka’s password>"; |
If we want to add another Instaclustr for Apache Kafka cluster to the AKHQ console, we will use the pattern below:
|
1 2 3 4 5 6 7 8 9 10 11 12 |
akhq: connections: kafka-cluster-1: properties: bootstrap.servers: "<node1-public-ip>:9092,<node2-public-ip>:9092,<node3-public-ip>:9092" <more properties from the Connection Info page> kafka-cluster-2: properties: bootstrap.servers: "<node1-public-ip>:9092,<node2-public-ip>:9092,<node3-public-ip>:9092" <more properties from the Connection Info page> |
NOTE: As previously mentioned, you must have your current IP address attached to the Firewall Rules of your Instaclustr for Apache Kafka cluster. You will not be able to connect your AKHQ console to your cluster otherwise.
Now that everything is set, you can launch the application with java –Dmicronaut.config.files=/path/to/application.yml -jar akhq.jar and then go to https://localhost:8080/ to test it out. Your AKHQ application should look something like this:
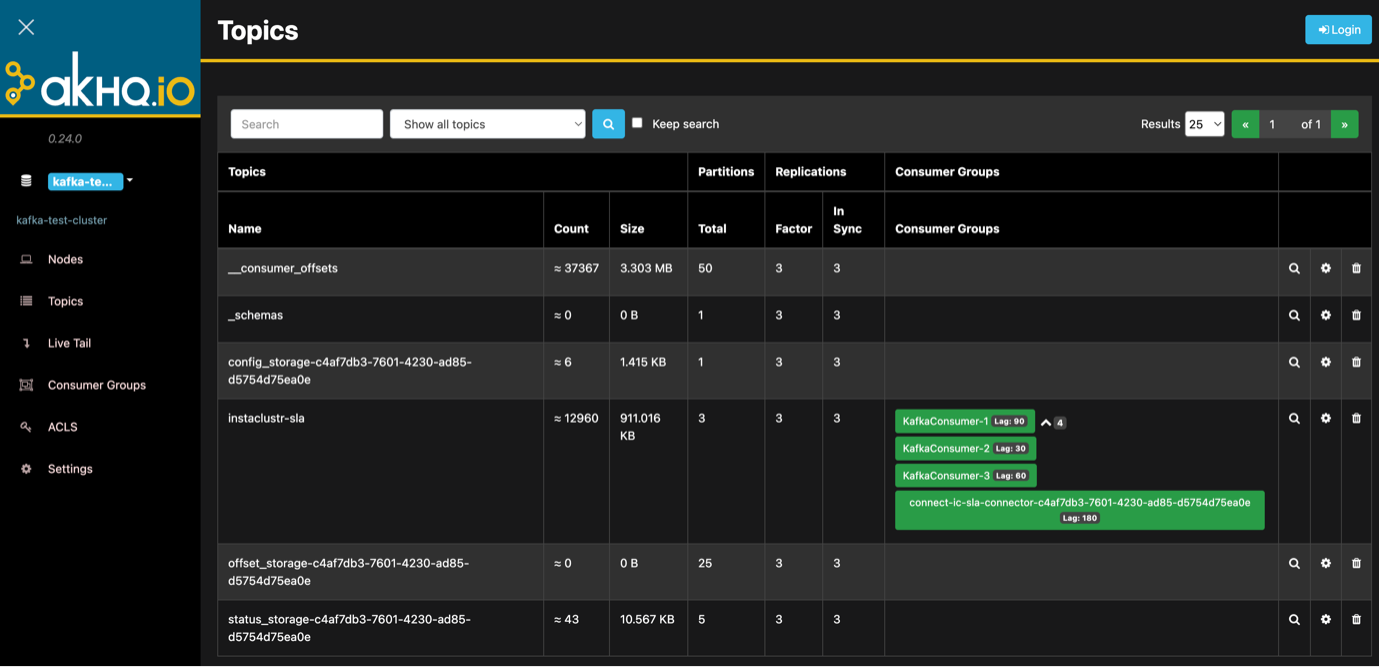
Figure 6: Instaclustr for Apache Kafka Cluster Topics via AKHQ Console
The default page of the AKHQ console is the Topics page, where you have a list of all the available topics in your Instaclustr for Apache Kafka cluster. The topics page also offers features such as creating, deleting, and modifying topics. You can also access each topic’s data, partitions, consumer groups, logs, ACLs, and configurations by simply clicking the magnifying glass on the right side of each table row.
You can also see the Nodes page, which displays information such as the nodes’ public IP addresses, the Active Controller, partitions’ percentages, and the corresponding racks.
Another couple of interesting pages contain information about the Consumer Groups and ACLs. You can either get an overview of the table contents of each page or go deeper and see each row individually through the magnifying glass icon on the right.
For mTLS Instaclustr for Apache Kafka clusters, all we have to do is follow the Instaclustr documentation on how to provision it and then configure the AKHQ cluster properties to use SSL configurations instead of SASL. Feel free to refer to our mTLS documentation when trying to connect the AKHQ console to your mTLS Instaclustr for Apache Kafka cluster.
Can I Add Instaclustr for Kafka Connect Cluster to AKHQ?
Yes!
If you have an Instaclustr for Kafka® Connect cluster connected to your Instaclustr for Apache Kafka cluster, all you have to do is follow the pattern shown below. We will use the kafka-test-cluster for this example and will connect a Instaclustr for Kafka Connect cluster to it as shown in the Instaclustr documentation. Since the SSL communication is enabled by default between the Instaclustr for Apache Kafka cluster and the Instaclustr for Kafka Connect cluster, we need the truststore.jks key downloaded from the Connection Info page of our Instaclustr for Kafka Connect cluster.
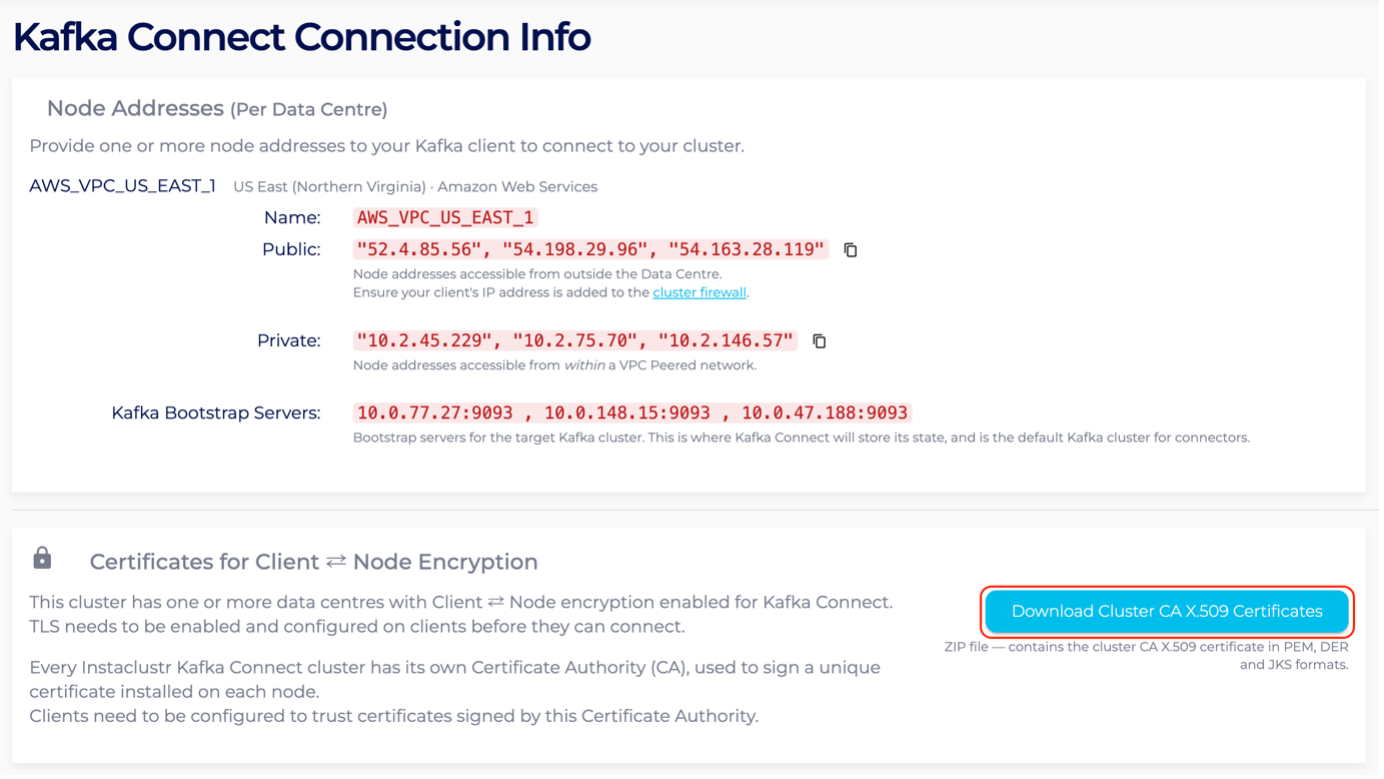
Figure 7: Download the Certificates for your Kafka Connect Cluster via Connection Info Page
Retrieve your Instaclustr for Kafka Connect credentials and the Instaclustr for Kafka Connect URL from the Connection Info page examples and update your application.yml file as shown below:
|
1 2 3 4 5 6 7 8 9 10 11 12 13 14 15 |
akhq: connections: kafka-test-cluster: properties: bootstrap.servers: "44.220.7.249:9092,52.207.4.212:9092,3.232.172.144:9092" security.protocol: SASL_PLAINTEXT sasl.mechanism: SCRAM-SHA-256 sasl.jaas.config: org.apache.kafka.common.security.scram.ScramLoginModule required username="ickafka" password="<ickafka’s password>"; connect: - name: kafka-connect-1 url: "https://52.4.85.56:8083/" basic-auth-username: ic_kc_user basic-auth-password: <ic_kc_user’s password> ssl-trust-store: /path-to-your/truststore.jks ssl-trust-store-password: <password> |

Figure 8: Kafka Connect Credentials via Connection Info Page
Add your current IP address to the Instaclustr for Kafka Connect’s Firewall Rules and then relaunch the AKHQ application. The console should now display the Connect page like this:
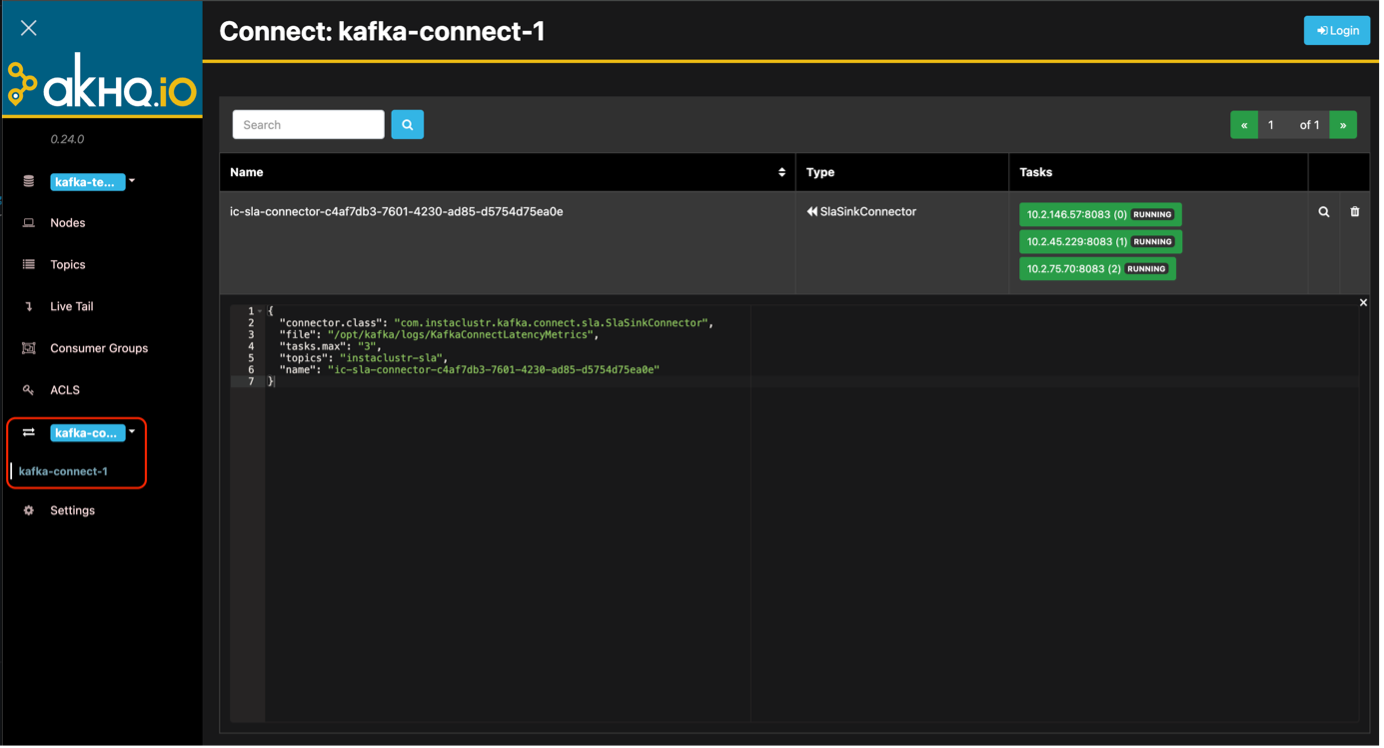
Figure 9: Kafka Connect via AKHQ Console
You can now visualize the details for each entry in the table through the magnifying glass and see information regarding the Instaclustr for Kafka Connect’s tasks and configurations.
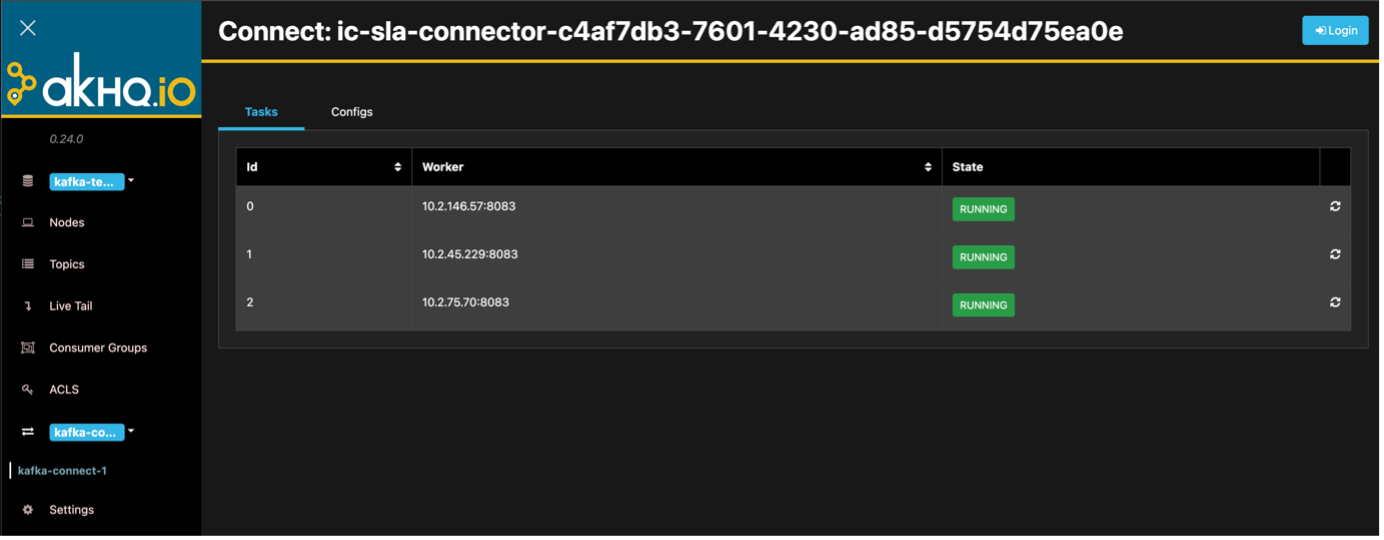
Figure 10: Kafka Connect – Connector Details
What About Using a Schema Registry With AKHQ?
Whether you use Karapace Schema Registry or Kafka Schema Registry, the configuration template is the same for both cases.
Let’s say you provisioned an Instaclustr for Apache Kafka cluster with Karapace Schema Registry. The Connection Info page should have a designated tab which contains the Credentials and Connection Information. Going back to our example, for our kafka-test-cluster we need the following information from the Instaclustr’s console:
- Karapace Schema Registry URL
- Karapace Schema Registry username and password
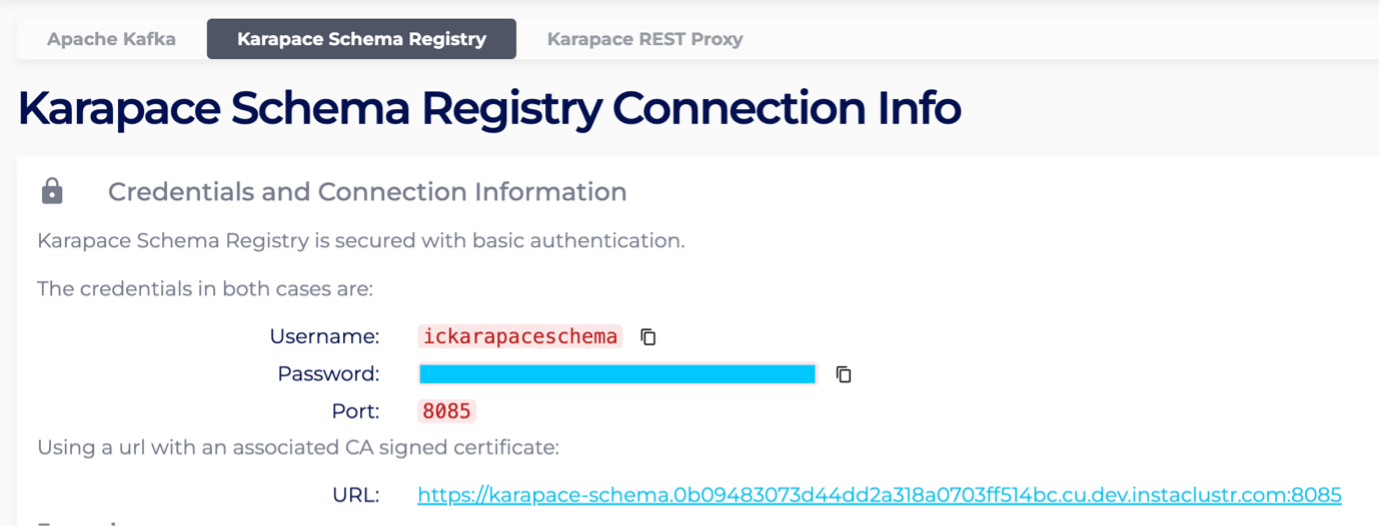
Figure 11: Karapace Schema Registry Credentials and Information via Instaclustr Console
The AKHQ configuration for our kafka-test-cluster will look like this:
|
1 2 3 4 5 6 7 8 9 10 11 12 13 14 15 16 17 18 19 |
akhq: connections: kafka-test-cluster: properties: bootstrap.servers: "44.220.7.249:9092,52.207.4.212:9092,3.232.172.144:9092" security.protocol: SASL_PLAINTEXT sasl.mechanism: SCRAM-SHA-256 sasl.jaas.config: org.apache.kafka.common.security.scram.ScramLoginModule required username="ickafka" password="<ickafka’s password>"; connect: - name: kafka-connect-1 url: "https://52.4.85.56:8083/" basic-auth-username: ic_kc_user basic-auth-password: <ic_kc_user’s password> ssl-trust-store: /path-to-your/truststore.jks ssl-trust-store-password: <password> schema-registry: url: "https://karapace-schema.0b09483073d44dd2a318a0703ff514bc.cu.dev.instaclustr.com:8085" basic-auth-username: ickarapaceschema basic-auth-password: <ickarapaceschema’s password> |
After relaunching the application, the AKHQ console will now display a Schema Registry tab, which contains a list of available schemas for our cluster. Since no schemas were added, the schemas table will be empty (see the snip below):
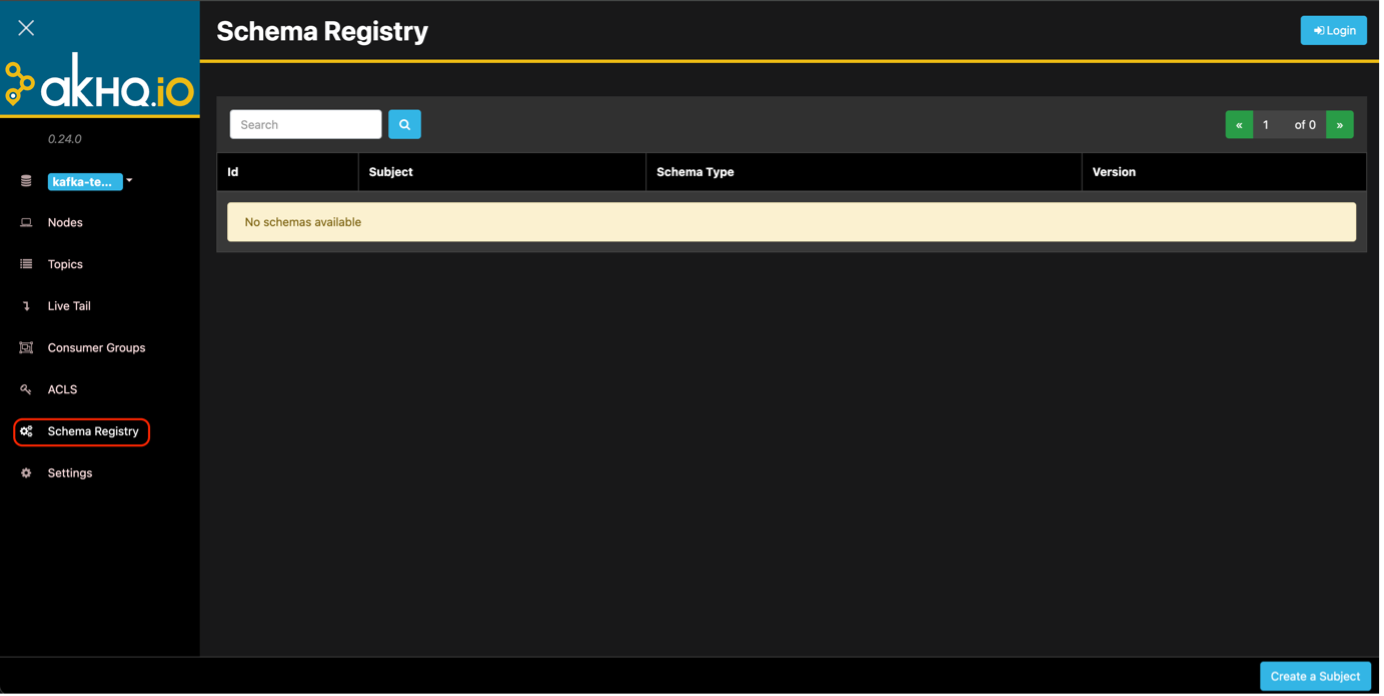
Figure 12: Schema Registry via AKHQ Console – No Schema Available
To add a schema, we can either use the Create a Subject button on the bottom of the Schema Registry’s page, or we can use the examples available on the Instaclustr’s console. For this demo, we will use the already generated examples in the Instaclustr’s console.
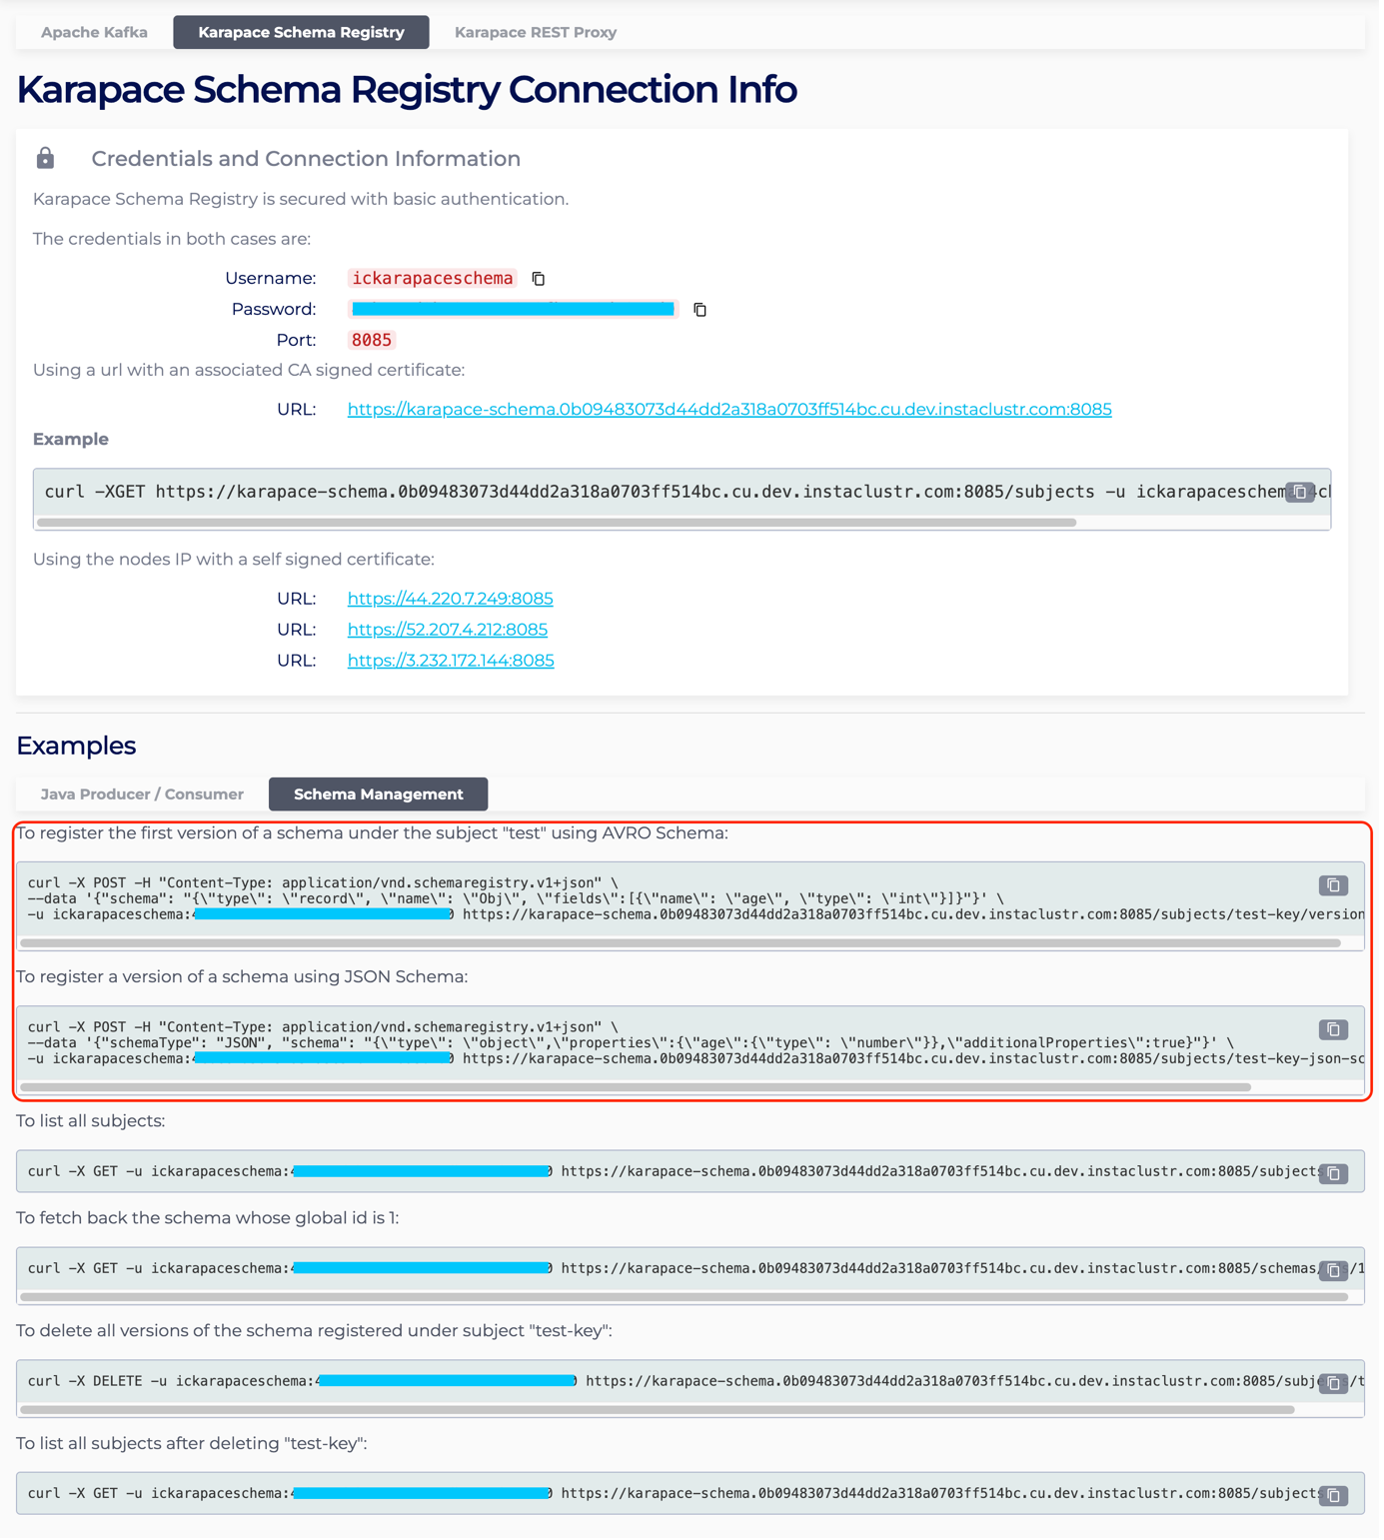
Figure 13: Generating Schemas via Instaclustr Console’s Examples
The first 2 examples will generate an AVRO schema and a JSON schema, which will be displayed in the AKHQ schema as shown below. You can now see that the Schema Registry table shows 2 schemas—an AVRO schema and a JSON schema.

Figure 14: Schema Registry via AKHQ Console – All Available Schemas
You can easily visualize each subject by accessing the details through the magnifying glass icon. You can update the schema or see the schema’s history under the Versions tab.
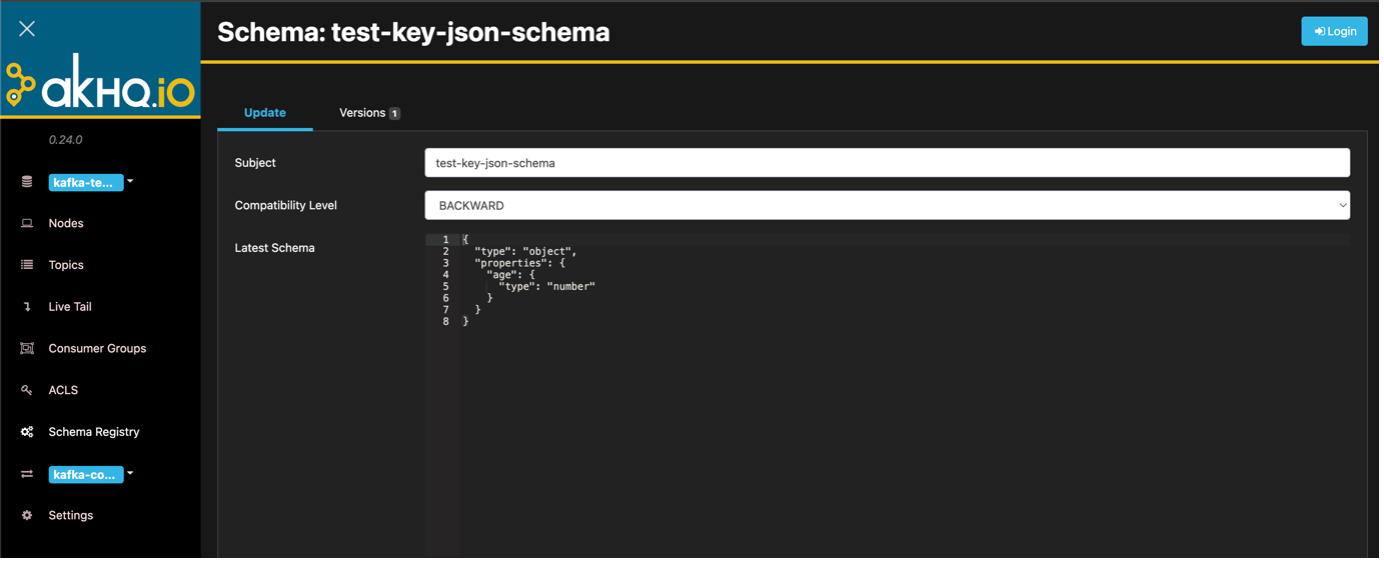
Figure 15: Schema Registry via AKHQ Console – test-key-json-schema Subject
And there you have it! A nice Apache Kafka UI for your Instaclustr for Apache Kafka cluster.
Look out for Part 2 in this series where we’ll explore how to use UI for Apache Kafka!
* * *
Please note that content provided on this page is purely for informational purposes and does not constitute a recommendation, endorsement or approval of any kind with respect to Third-Party Sites, any information, software, products, services, or materials found there or any results that may be obtained from using them.

Master Apache Kafka with expert insights
Struggling to strike the perfect balance between performance, scalability, and reliability in your Kafka ecosystem? Whether you're optimizing for zero downtime or maximizing resource efficiency, this guide has you covered.