Kafka Integration
On the Instaclustr platform, ClickHouse clusters can be integrated with Kafka clusters and their topics to enable ingesting data from Kafka into ClickHouse using the Kafka Table Engine.
Once you have finished integrating your ClickHouse cluster with Kafka (as outlined in “How To Enable” below), you will need to manually create a ClickHouse table using the Kafka Table Engine to store the ingested data permanently (as outlined in “How To Use ClickHouse Kafka Table Engine” below).
Clusters on the NetApp Instaclustr managed platform are secured through egress firewall rules to protect against data exfiltration. Integrating with Kafka adds a whitelist rule to the firewall enabling access.
Prerequisites
- ClickHouse cluster, running in your Instaclustr account (integration supported by all ClickHouse versions available on the Instaclustr platform)
- Refer to this guide on creating a ClickHouse cluster
- Kafka cluster(s) you wish to integrate your ClickHouse cluster with, running in the same Instaclustr account (integration supported by all Kafka versions available on the Instaclustr platform)
- Refer to this guide on creating a Kafka cluster
- Topics on each Kafka cluster you wish to integrate your ClickHouse cluster with
- Refer to this guide on creating a Kafka topic
Limitations
- The integration procedure outlined in this guide does not support pushing data from ClickHouse to Kafka
- Integration with Kafka clusters not managed by NetApp Instaclustr is not supported
- Having Private Network enabled on either your ClickHouse or Kafka clusters is only supported under the following conditions:
- Your ClickHouse and Kafka clusters are VPC-peered (refer to this guide on setting up VPC peering); or
- Your ClickHouse and Kafka clusters are RIYOA provisioned in the same VPC
- Your Kafka cluster(s) must not have PrivateLink enabled
How To Enable
You can set up ClickHouse Kafka integrations using the Instaclustr Console, API, or Terraform provider. Steps for using each method are provided below.
Using the Console
The following steps explain how to integrate a ClickHouse cluster with a Kafka cluster and topic.
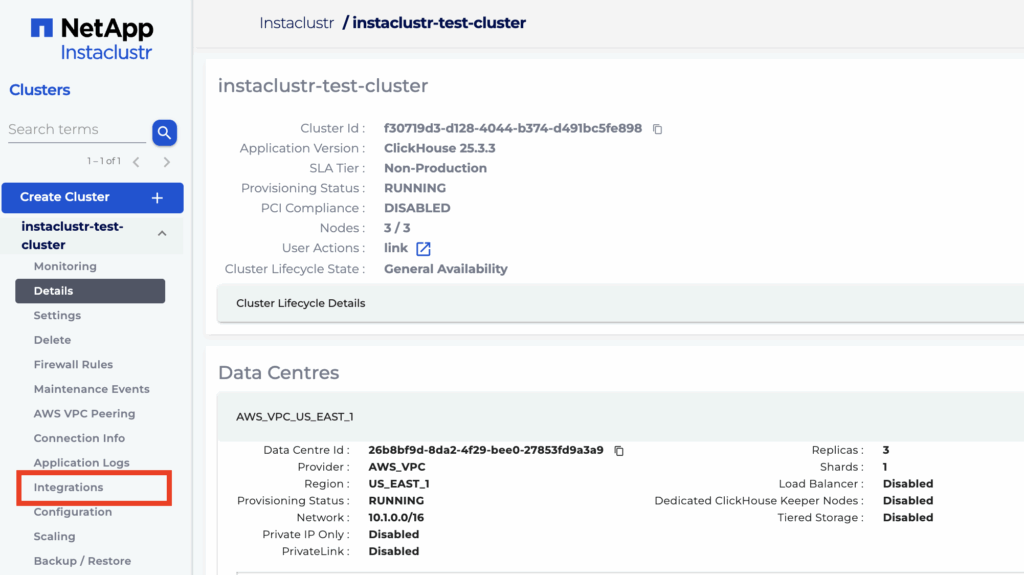
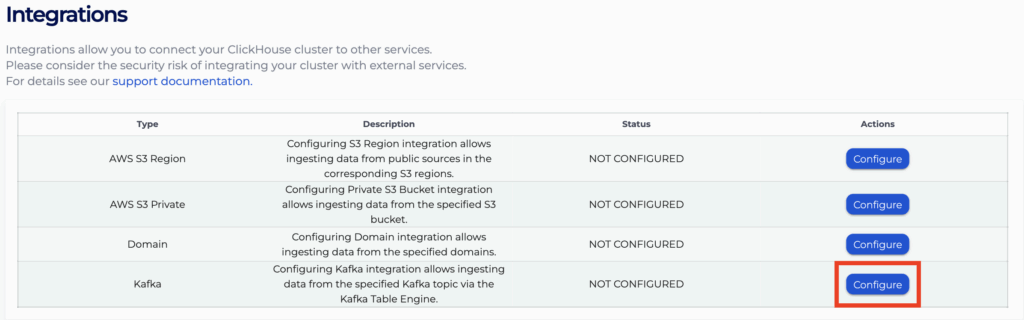
- First expand the ClickHouse cluster options on the sidebar and select the “Integrations” option in Console. The page will show available types of integrations to add to the cluster.
- Click “Configure” for the row with type “Kafka”.
- The first dropdown box will display all Kafka clusters created and running in your Instaclustr account. Select the cluster you wish to integrate with.

- In the textbox type in the topic(s) you wish to integrate with for your selected Kafka cluster. Multiple topics can be inputted by separating each with a comma (,).
NOTE: Topic names differing only in their use of dots (.), dashes (-) or underscores (_) as separators are considered identical

- From the second dropdown box select the expected format of messages within the inputted Kafka topics. If your required format is not listed as an option, contact [email protected] for assistance.

NOTE: Each integration of a Kafka cluster and topic can only be associated with one message format. - Click the “Add” button to display the desired new integrations in the “Kafka Integrations” table below as “PENDING”.
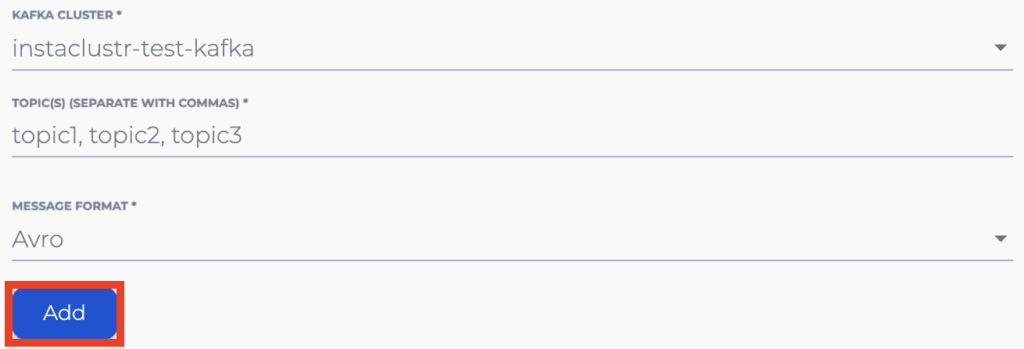
NOTE: All the newly pending integrations will be added with the format specified in Step 5. Repeat Steps 4-6 for any other integrations with differing expected formats you may have.
- The “Kafka Integrations” table lists the information for all pending and applied integrations, indicated by the “Status” field. Clicking the “Remove” button for a pending integration will stop it from being applied, while clicking it for an applied integration will mark it to be deleted.

- In the event that any integrations you previously tried to add had failed, they will be listed in the “Kafka Integrations (Failed)” table. Clicking the “Remove” button for a failed integration will mark it to be permanently deleted, while checking the “Retry failed integrations” box at the bottom of the table will mark the remaining integrations to be retried.

- Once you are satisfied with any new integrations pending for addition and preexisting ones pending for removal, click the “Apply” button to apply the changes and return to the “Integrations” page. Clicking the “Cancel” button will return to the main “Integrations” page while discarding any pending changes.

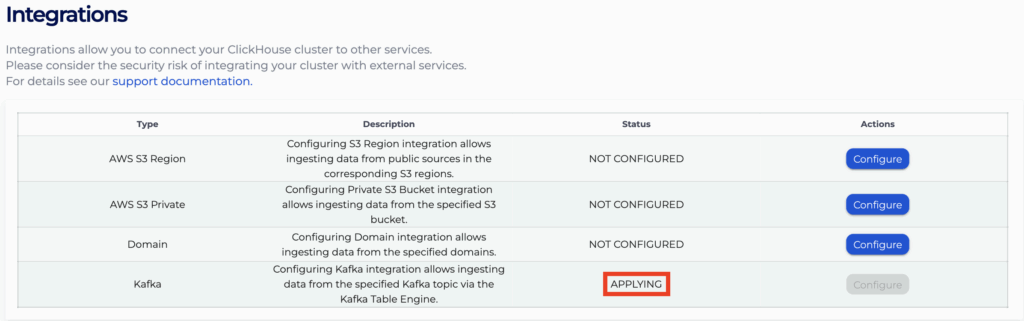
- After returning to the “Integrations” page, the status for the “Kafka” integration row will indicate that your changes are being processed and you will be momentarily blocked from accessing the page. After processing has finished, you will be allowed to re-enter the page and see the statuses for your integrations.
NOTE: If any of your attempted integrations appear in the “Kafka Integrations (Failed)” table, ensure that its topic already exists for the corresponding Kafka cluster before retrying the integration. If the topic already exists and retrying the integration does not seem to resolve the issue by itself, contact [email protected] for assistance.
Using the API
You can create, view, and remove your Kafka integrations using the Instaclustr API. An example for the POST endpoint is provided below.
- Endpoint: https://api.instaclustr.com/cluster-management/v2/resources/applications/clickhouse/integrations/kafka/v2
- Payload:
12345678{"clusterId": "<clickhouse-cluster-id>","kafkaCluster": {"id": "<kafka-cluster-id>","topicName": "<topic-name>","format": "<format>"}} - Example response:
1234567891011{"clusterId": "68ae9de1-9acf-4d95-8d90-3f3d1b48a92a","id": "8f6061dc-ccfe-4129-bc79-b88bd2988f08","kafkaCluster":{ "format": "JSON","id": "056d550e-bce0-4e52-b90c-1bd9cd2755f0","topicName": "test1"},"namedCollection": "kafka_cluster_056d550e_bce0_4e52_b90c_1bd9cd2755f0_topic_test1","status": "APPLYING"} - Note: the namedCollection parameter is included in the response body for creating the Kafka queue table on ClickHouse.
For details on all API endpoints, please refer to the Instaclustr API documentation.
Using the Terraform Provider
You can manage your Kafka integrations using Terraform, where each integration is treated as a separate resource. The steps are as follows:
- Follow this support document to set up your Instaclustr Terraform Provider V2.
- Populate the resource template below with information about the integration.
12345678resource "instaclustr_clickhouse_integration_kafka_v2" "example" {cluster_id = "<clickhouse_cluster_id>"kafka_cluster {format = "<format>"topic_name = "<topic_name>"id = "<kafka_cluster_id>"}} - Follow the Terraform init, plan, and apply cycle to provision the integration.
For details of the Terraform resources, please refer to the Instaclustr Terraform documentation
How To Use ClickHouse Kafka Table Engine
Once you have successfully integrated a Kafka cluster and topic with your ClickHouse cluster, you will be able to use the Kafka Table Engine to store the ingested Kafka messages permanently in a ClickHouse table. To create the tables required for this, follow the steps below.
- Create a Queue Table
Create a queue table using the Kafka Table Engine with the “Named Collection” of the integration (copy from the “Kafka Integrations” table on Console), which tells the engine which Kafka-topic integration to make use of:
12CREATE TABLE <DESIRED QUEUE TABLE NAME> (<DATA FIELDS>)ENGINE=Kafka(<NAMED COLLECTION>);
This table will serve as the source for data streaming from Kafka.
NOTE: Refer to the official documentation for more detailed instructions on configuring the Kafka Table Engine. - Create a Destination Table
Create a destination table using the MergeTree Engine:
123CREATE TABLE <DESIRED DESTINATION TABLE NAME> (<DATA FIELDS>)ENGINE=MergeTreeORDER BY <DESIRED DATA FIELDS FOR ORDERING>;
This table will store the processed data from the Kafka Table Engine. - Create a Materialized View
Create a materialized view to automatically process records from the queue table and insert them into the destination table:
12CREATE MATERIALIZED VIEW <DESIRED VIEW NAME> TO <DESTINATION TABLE NAME> ASSELECT <DATA FIELDS> FROM <QUEUE TABLE NAME>;
Once created, the materialized view will start continuously reading data from the queue table and ingesting it into the destination table as background operations (refer to this guide for instructions on adding data to a Kafka topic). - Verification: Query the Destination Table
You can then query the destination table to access the processed data.
1SELECT * FROM <DESTINATION TABLE NAME>;
By following these steps, you will have set up a continuous data ingestion pipeline from Kafka to ClickHouse using the Kafka Table Engine. As new messages are produced in the specified topic, they will be automatically processed and inserted into your destination table.