Apache Spark Streaming, Apache Kafka and Apache Cassandra Tutorial
| For Legacy Support Purposes Only |
|---|
This tutorial builds on our basic “Getting Started with Instaclustr Spark and Cassandra” tutorial to demonstrate how to set up Apache Kafka and use it to send data to Spark Streaming where it is summarised before being saved in Cassandra.
The high-level steps to be followed are:
- Set up your environment.
- Build the sample.
- Run the sample.
Table of Contents
Set Up Your Environment
To set up your environment, first follow the step in sections 1 (Provision a cluster with Cassandra and Spark), 2 (Set up a Spark client), 3 (Configure Client Network Access) in the tutorial here: https://www.instaclustr.com/support/documentation/cassandra-add-ons/apache-spark/getting-started-with-instaclustr-spark-cassandra/
(Just a minor change in the configuration would be selecting “AMI: Ubuntu Server 16.04 LTS (HVM), SSD Volume Type as the AMI”)
Ensure that your Spark client machine has Java 8 installed and selected as the preferred Java version:
|
1 2 3 |
sudo add-apt-repository ppa:webupd8team/java sudo apt-get update sudo apt-get install oracle-java8-installer |
And finally select Java 8 as the preferred Java version:
|
1 |
sudo update-alternatives --config java |
Use the following commands to install sbt in order to build the example project:
|
1 2 3 4 |
echo "deb https://dl.bintray.com/sbt/debian /" | sudo tee -a /etc/apt/sources.list.d/sbt.list sudo apt-key adv --keyserver hkp://keyserver.ubuntu.com:80 --recv 2EE0EA64E40A89B84B2DF73499E82A75642AC823 sudo apt-get update sudo apt-get install sbt |
Once you have configured a Cassandra + Spark cluster and a Spark client, follow the instructions here to create a Kafka cluster. Once you’ve created a Kafka cluster you will need to allow the IP addresses of the Spark client and Spark cluster through your Kafka cluster firewall. You can find the IP addresses of your Spark cluster in the cluster’s Details tab on the Instaclustr console. You can add the Spark client and Spark cluster IPs to your Kafka cluster’s allowed addresses in the cluster’s Settings tab on the Instaclustr console.
Build the sample
We have uploaded a sample project including the build, source and configuration files to Github. To build the project:
- Clone the repository:
12cd ~git clone https://github.com/instaclustr/sample-KafkaSparkCassandra.git
The repository (https://github.com/instaclustr/sample-KafkaSparkCassandra.git) contains 7 active files:
- build.sbt: the project file that specifies dependencies.
- cassandra-count.conf: configuration file with IPs, username, password.
- kafka.properties: configuration file with Kafka connection details.
- kafka.properties.template: template kafka.properties file for a Kafka cluster without Client ⇆ Broker encryption.
- kafka-secure.properties.template: template kafka.properties file for a Kafka cluster with Client ⇆ Broker encryption.
- src/main/scala/KafkaSparkCassandra.scala: the scala file with the actual application. The code is heavily commented to explain what is going on.
- project/assembly.sbt: sbt plugin config to package dependencies in the target jar.
When executed, the application will:
- Connect directly from the Spark driver to Cassandra, create a keyspace and table to store results if required.
- Start a Spark streaming session connected to Kafka. Summarise messages received in each 5 second period by counting words. Save the summary result in Cassandra.
- Stop the streaming session after 30 seconds.
- Use Spark SQL to connect to Cassandra and extract the summary results table data that has been saved.
- Build the project:
12cd sample-KafkaSparkCassandrasbt assembly
This may take a while the first time as all the required dependencies will need to be downloaded.
- Setup your cassandra-count.conf configuration file like so:
12345678spark.master spark://<Spark ip address 1>:7077,<Spark ip address 2>:7077,<Spark ip address 3>spark.executor.memory 1gspark.cassandra.connection.host <Cassandra ip address>spark.cassandra.auth.username <Cassandra username>spark.cassandra.auth.password <Cassandra password>spark.serializer org.apache.spark.serializer.KryoSerializerspark.eventLog.enabled truespark.eventLog.dir .
Fill in the <> brackets with appropriate values. You can find the IP addresses of your Spark cluster in the cluster’s Details tab on the Instaclustr console. Similarly, you can find the connection details for your Cassandra cluster on the cluster’s Connection Details tab on the console.
- Setup your kafka.properties configuration file. If your Kafka cluster does not have Client ⇆ Broker encryption enabled, copy and modify the kafka.properties.template file into kafka.properties:
123456789bootstrap.servers=<Kafka ip 1>:9092,<Kafka ip 2>:9092,<Kafka ip 3>:9092group.id=spark-streamingkey.deserializer=org.apache.kafka.common.serialization.StringDeserializervalue.deserializer=org.apache.kafka.common.serialization.StringDeserializersecurity.protocol=SASL_PLAINTEXTsasl.mechanism=SCRAM-SHA-256sasl.jaas.config=org.apache.kafka.common.security.scram.ScramLoginModule requiredusername="ickafka"password="<Kafka password>";Filling in the <> brackets with appropriate values. If your Kafka cluster does have Client ⇆ Broker encryption enabled, copy and modify the kafka-secure.properties.template into the kafka.properties file:
1234567891011bootstrap.servers=<Kafka ip 1>:9092,<Kafka ip 2>:9092,<Kafka ip 3>:9092group.id=spark-streamingssl.enabled.protocols=TLSv1.2,TLSv1.1,TLSv1ssl.truststore.location = truststore.jksssl.truststore.password = instaclustrssl.protocol=TLSsecurity.protocol=SASL_SSLsasl.mechanism=SCRAM-SHA-256sasl.jaas.config=org.apache.kafka.common.security.scram.ScramLoginModule requiredusername="ickafka"password="<Kafka password>";You can find all the connection details for your Kafka cluster on the cluster’s Connection Details page. If your cluster has client ⇆ broker encryption enabled make sure to use the “Download Cluster CA X.509 Certificates” button and move the truststore.jks file contained in the archive to the sample-KafkaSparkCassandra directory.
Run the sample
We need to run both the Kafka producer test harness and the Spark sample app at the same time so it’s easiest if you have two console windows open. Once you have the two windows open do the following:
- Follow the guide here to start a Kafka console producer, changing the topic name to the wordcount-input topic.
- In the second console window, submit your Spark job. If your Kafka cluster does not have Client ⇆ Broker encryption enabled, use the following command:
12cd ~/sample-KafkaSparkCassandra/~/spark-2.1.1-bin-hadoop2.6/bin/spark-submit --properties-file cassandra-count.conf --class KafkaSparkCassandra target/scala-2.11/cassandra-kafka-streaming-assembly-1.0.jar
If your Kafka cluster does have Client ⇆ Broker encryption enabled, use this command instead:
12cd ~/sample-KafkaSparkCassandra/~/spark-2.1.1-bin-hadoop2.6/bin/spark-submit --properties-file cassandra-count.conf --files truststore.jks --class KafkaSparkCassandra target/scala-2.11/cassandra-kafka-streaming-assembly-1.0.jarMake sure the path to truststore.jks is correct. You can download the truststore.jks file by going to your cluster’s Connection Details page and using the “Download Cluster CA X.509 Certificates” button.
- Switch back to the Kafka producer console window and enter some test messages for 20 seconds or so.
- Switch back to the Spark console window, you should see something like the following which is the summary from a single Spark streaming batch:
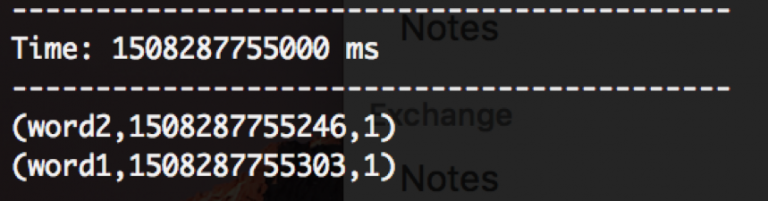
- After 30 seconds of streaming has passed, you should see an output like so, which is the dump of the word_count Cassandra table:
