Create a Multi-Region Cadence Cluster
Getting started
Multi-region Cadence is using Cadence Cross-DC replication and Cadence Global Domain to support replication of workflow execution across clusters. We can set up 2 Cadence clusters running in multi-region mode. The first Cadence cluster we call PRIMARY and the second one we call SECONDARY. Global domains on it can only be active in one of the clusters at any point in time.
There are 2 stages to creating the Multi-region Cadence cluster:
- Stage 1 – Create a Cadence Cluster. For a step-by-step guide to creating a Cadence cluster, you can read this guide.
- Stage 2 – Create a SECONDARY Cadence Cluster with the multi-region settings enabled and target the Cadence Cluster created in stage 1. We will automatically set the targeted Cadence Cluster to be working as PRIMARY in a multi-region setup. We only support Multi-region Cadence in the “Packaged Solution” and “Cadence Cluster Only” provisioning approach.
Stage 1 – Create a Cadence Cluster
(you can read this guide)
Step 1 – Create an Apache Cassandra® cluster
For a step-by-step guide to creating an Apache Cassandra® cluster, you can read this guide.
For an abbreviated guide, you can do as follows:
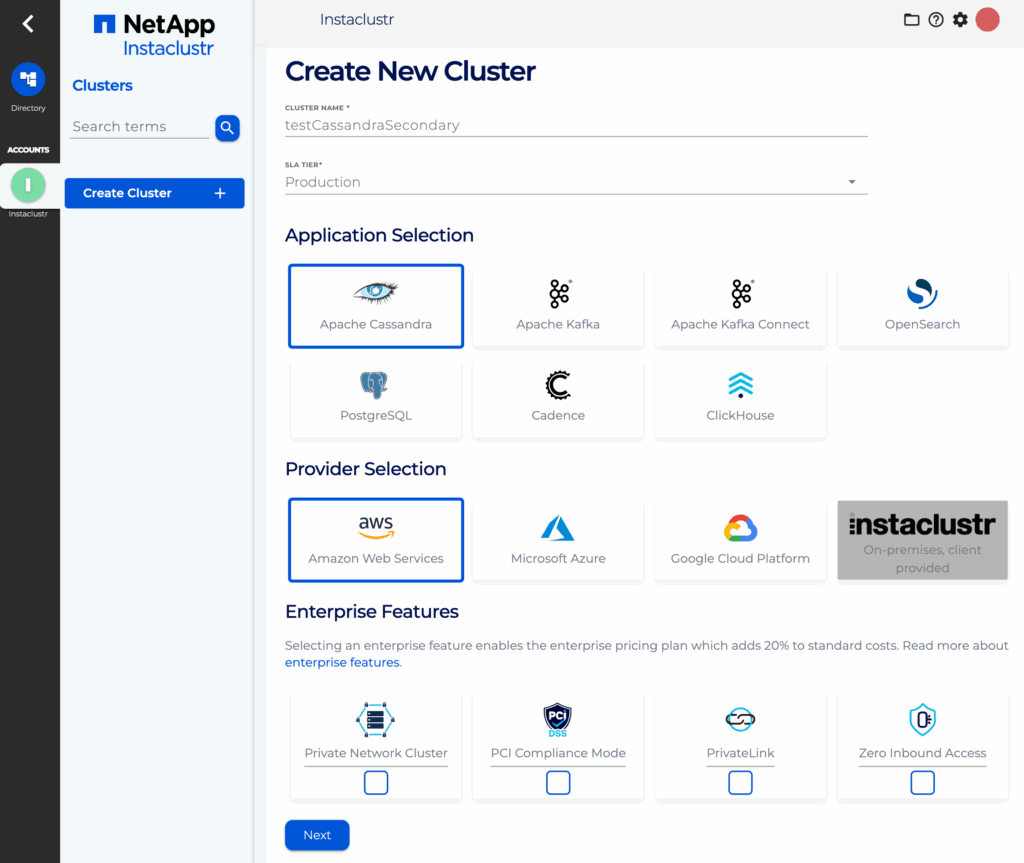
- Log into the Instaclustr Console and click the Create Cluster button. This will take you to the wizard for creating a new cluster.
- Give your cluster a name, select Apache Cassandra as the application, select your desired Cloud Service Provider and click Next.

- Under the Cassandra Setup page, select Apache Cassandra version 5.0.3. Also check “Use private IPs broadcast for auto-discovery“.

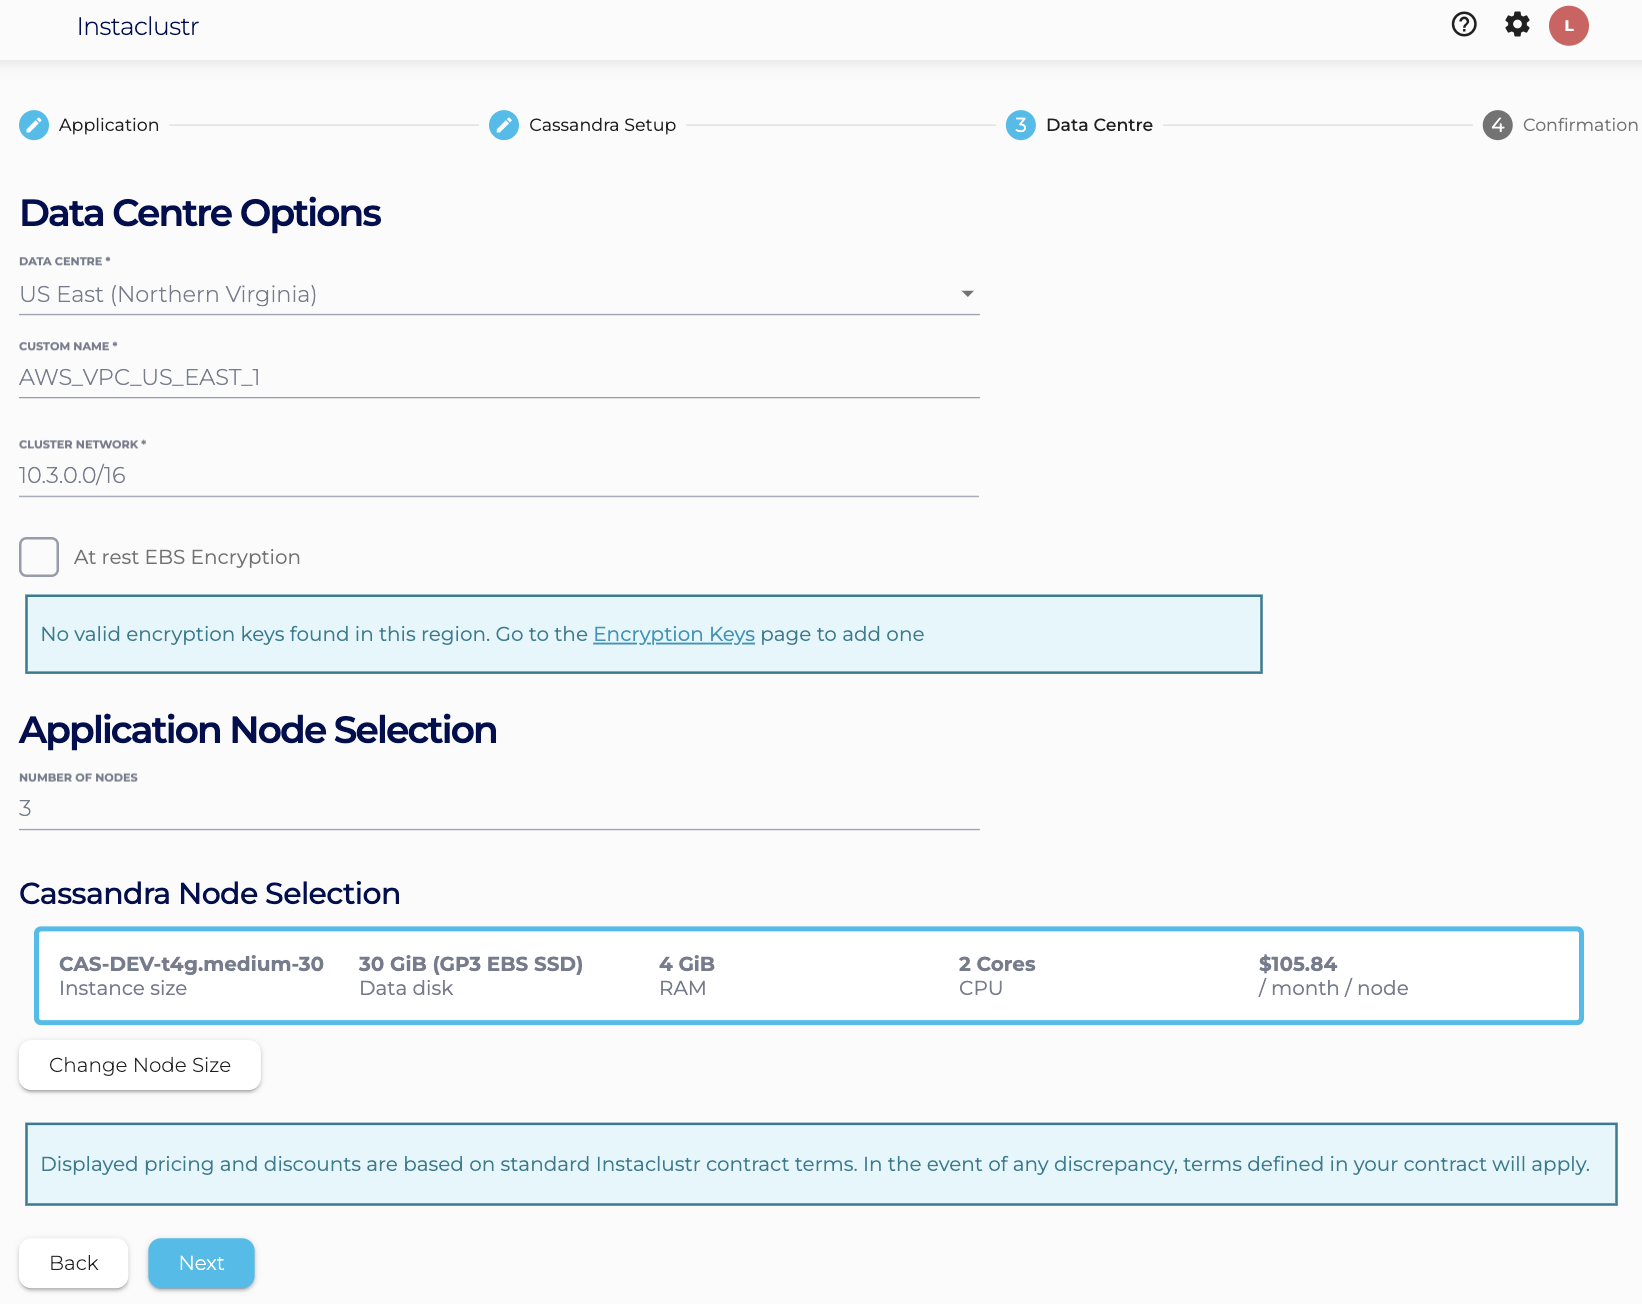
- Under the Data Centre options, select:
- Data Centre Region,
- Cluster Network address block,
- The number of nodes for your application,
- Your desired node size (recommend using a node size with at least 4GB of memory).
- Note : Free trial users should use the defaults (i.e. 3 developer sized nodes).
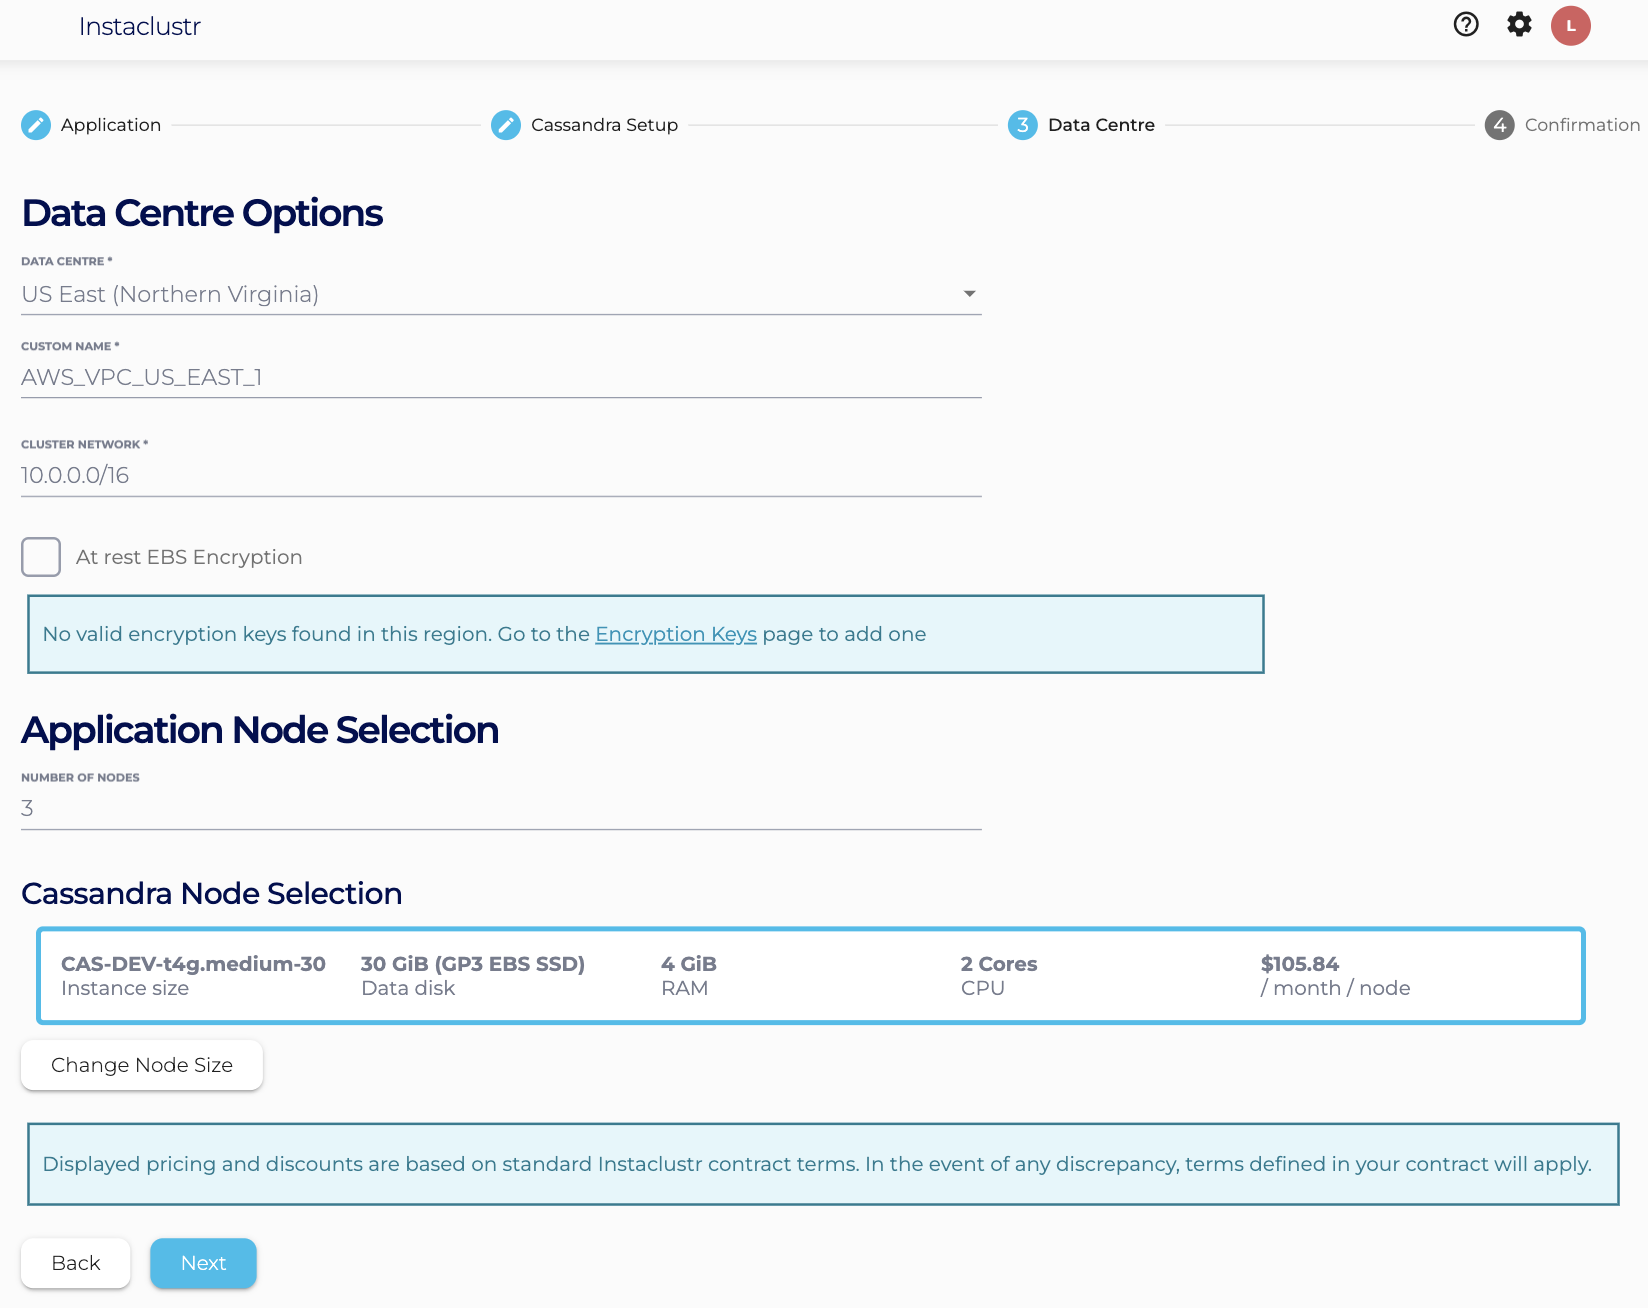
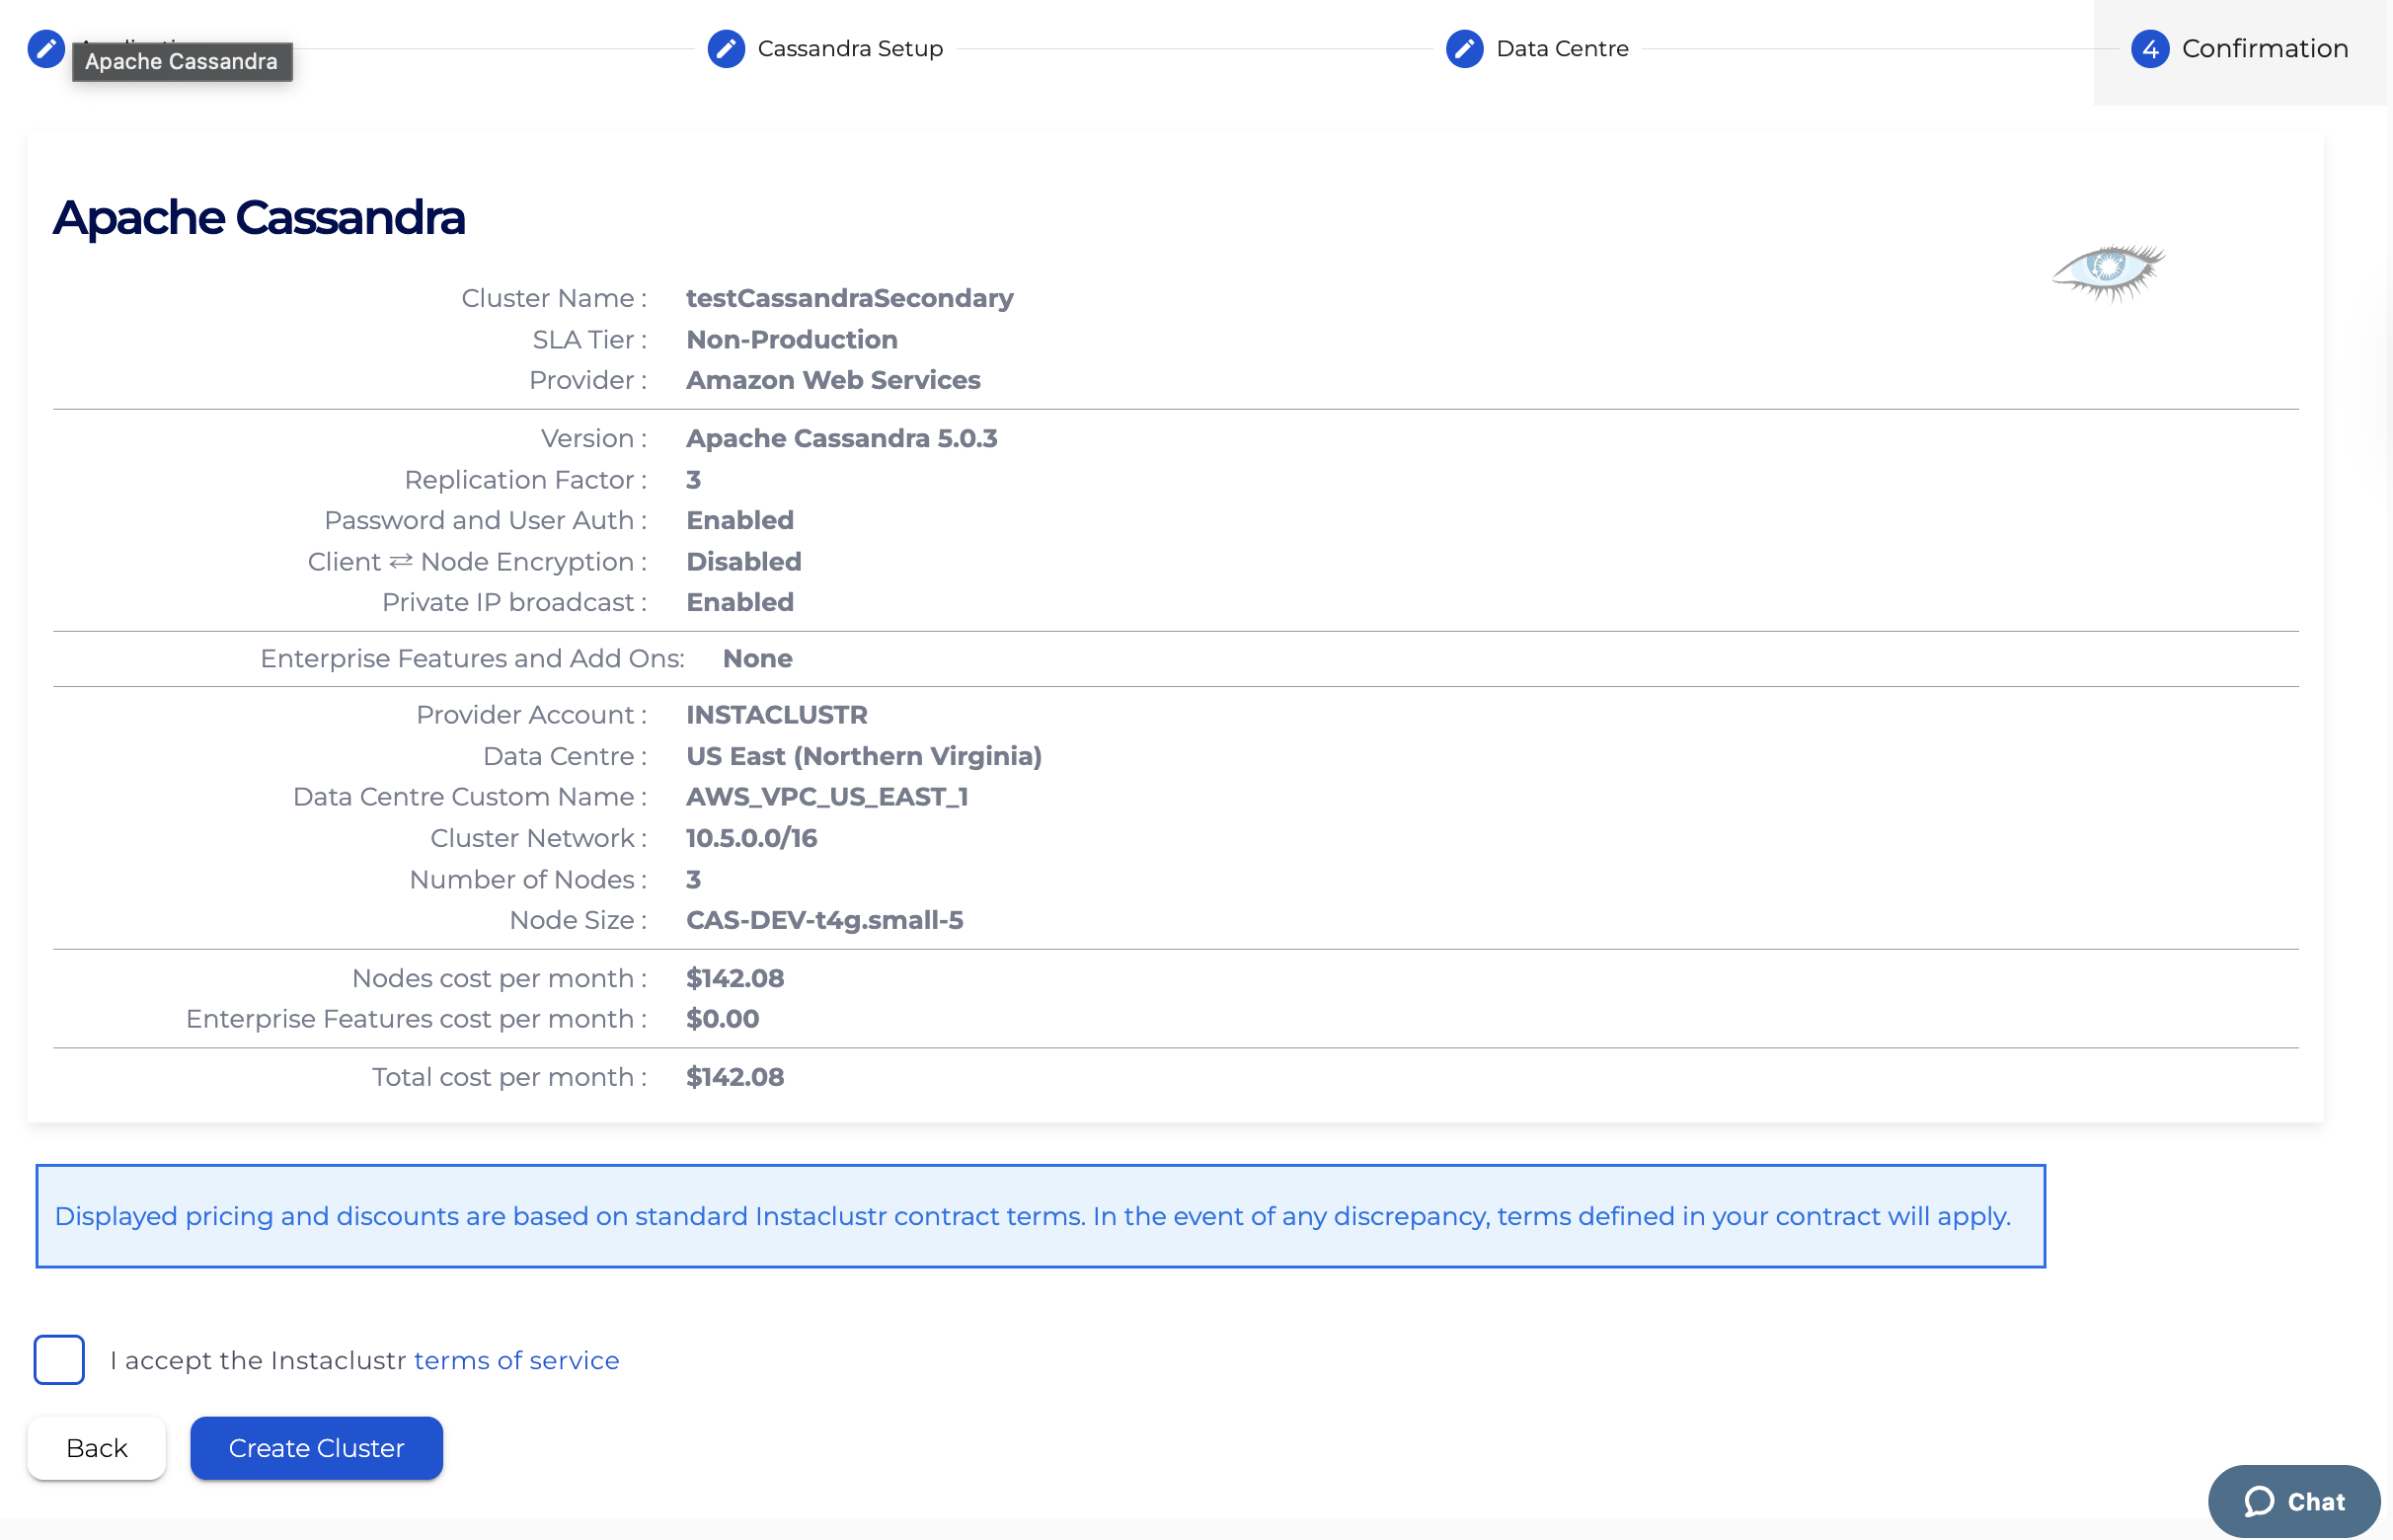
- The Confirmation section displays a brief summary of your cluster configurations and pricing details.
If you are happy with the cluster configuration and have accepted the terms and conditions, click the Create Cluster button to start provisioning the cluster.

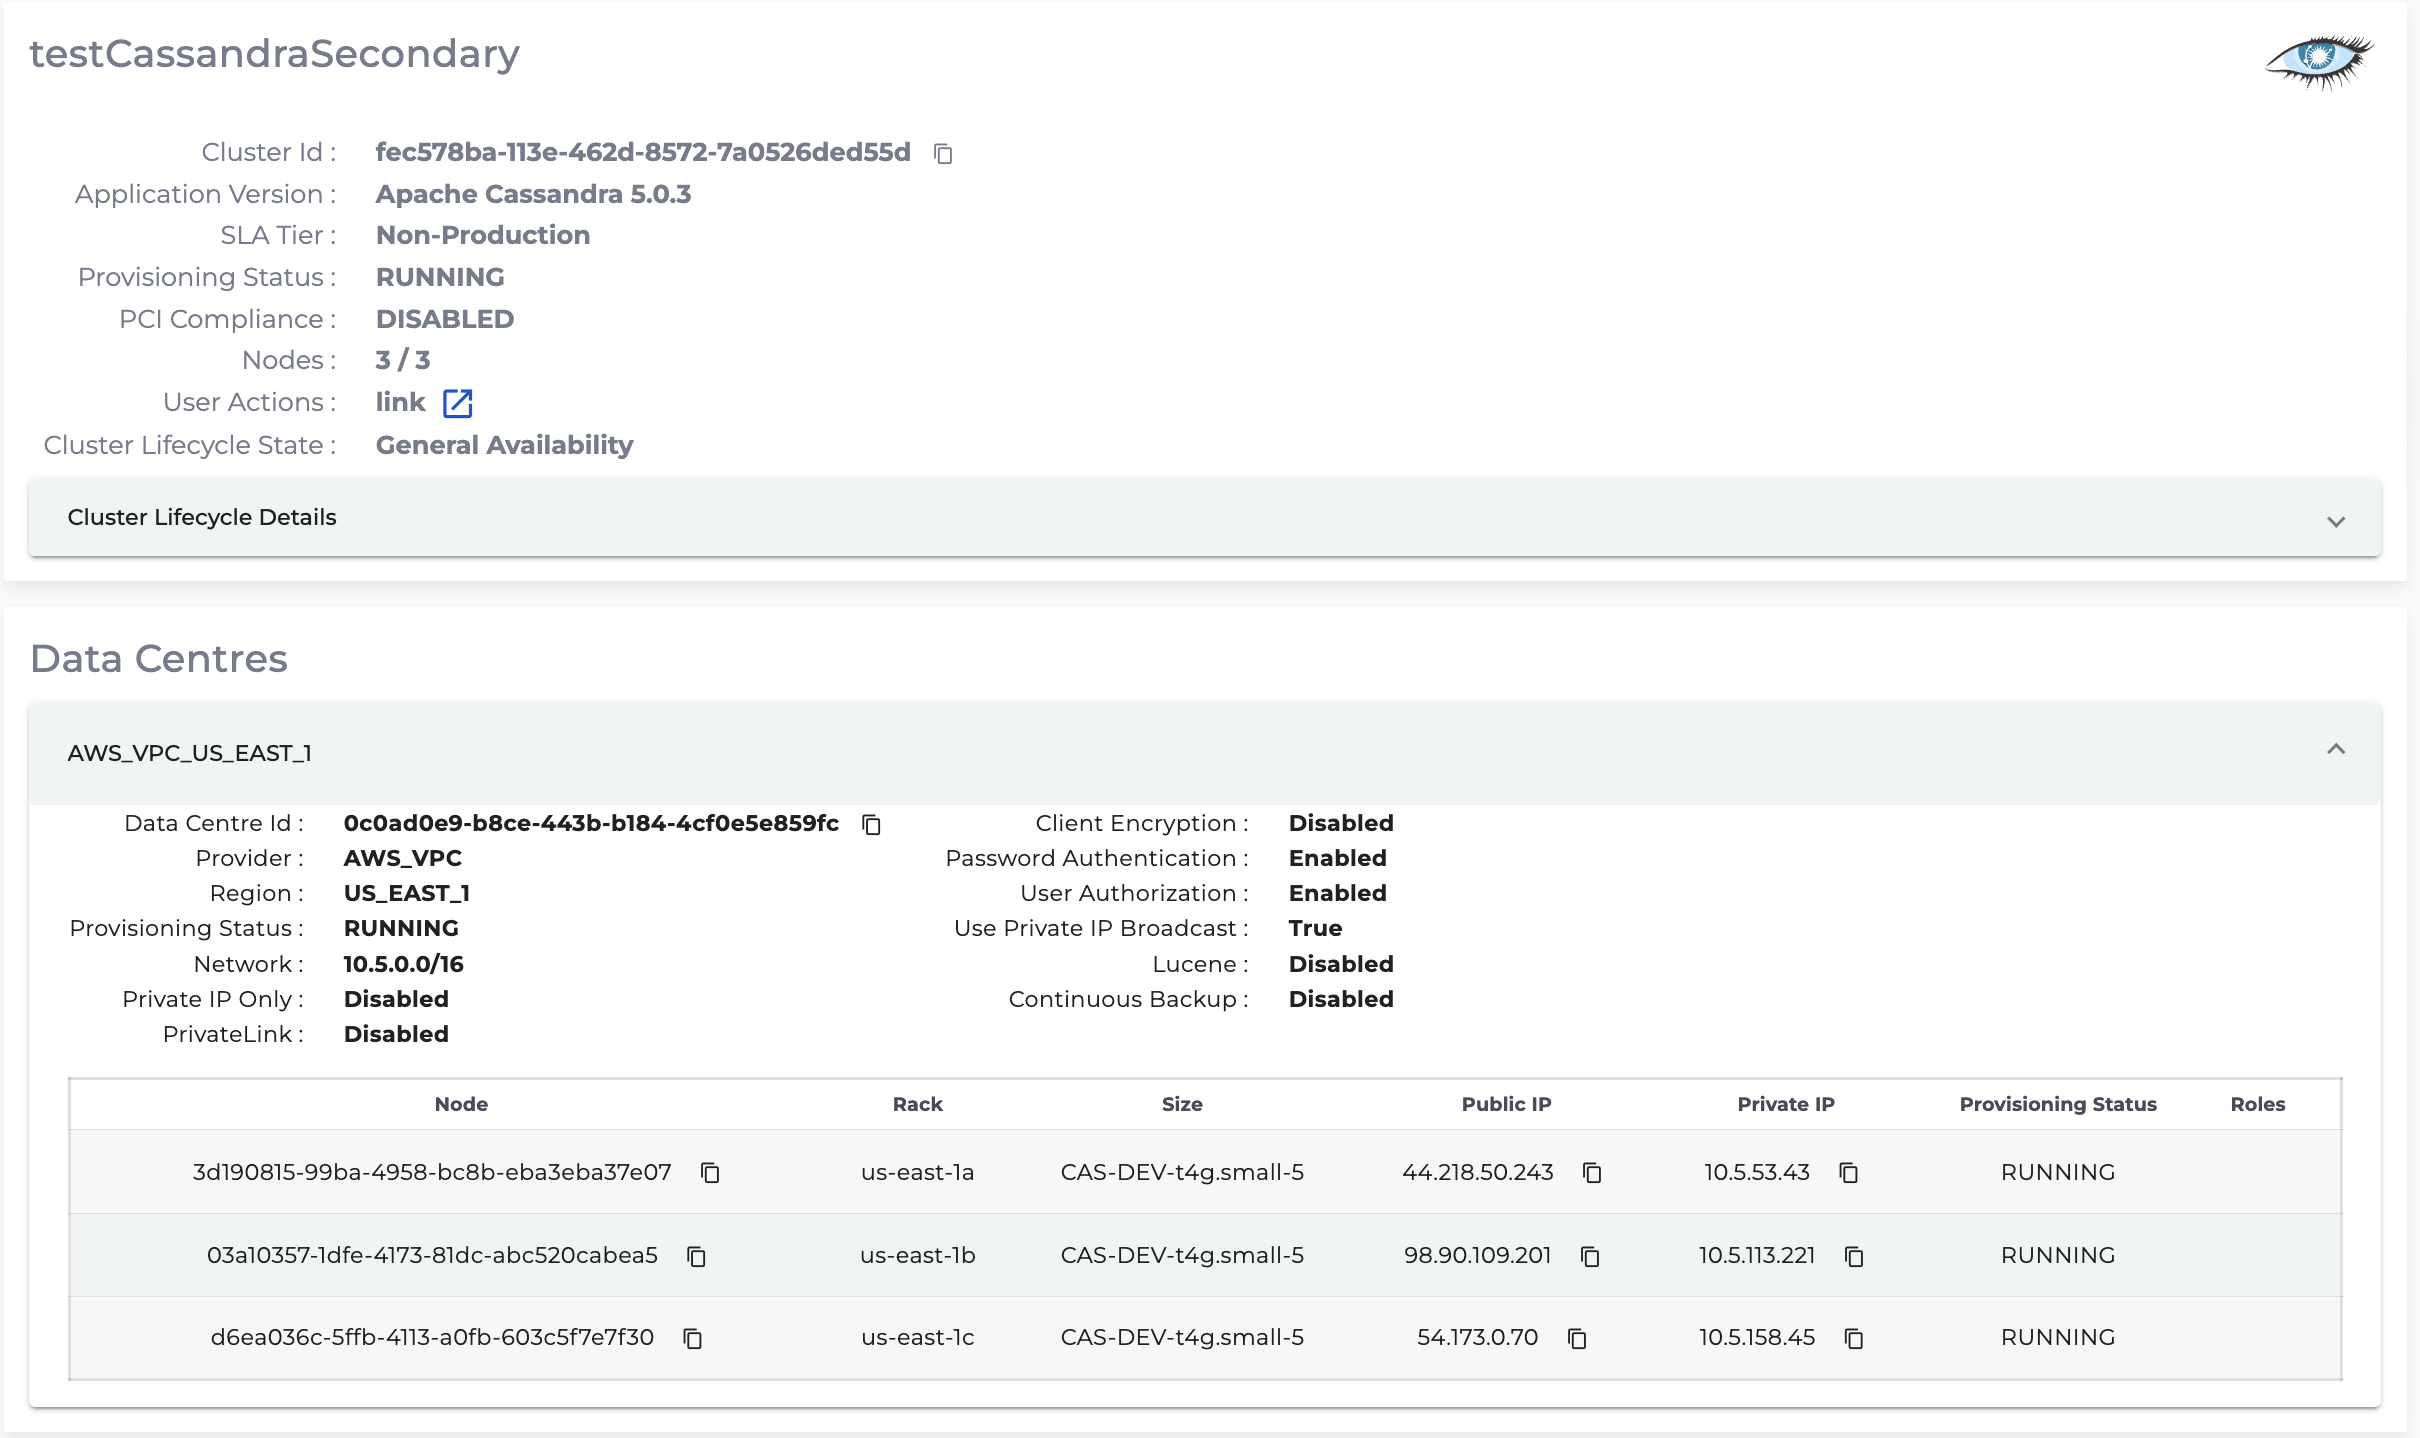
- Provisioning a cluster can take some time depending on the responsiveness of the underlying cloud provider. There are separate status indicators for the overall cluster provisioning state.
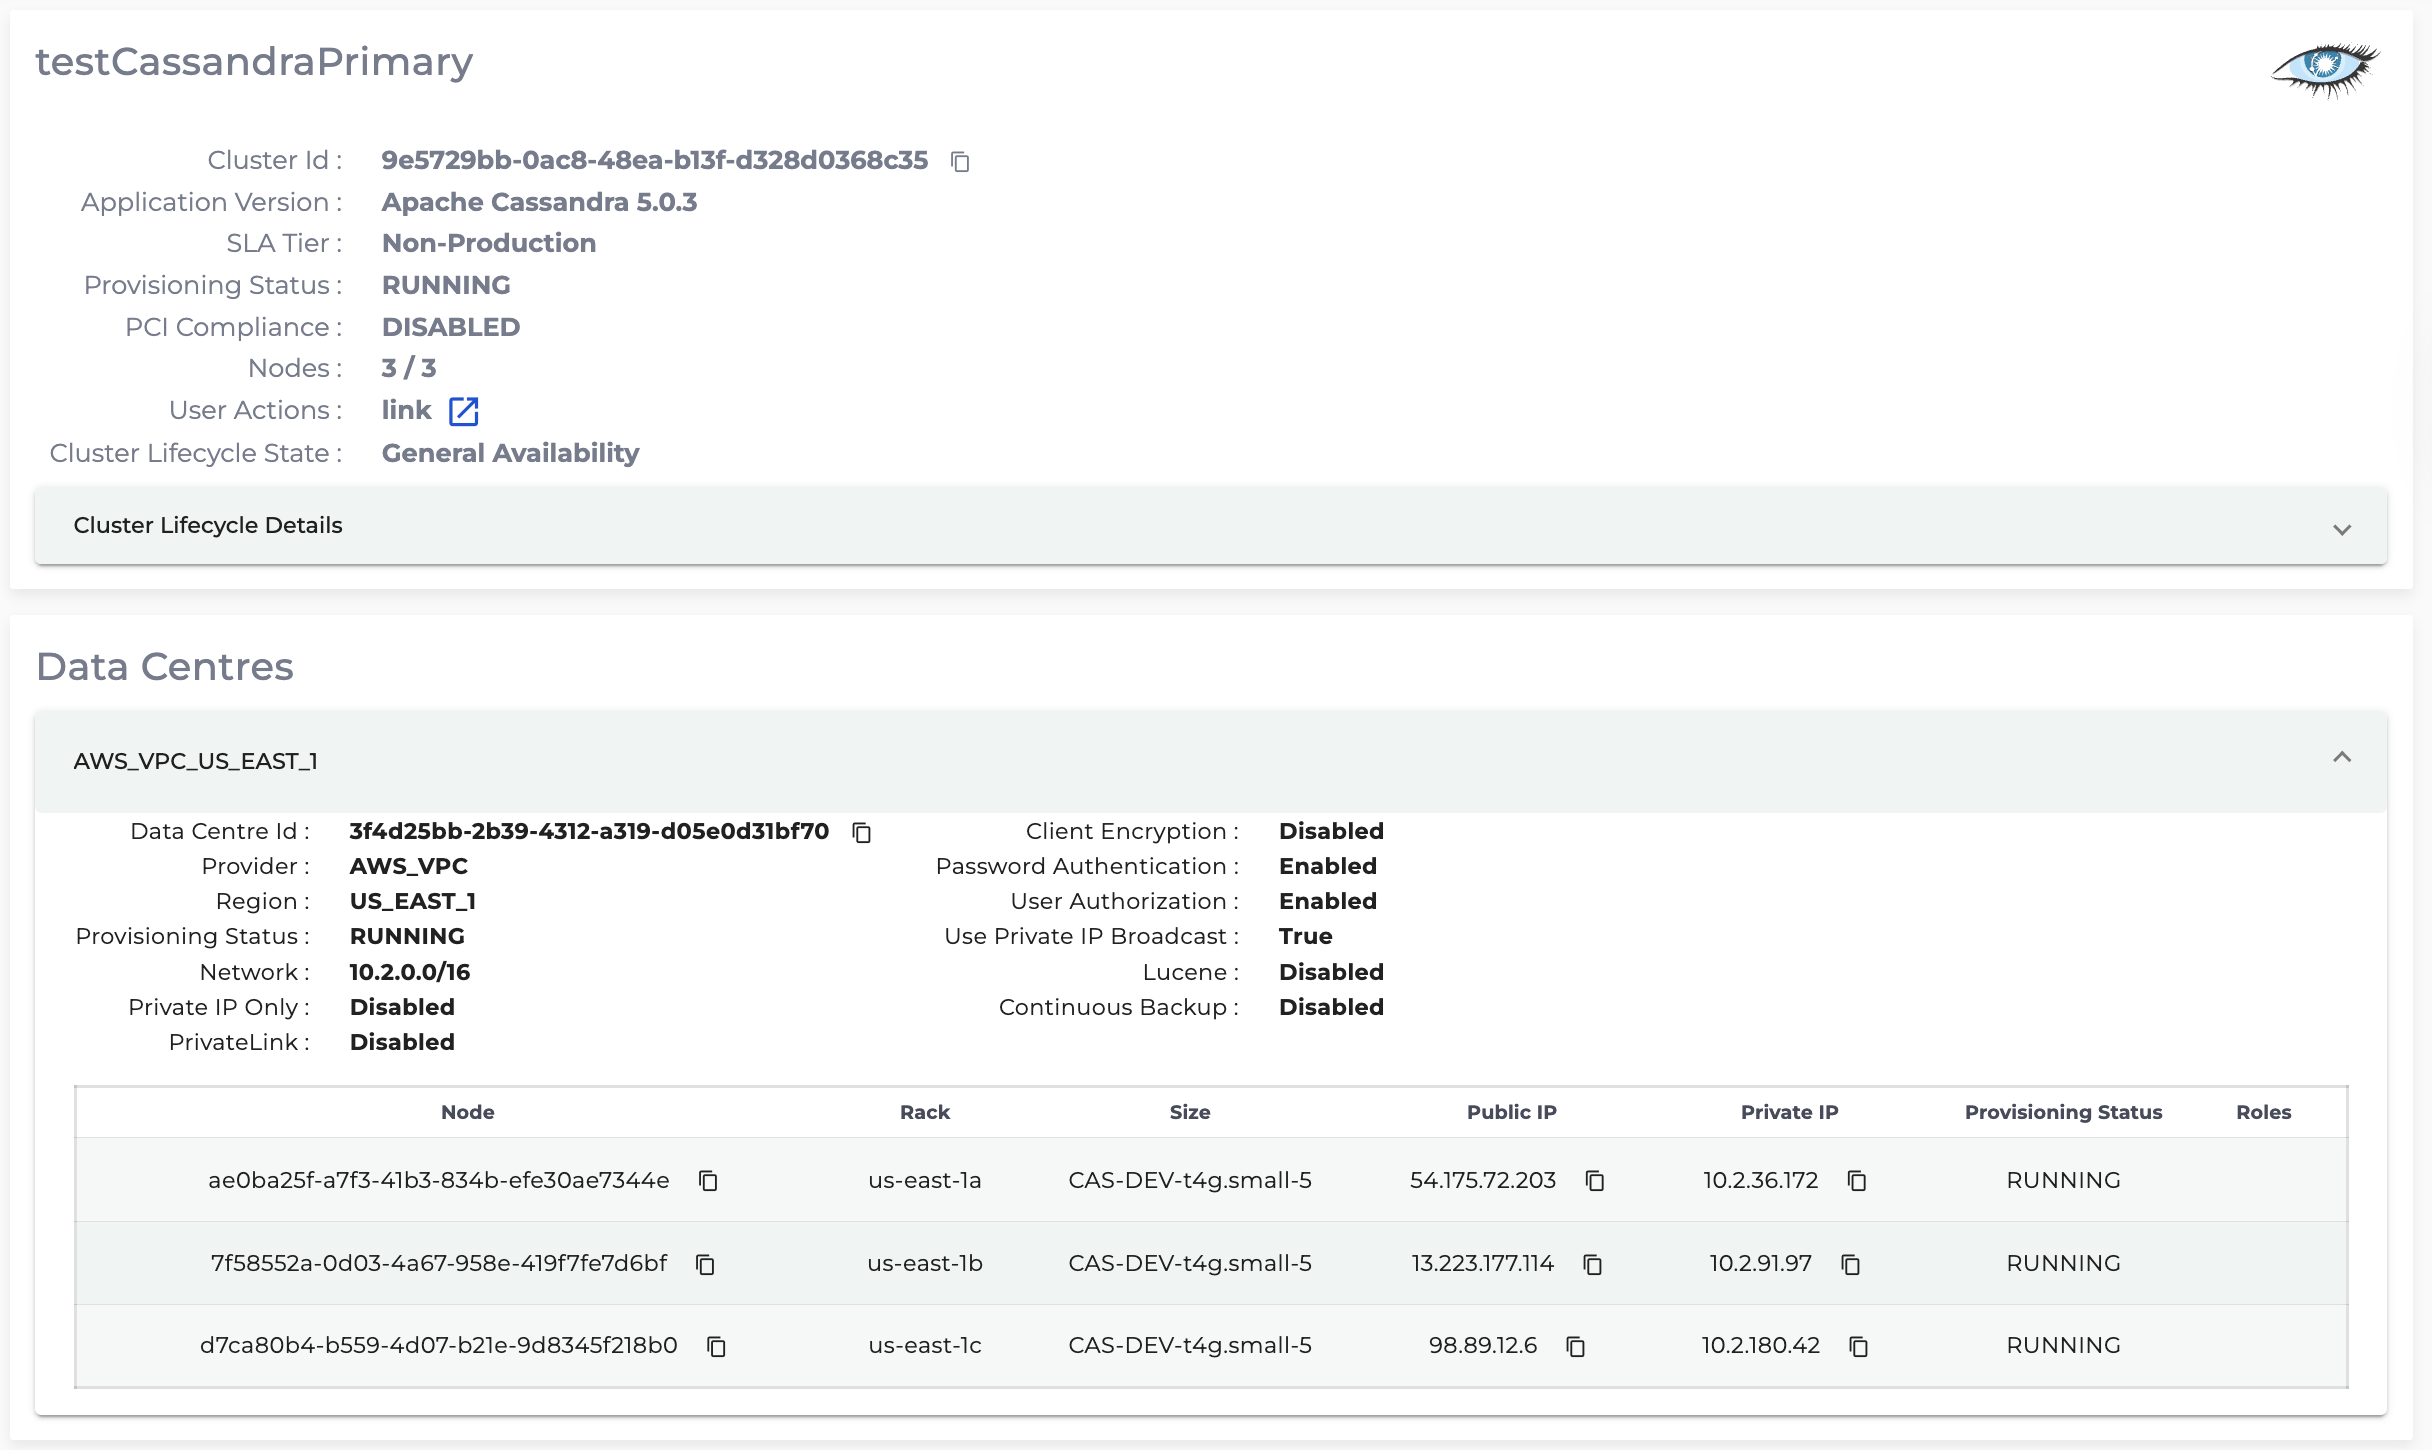
- You have now finished creating your Cassandra cluster, congratulations! All your clusters will be listed on the left sidebar of the console. You can view your cluster’s configuration details by navigating to the Details page.
Step 2 – Create a Cadence cluster
Now that we have a running Cassandra cluster, we can create a Cadence cluster and link them together:
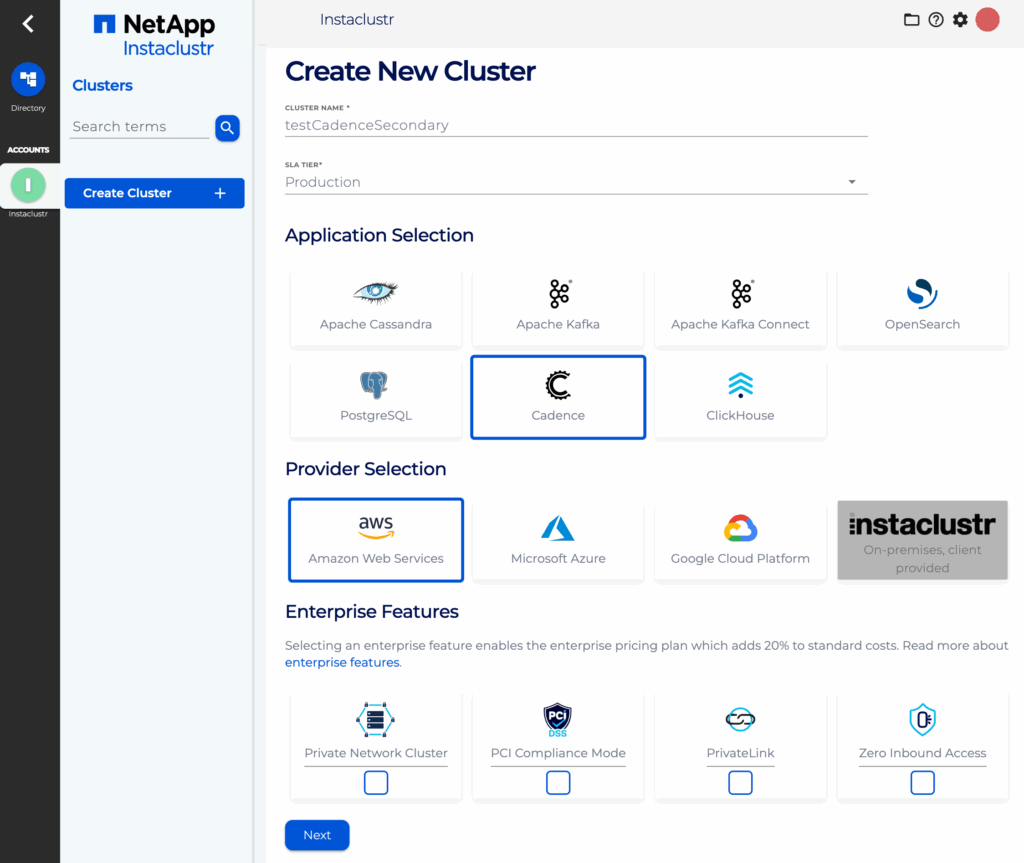
- On the console, click the Create Cluster button again, this time we will select the Cadence application.

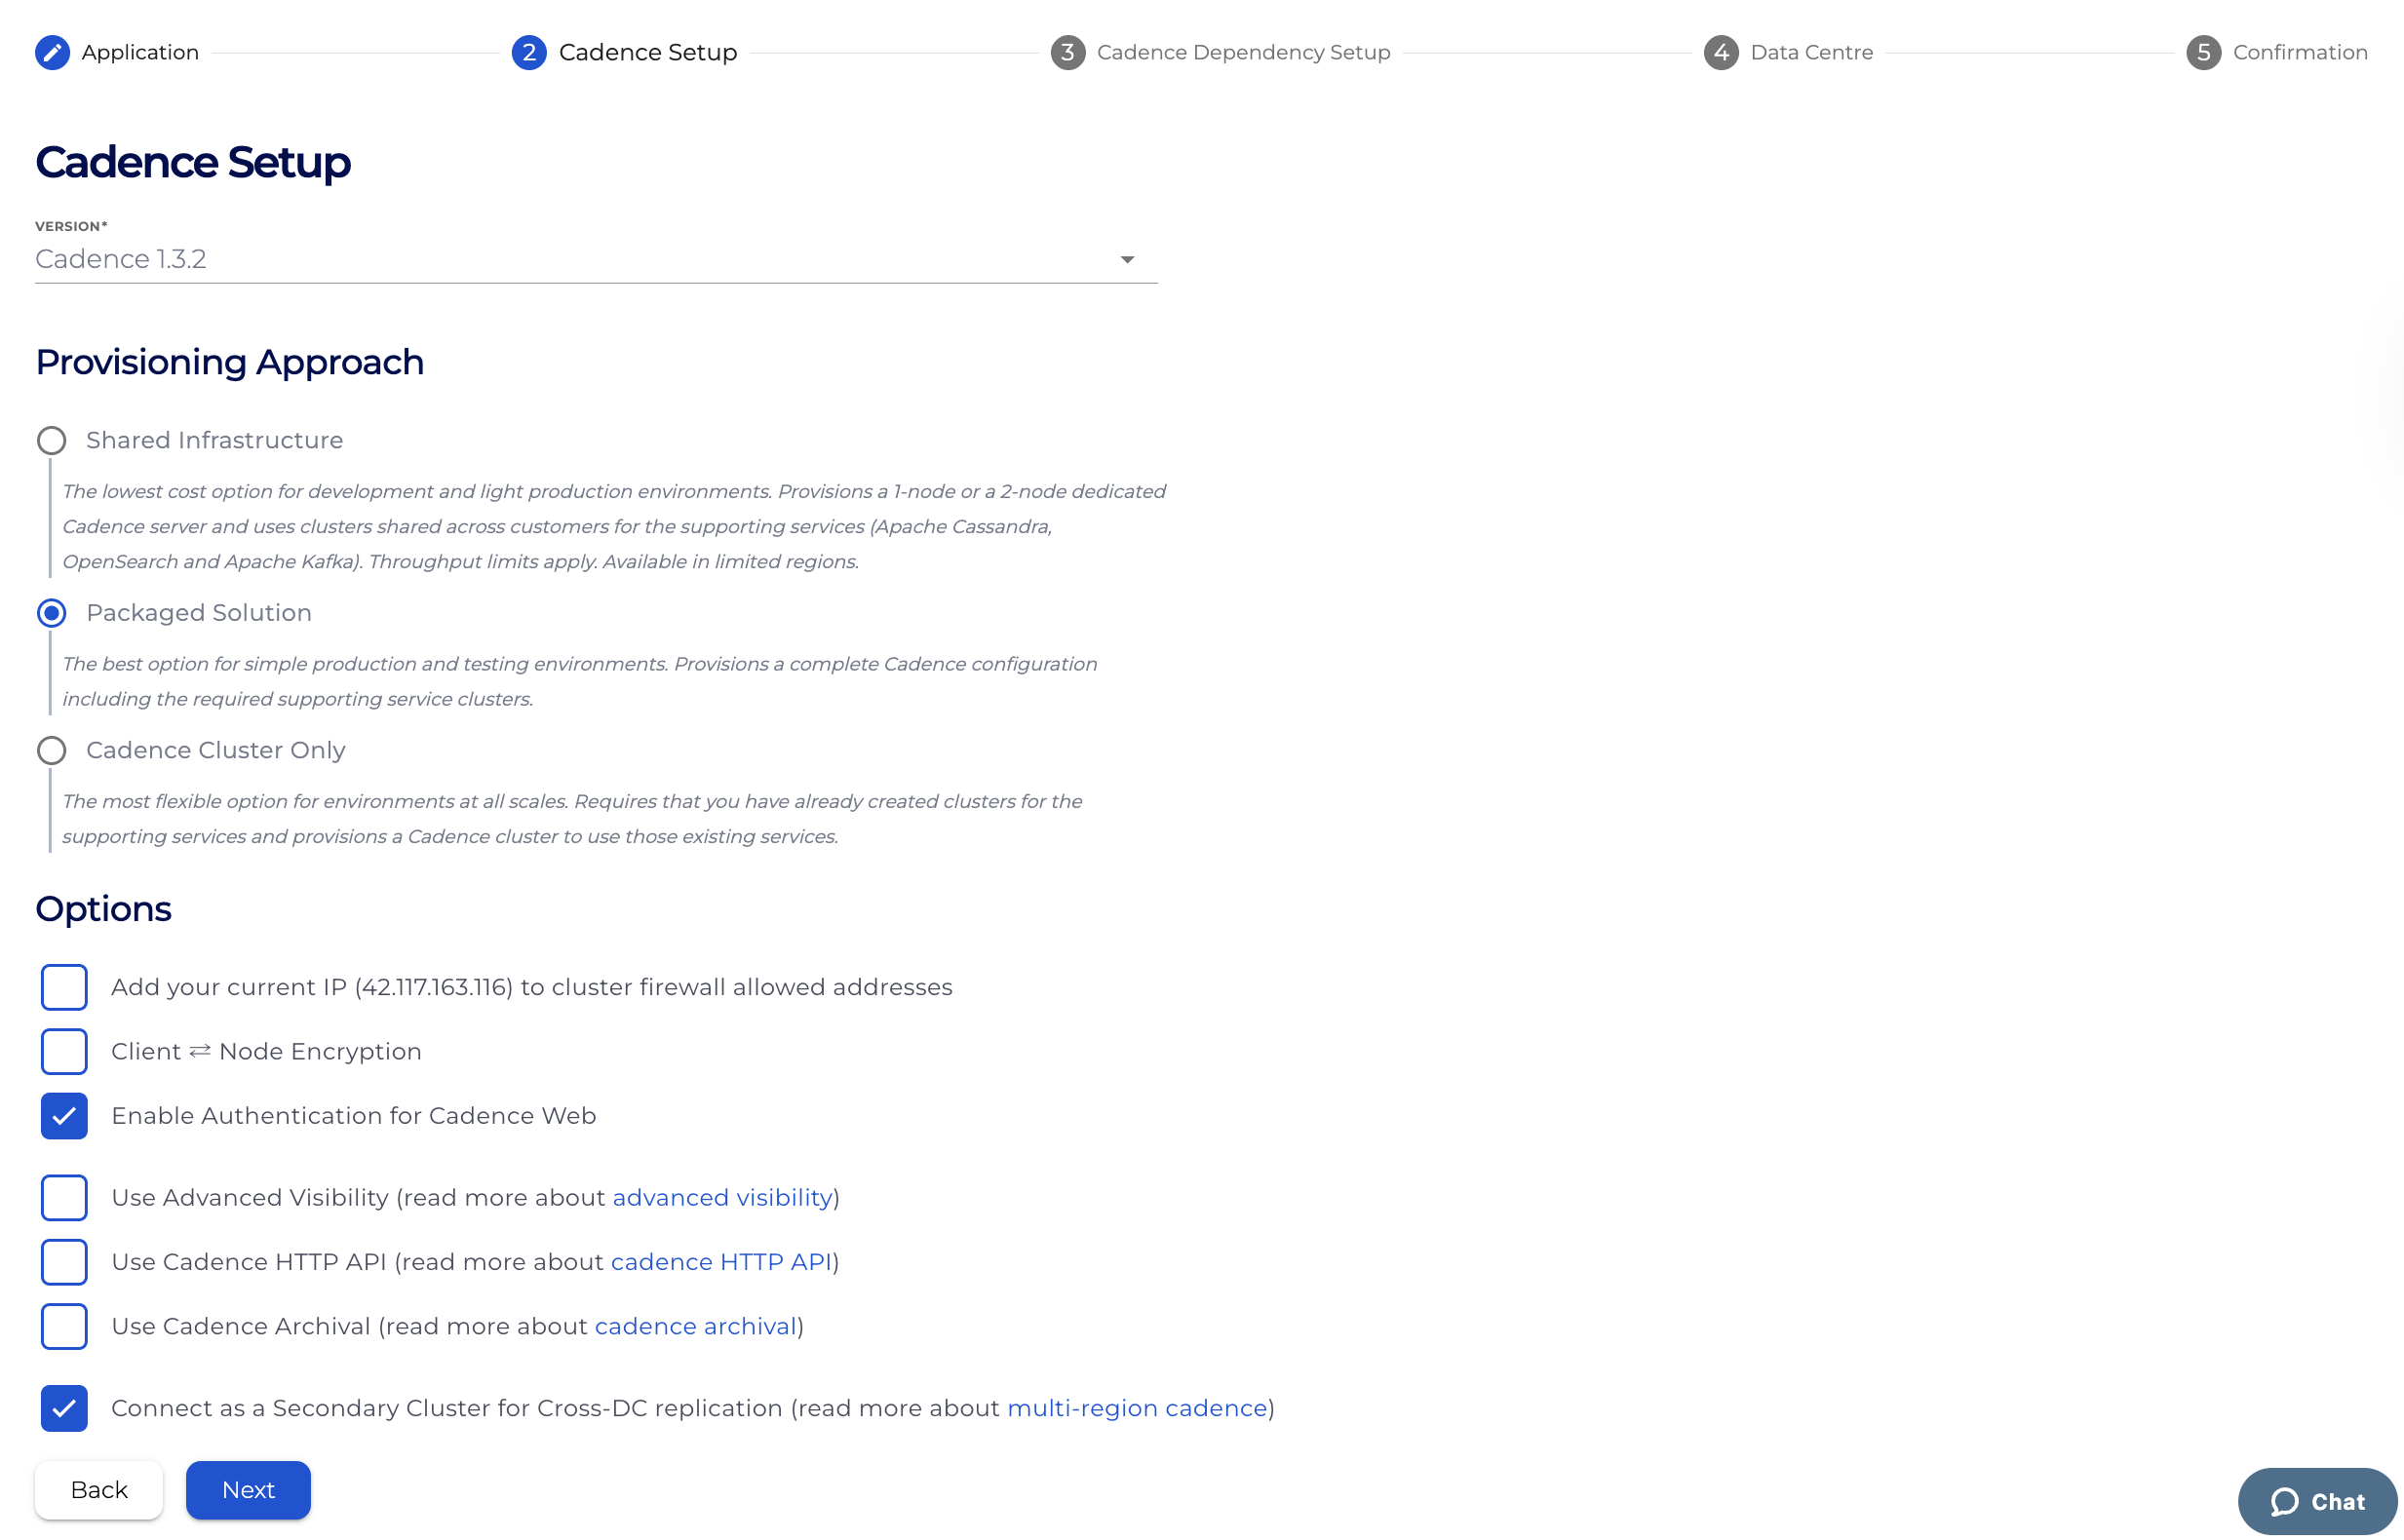
- On the Cadence Setup page, we can select the version of Cadence. We are currently offering Cadence 1.3.2. Select “Cadence Cluster Only“ as the provisioning approach. Keep “Use Advanced Visibility“ option unchecked, we will demonstrate that option here.

- On the Cadence Dependency Setup page, we can now select our previously created Cassandra cluster as the Cadence persistence store. If there are multiple Cassandra clusters running in your account, you can use the drop-down to select the one you want to use with Cadence.
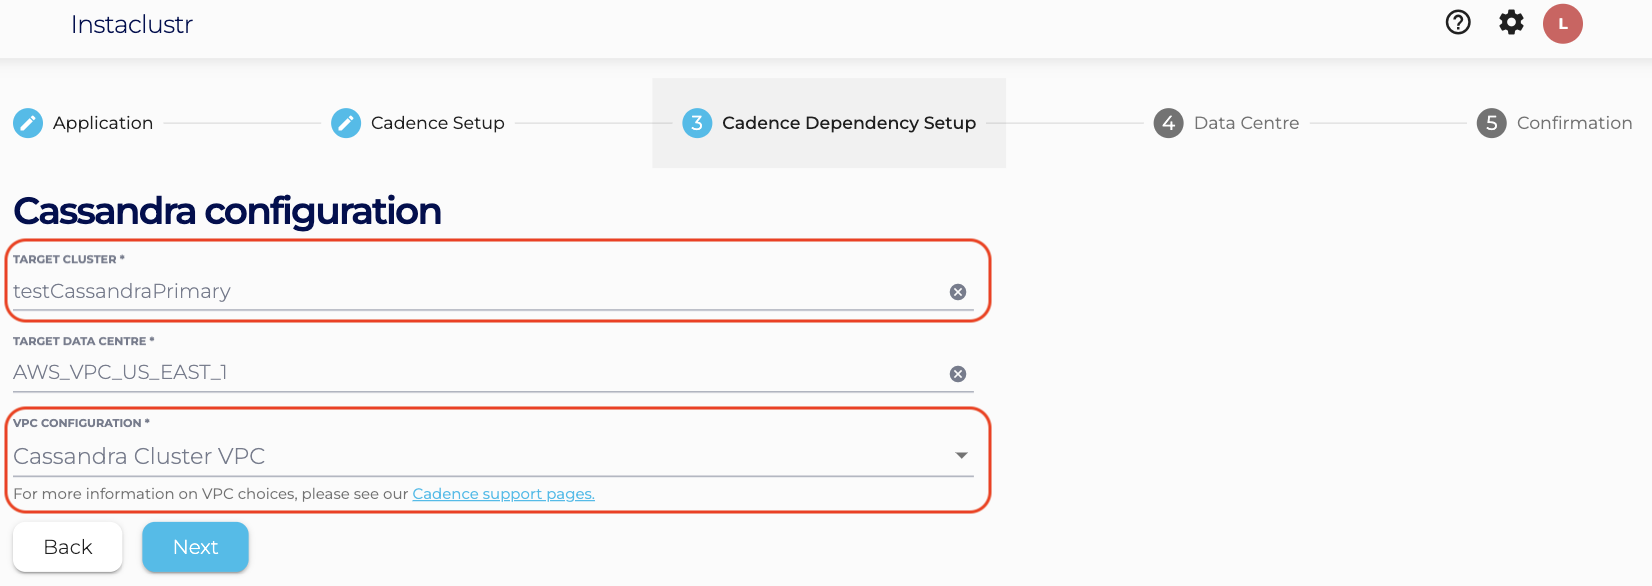
In addition to selecting which Cassandra cluster to link to, we can select how they are linked and communicate over the network, i.e. the Cadence VPC configuration. Configuring the Cadence VPC gives a detailed explanation about the different approaches to configuring the Cadence VPC. - Under the Data Centre section,
- Select a Data Centre Region,
- A cluster network address block (Note : Provide a non-overlapping CIDR block for VPC Peering and Cassandra Cluster VPC option),
- The number of nodes for your application,
- The desired node size (recommend using a node size with at least 8GB of memory). The following node sizes are incompatible with multi-region Cadence:
Provider Incompatible node size AWS_VPC CAD-DEV-t3.small-5 AWS_VPC CAD-DEV-t3.small-80 AWS_VPC CAD-DEV-t3.medium-30 AWS_VPC CAD-DEV-t3.medium-80 AWS_VPC CAD-DEV-t4g.small-80 AWS_VPC CAD-DEV-t4g.medium-80 GCP CAD-DEV-n1-standard-1-30 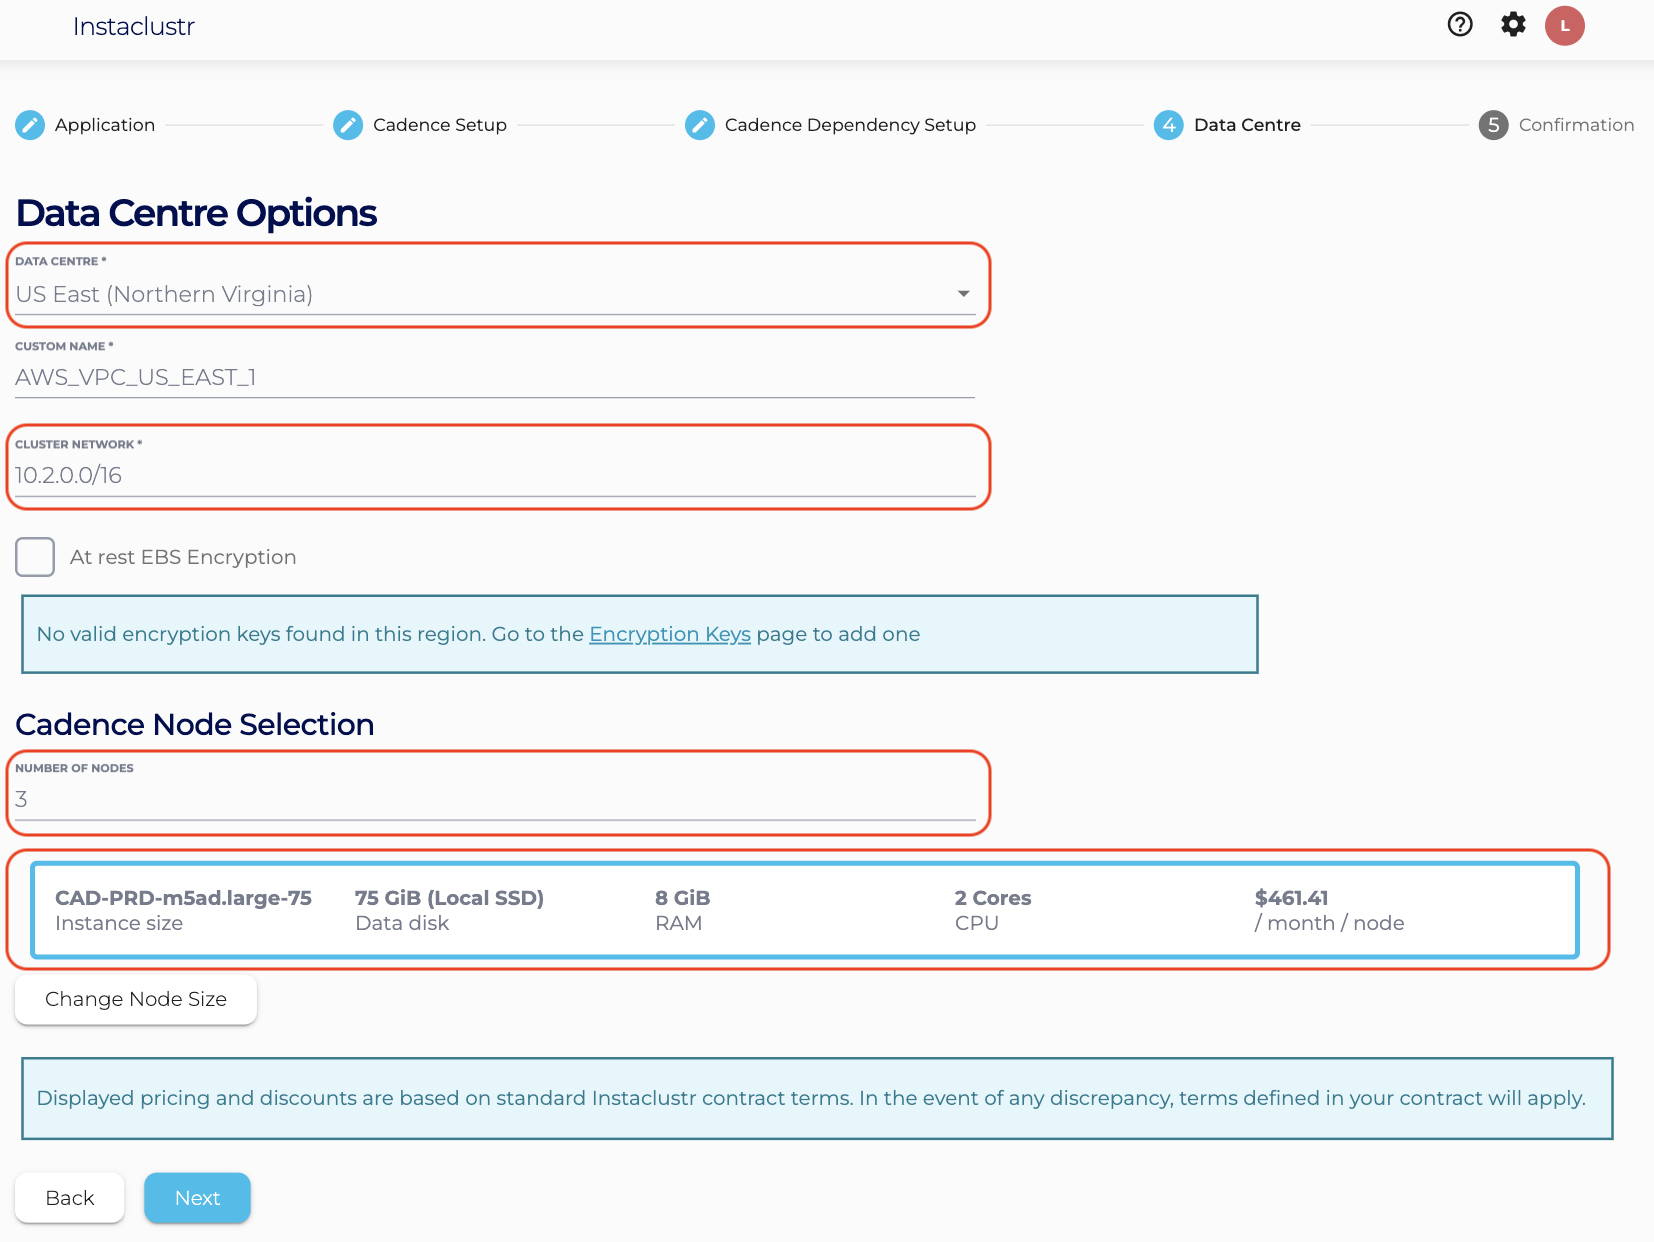
- The Confirmation section displays a brief summary of your cluster configurations and pricing details. If you are happy with the cluster configuration and have accepted the terms and conditions, click the Create Cluster button to start provisioning the Cadence cluster.

- Just as with the Cassandra cluster, provisioning a cluster can take some time depending on the responsiveness of the underlying cloud provider. There are a few additional automated steps required to link these clusters that take place at this time. While waiting for the Cadence cluster to finish provisioning, you can start Step 1 in the next stage.
Stage 2 – Create the SECONDARY Cadence Cluster
Step 1 – Create an Apache Cassandra® cluster
For a step-by-step guide to creating an Apache Cassandra® cluster, you can read this guide.
For an abbreviated guide, you can do as follows:
- Log into the Instaclustr Console and click the Create Cluster button. This will take you to the wizard for creating a new cluster.
- Give your cluster a name, select Apache Cassandra as the application, select you’re the same Cloud Service Provider for the first Cadence cluster and click Next.
- Under the Cassandra Setup page, select Apache Cassandra version 5.0.3. Also check “Use private IPs broadcast for auto-discovery“.
- Under the Data Centre options, select:
- Data Centre Region,
- Cluster Network address block,
- The number of nodes for your application,
- Your desired node size (recommend using a node size with at least 4GB memory).
- Note : Free trial users should use the defaults (i.e. 3 developer sized nodes).
- The Confirmation section displays a brief summary of your cluster configurations and pricing details.
If you are happy with the cluster configuration and have accepted the terms and conditions, click the Create Cluster button to start provisioning the cluster.
- Provisioning a cluster can take some time depending on the responsiveness of the underlying cloud provider. There are separate status indicators for the overall cluster provisioning state.
- You have now finished creating your Cassandra cluster, congratulations! All your clusters will be listed on the left sidebar of the console. You can view your cluster’s configuration details by navigating to the Details page.
Step 2 – Create a SECONDARY Cadence cluster
Now that we have a running Cassandra cluster, we can create a Cadence cluster and link them together:
- On the console, click the Create Cluster button again, this time we will select the Cadence application.
- On the Cadence Setup page, we can select the version of Cadence. We are currently offering Cadence 1.3.2. Select “Cadence Cluster Only“ as the provisioning approach. Keep “Use Advanced Visibility“ option unchecked, we will demonstrate that option here. Select “Connect as a Secondary Cluster for Cross-DC replication”
- On the Cadence Dependency Setup page, we can now select our previously created Cassandra cluster as the Cadence persistence store. If there are multiple Cassandra clusters running in your account, you can use the drop-down to select the one you want to use with Cadence. Furthermore, select our previously created Cadence cluster as the Multi-region Cadence configuration.
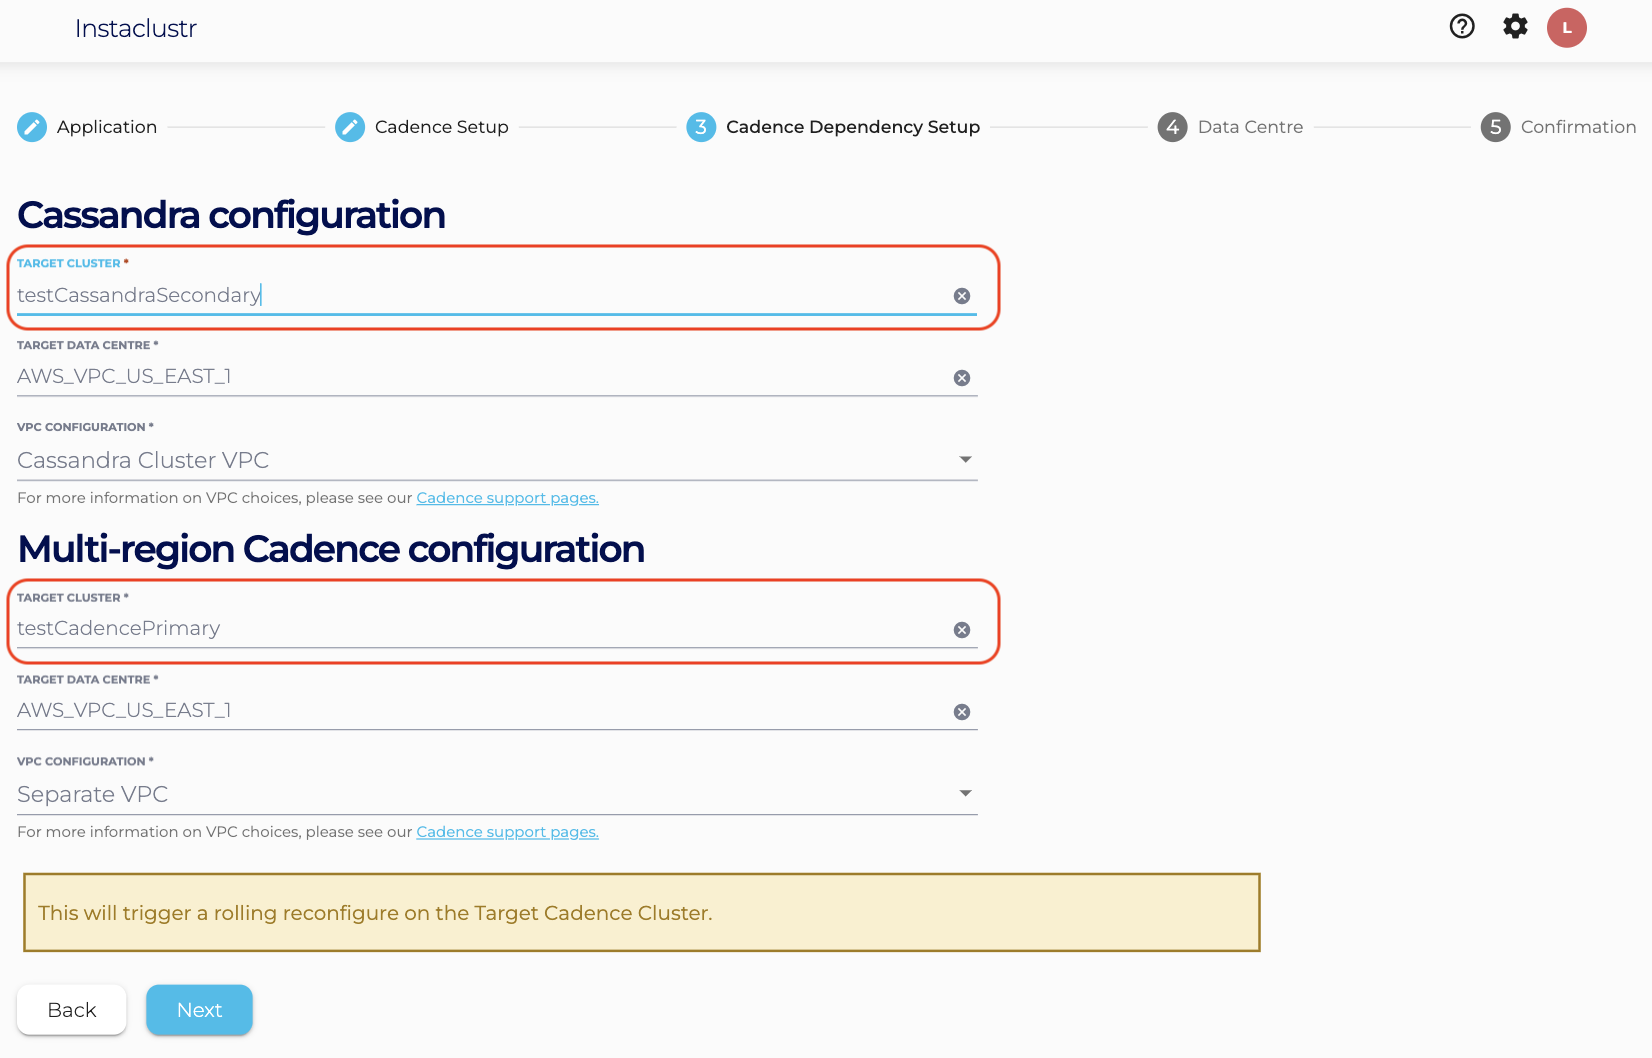
In addition to selecting which Cassandra cluster to link to, we can select how they are linked and communicate over the network, i.e. the Cadence VPC configuration. Configuring the Cadence VPC gives a detailed explanation about the different approaches to configuring the Cadence VPC. Please noticed that creating a Multi-region Cadence cluster will trigger a rolling reconfigure on the target Cadence cluster. - Under the Data Centre section,
- Select a Data Centre Region,
- A cluster network address block (Note : Provide a non-overlapping CIDR block for VPC Peering, Cassandra Cluster VPC option and all the Cluster related to the target Cadence cluster),
- The number of nodes for your application,
- The desired node size (recommend using a node size with at least 8GB of memory).
- The following node sizes are incompatible with multi-region Cadence:
Provider Incompatible node size AWS_VPC CAD-DEV-t3.small-5 AWS_VPC CAD-DEV-t3.small-80 AWS_VPC CAD-DEV-t3.medium-30 AWS_VPC CAD-DEV-t3.medium-80 AWS_VPC CAD-DEV-t4g.small-80 AWS_VPC CAD-DEV-t4g.medium-80 GCP CAD-DEV-n1-standard-1-30 
- The Confirmation section displays a brief summary of your cluster configurations and pricing details. If you are happy with the cluster configuration and have accepted the terms and conditions, click the Create Cluster button to start provisioning the Cadence cluster.
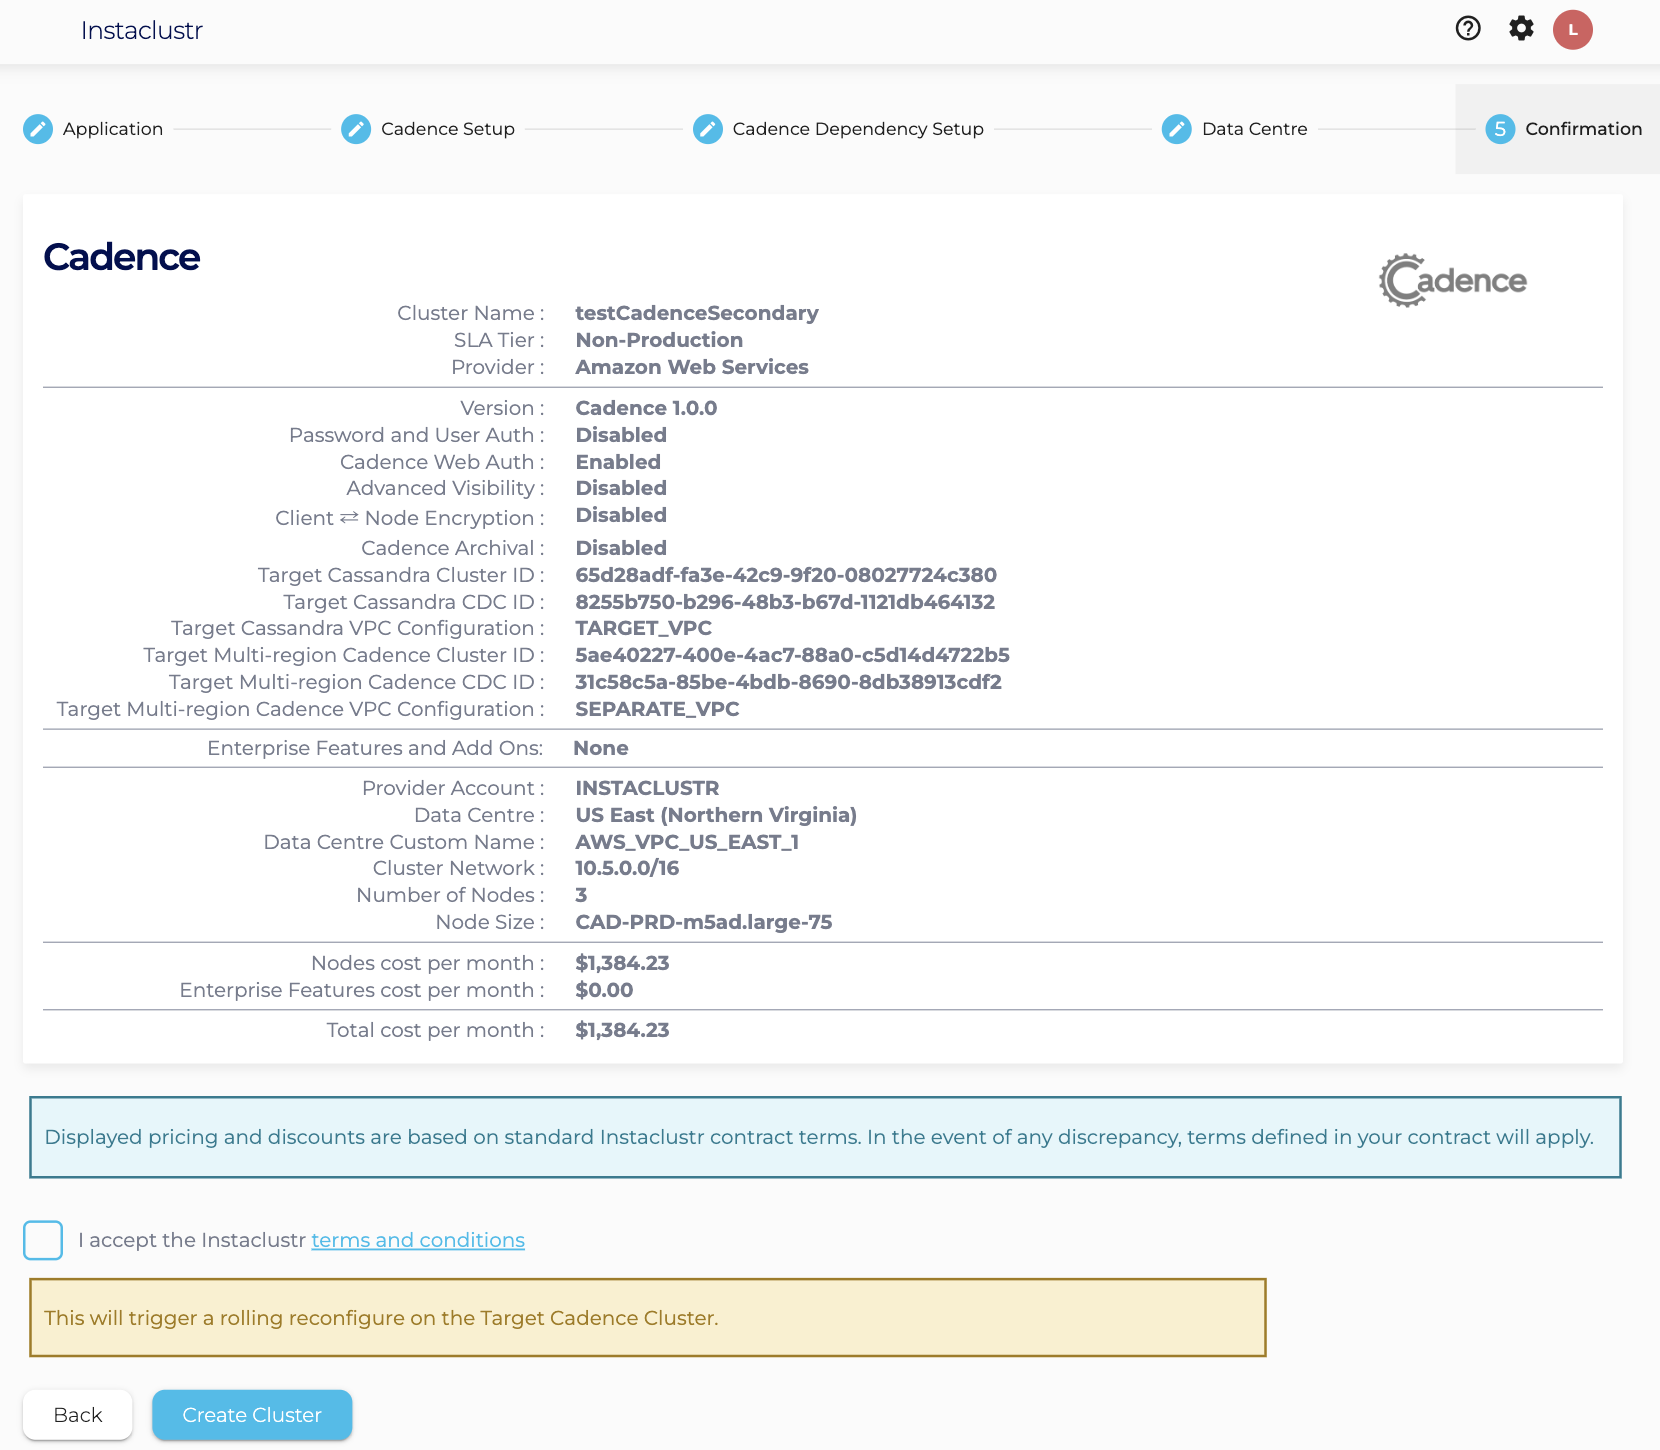
- Just as with the Cassandra cluster, provisioning a cluster can take some time depending on the responsiveness of the underlying cloud provider. There are a few additional automated steps required to link these clusters that take place at this time. The provisioning will also trigger a rolling reconfigure on the target Cadence cluster. Status can be monitored through the Details page.

- Once the reconfiguration of the PRIMARY cluster started, the status will be updated.

- Once the secondary Cadence cluster finishes provisioning and the primary cluster finishes all rolling reconfiguration, you can start using this Multi-region Cadence cluster.

Please contact [email protected] if you have any questions.