Connect to Apache Cassandra with Node.js
The Node.js runtime environment can be used to connect your JavaScript web applications to your Cassandra database. In this article, we will introduce how to connect to a Cassandra cluster using Node.js.
We will start by installing Node.js and the DataStax Node.js Cassandra driver, and then provide simple demo code for connecting the remote server (Cassandra) and the local program.
Download Node.js
Go to Nodejs.org and choose an appropriate version to download.
Install Node.js
Follow the instructions to install.
Install the DataStax Node.js driver for Apache Cassandra
Run the following command in your terminal:
npm install cassandra-driver
This command will create a “node_modules” folder and a JSON file called “package-lock.json”. For more information about the driver, visit the DataStax Node.js for Apache Cassandra GitHub page.
Populate the cluster with sample data
For this example, we will be creating some sample data. To connect to your instaclustr Cassandra cluster database using the CQL shell, see the support article Connecting to Instaclustr Using Cqlsh. If the connection is successful, you will see the “iccassandra@cqlsh>” prompt.
In the CQL shell, type in the following queries:
|
1 2 3 4 5 6 7 8 |
CREATE KEYSPACE grocery WITH REPLICATION = {'class' : 'SimpleStrategy','replication_factor' : 1}; CREATE TABLE IF NOT EXISTS grocery.fruit_stock (item_id TEXT, name TEXT, price_p_item DECIMAL, PRIMARY KEY (item_id)); INSERT INTO grocery.fruit_stock (item_id, name, price_p_item) VALUES ('a0','apples',0.50); INSERT INTO grocery.fruit_stock (item_id, name, price_p_item) VALUES ('b1','bananas',0.40); INSERT INTO grocery.fruit_stock (item_id, name, price_p_item) VALUES ('c3','oranges',0.35); INSERT INTO grocery.fruit_stock (item_id, name, price_p_item) VALUES ('d4','pineapples',2.5); |
To check that the database has been properly populated, run the command:
|
1 |
SELECT * FROM grocery.fruit_stock; |
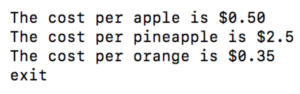
The output should be: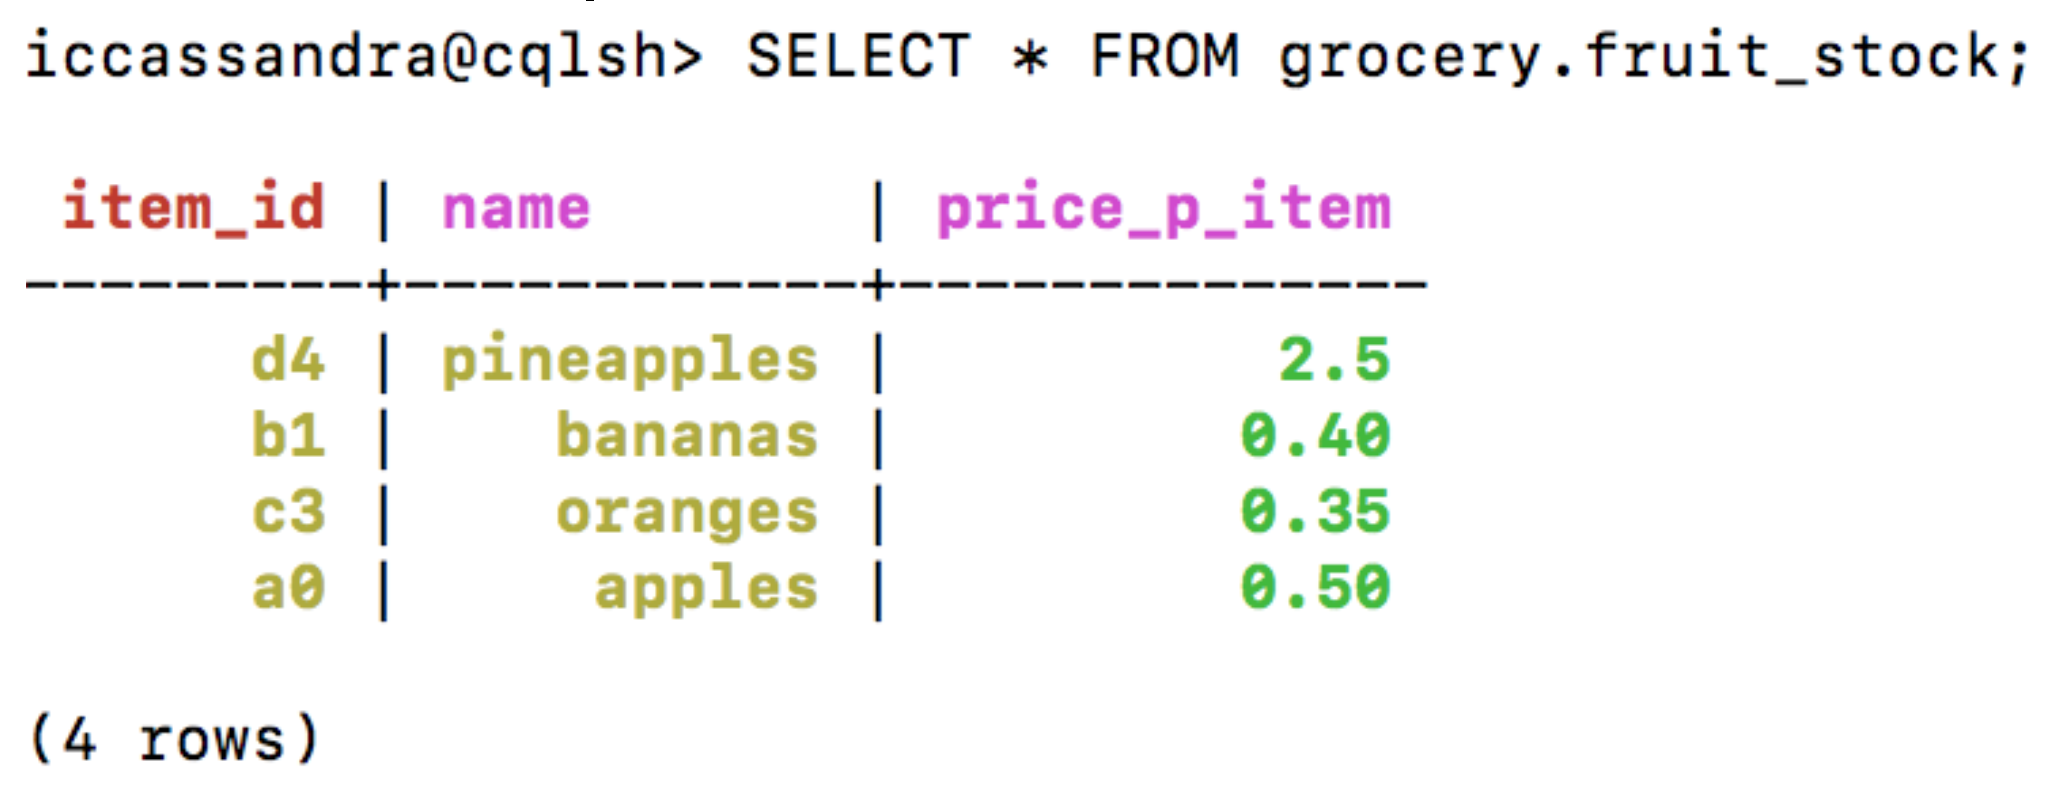
Create a Node.js file
Create a file “my_node_example.js”, and open it in a text editor of your choice. This file will need to reference the Cassandra-driver file in the node_modules folder, so for easy access, we saved my_node_example.js into node_modules. If you saved the file elsewhere, be sure to reference the correct location of Cassandra-driver.
Input Sample Code
In the my_node_example.js file, copy in the following code. Note that in the DataStax Node.js driver, clusters are referred to as “clients”.
|
1 2 3 4 5 6 7 8 9 10 11 12 13 14 15 16 17 18 19 20 |
// "cassandra-driver" is in the node_modules folder. Redirect if necessary. let cassandra = require('cassandra-driver'); // Replace 'Username' and 'Password' with the username and password from your cluster settings let authProvider = new cassandra.auth.PlainTextAuthProvider('Username', 'Password'); // Replace the PublicIPs with the IP addresses of your clusters let contactPoints = ['PublicIP1','PublicIP2','PublicIP3']; // Replace DataCenter with the name of your data center, for example: 'AWS_VPC_US_EAST_1' let localDataCenter = 'DataCenter'; let client = new cassandra.Client({contactPoints: contactPoints, authProvider: authProvider, localDataCenter: localDataCenter, keyspace:'grocery'}); // Define and execute the queries let query = 'SELECT name, price_p_item FROM grocery.fruit_stock WHERE name=? ALLOW FILTERING'; let q1 = client.execute(query, ['oranges']).then(result => {console.log('The cost per orange is ' + result.rows[0].price_p_item);}).catch((err) => {console.log('ERROR oranges:', err);}); let q2 = client.execute(query, ['pineapples']).then(result => {console.log('The cost per pineapple is ' + result.rows[0].price_p_item);}).catch((err) => {console.log('ERROR pineapples:', err);}); let q3 = client.execute(query, ['apples']).then(result => {console.log('The cost per apple is ' + result.rows[0].price_p_item);}).catch((err) => {console.log('ERROR apples:', err);}); // Exit the program after all queries are complete Promise.allSettled([q1,q2,q3]).finally(() => client.shutdown()); |
Replace ‘Public IP’ with the public IP addresses used by your cluster. Also, replace ‘Username’ and ‘Password’ with your cluster’s authentication settings, and replace ‘DataCenter‘ with the name of your cluster’s data center. To obtain your cluster’s username and password settings, go to console.instaclustr.com > Log In > Cluster Details > Connection Info > Default Credentials for Password Authentication.
Run the Sample Code
To run the my_node_example.js file, type into a separate terminal window (not the one running the CQL shell):
node my_node_example.js
You should obtain the following results. Note that the outputs may not be in the same order, due to the asynchronous nature of NodeJS.