AWS FSxN Integration
On the Instaclustr platform, ClickHouse clusters can be integrated with Amazon FSx for NetApp ONTAP (FSxN) file systems configured to host S3-compatible services. Once a file system is integrated, the cluster is able to use S3 table functions and engines to query as well as write data to files within the file system.
This guide will walk through all steps required for FSxN integration, including provisioning compatible clusters, enabling integrations on them, and leveraging S3 functionality to make use of the integrations. It also includes information on managing your Instaclustr-managed FSxN file systems.
Before proceeding, please note that the information provided on this page is relevant if your use case fits either of the following:
- If you already have an FSxN file system that you wish to integrate with, you must provision the ClickHouse cluster into the same VPC as the FSxN.
- If you wish to create a new FSxN file system for integration, you can create and directly integrate it with the ClickHouse cluster via the Integrations tab in the cluster options. File systems created this way will be available for management via the Instaclustr platform. Note that if you create a file system by directly integrating it with a ClickHouse cluster, you will not be able to delete the cluster without first deleting the file system.
Prerequisites
- You must have access to your own AWS account for hosting FSxN file systems, configured in accordance with the RIYOA setup guides available in Console. These guides can be accessed by clicking Directory in the top-left corner, then under Guides in the sidebar expanding RIYOA Setup:
- AWS Standard Setup
- AWS IAM Roles Explanation: The IAM policy required for integrating FSxN file systems looks like this:
123456"Sid": "AllowFSX","Effect": "Allow","NotAction": ["fsx:DeleteBackup"],"Resource": "arn:aws:fsx:::*"
Limitations
- Currently, Instaclustr only supports creating integrations between FSxN and ClickHouse cluster in the same VPC.
- The integration is only supported for ClickHouse clusters provisioned with RIYOA setup.
How to Provision ClickHouse Clusters in the VPC of an Existing FSxN Cluster
NOTE: The steps in this section are only required if you wish to provision a new ClickHouse cluster that is compatible with an FSxN file system you have already created, either outside of the NetApp Instaclustr platform in your AWS account, or from a previous ClickHouse FSxN integration. If you wish to create a new FSxN file system to integrate with, please skip to the heading “How to Enable FSxN Integration” below.
To integrate a ClickHouse cluster with you existing FSxN file system, the cluster must be provisioned to the same VPC of the file system.
Using the Console
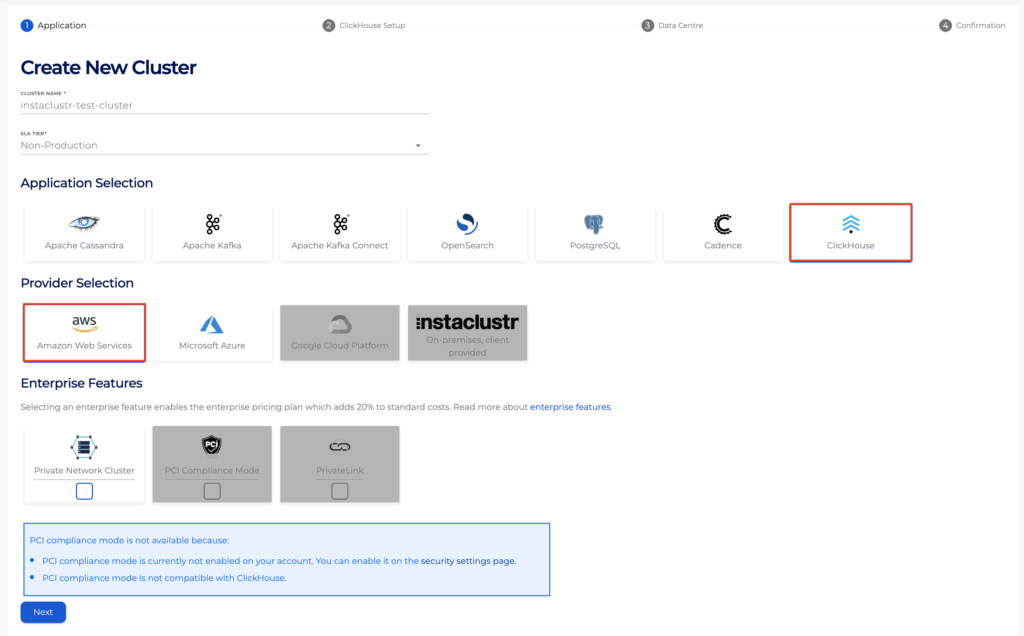
- Click Create Cluster in the left sidebar, then select ClickHouse under Application Selection and Amazon Web Services under Provider Selection. You can refer to this support document for further guidance on navigating the remainder of the cluster creation process, but do not click Create Cluster on the final confirmation page yet.
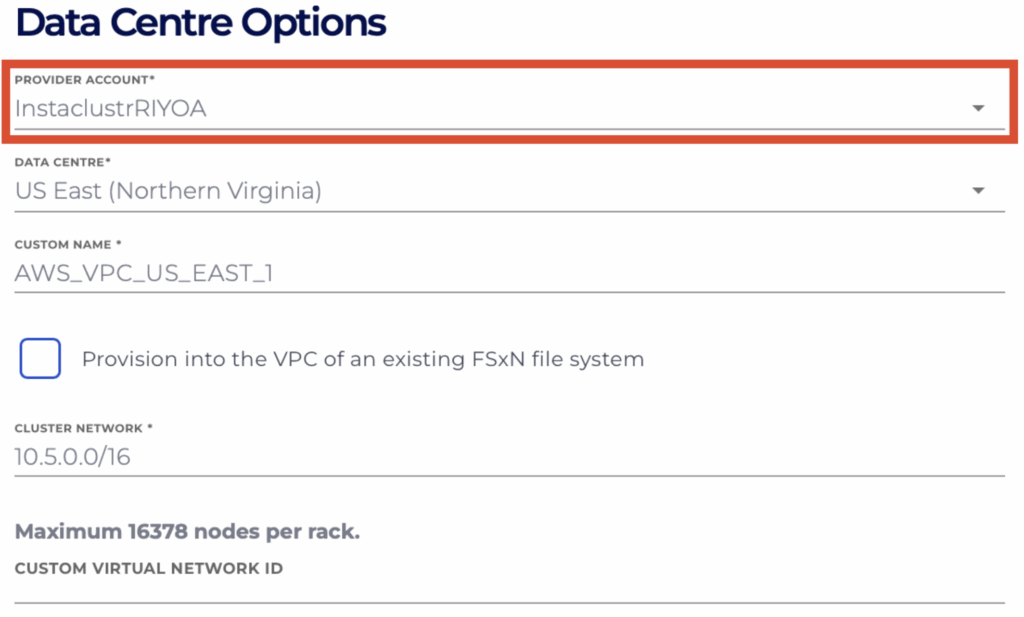
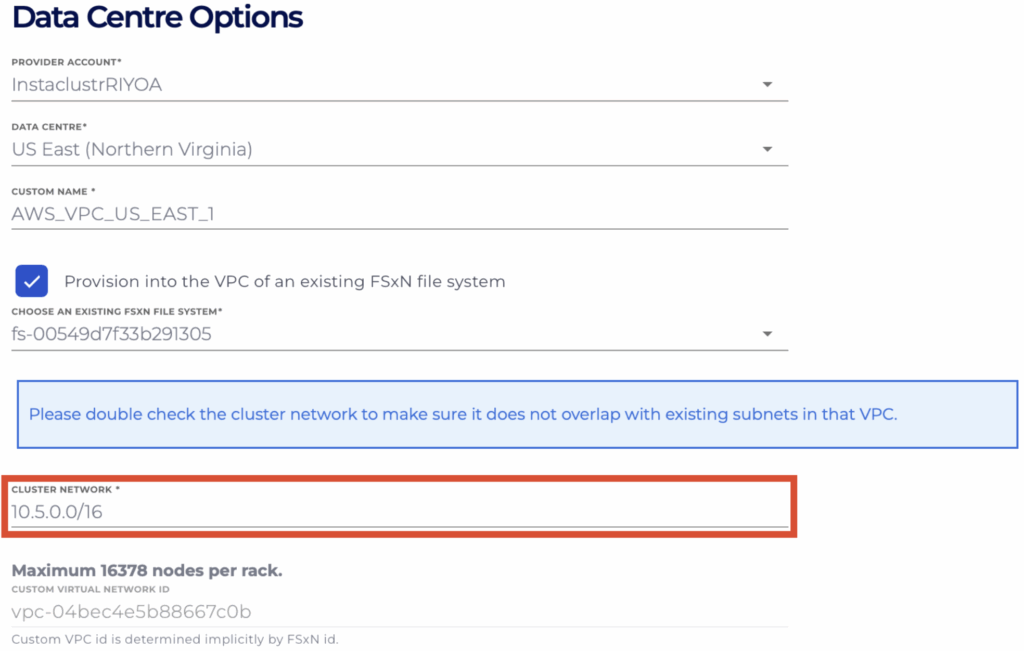
- On the Data Centre Options page, click the Provider Account dropdown box and ensure your own provider account has been selected.
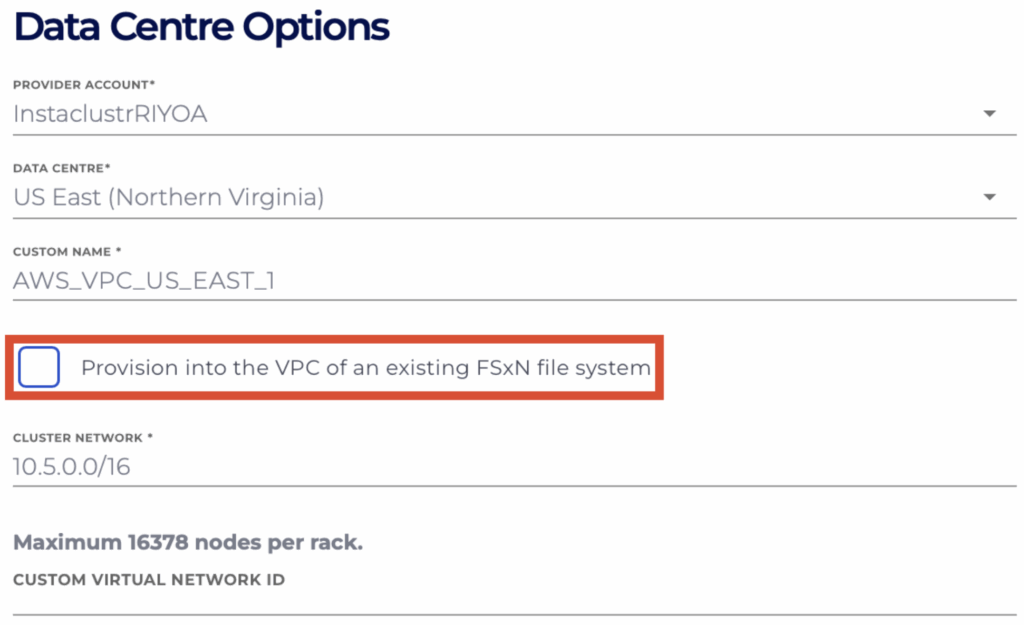
- One of the two actions is needed for ensuring the cluster gets provisioned into the same VPC as the FSxN, preparing it for configuring the integration later
- If you have the ID of the VPC that your FSxN is in, you could directly put that into the Custom Virtual Network ID field;
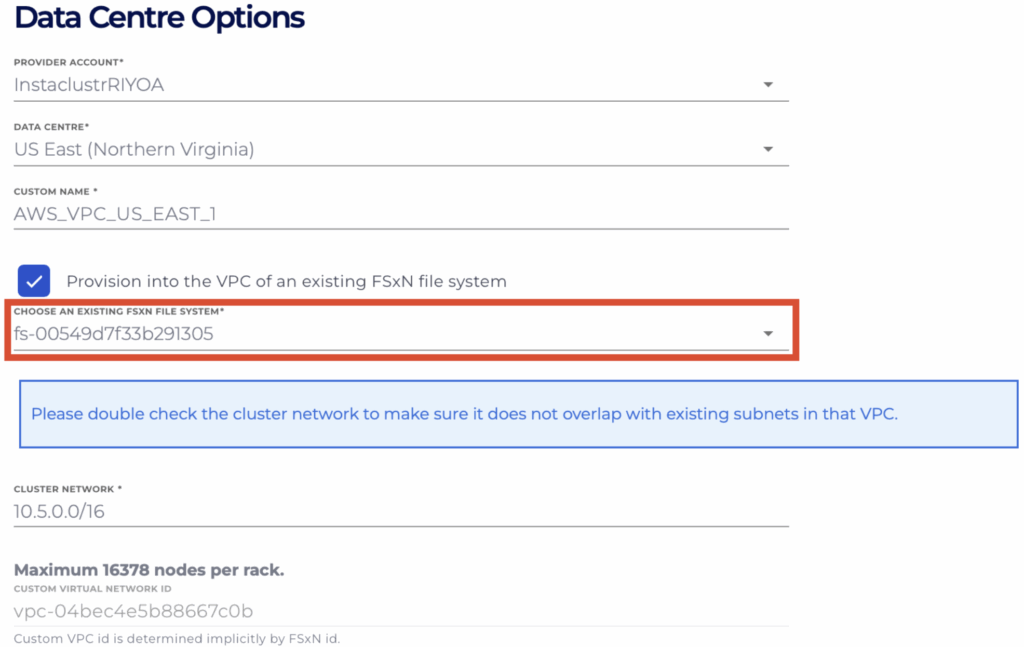
- Otherwise, check the Provision into the VPC of an existing FSxN file system checkbox, and select the ID of the FSxN that you wish to integrate with later from the dropdown list, which includes all the FSxN available from the chosen provider account (i.e., self-created, or NetApp Instaclustr managed). This will auto populate the Custom Virtual Network ID field based on the file system selected.
- If you have the ID of the VPC that your FSxN is in, you could directly put that into the Custom Virtual Network ID field;
- Ensure the value inputted in the Cluster Network field does not overlap with any subnet within the selected VPC.
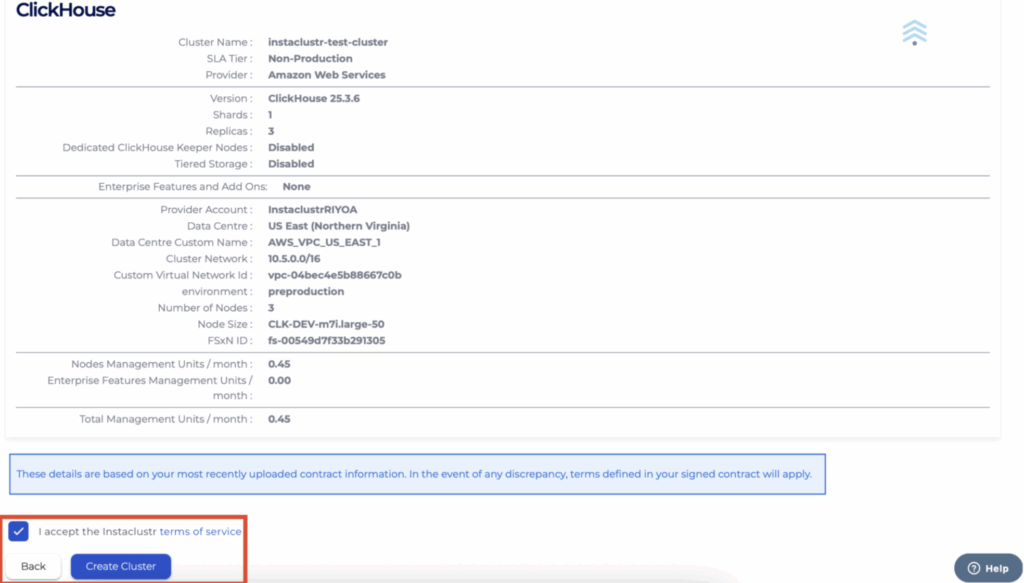
- Once you are satisfied with all other cluster configurations, click Create Cluster on the final confirmation page.
Using the API
You can create, view and remove ClickHouse clusters compatible with FSxN integration using the Instaclustr API. An example payload for the POST endpoint is provided below. Please refer to the endpoint documentation page for further details on all configurable parameters:
|
1 |
POST https://api.instaclustr.com/cluster-management/v2/resources/applications/clickhouse/clusters/v2 |
|
1 2 3 4 5 6 7 8 9 10 11 12 13 14 15 16 17 18 19 20 |
{ ... dataCentres: [ { ... network: '<DESIRED CLUSTER NETWORK IP RANGE – ENSURE NO OVERLAP WITH VPC SUBNETS>', ... awsSettings: [ { .... customVirtualNetworkId: '<VPC ID FOR FSXN FILE SYSTEM>' ... } ], ... } ], ... } |
You are also able to use the API to create FSxN file systems within the Instaclustr platform. For instructions on how to do this, refer to the “How to Manage FSxN File Systems Created Within the Instaclustr Platform” → “Using the Console” section below.
Using the Terraform Provider
You can manage your ClickHouse clusters compatible with FSxN integrations using Terraform. The steps are as follows:
- Follow this support document to set up your Instaclustr Terraform Provider V2.
- Follow the resource template below for guidance on cluster details required for compatibility with FSxN integration. Refer to the resource documentation page for details on all configurable parameters.
12345678910111213resource "instaclustr_clickhouse_cluster_v2" "example" {...data_centre {...network = "<DESIRED CLUSTER NETWORK IP RANGE – ENSURE NO OVERLAP WITH FSXN NETWORK>"...aws_settings {...custom_virtual_network_id = "<VPC ID FOR FSXN FILE SYSTEM>"...}...} - Follow the Terraform init, plan and apply cycle to provision the cluster.
You are also able to use the Terraform provider to create FSxN file systems within the Instaclustr platform. For instructions on how to do this, refer to the “How to Manage FSxN File Systems Created Within the Instaclustr Platform” → “Using the Terraform Provider” section below.
For further details on Terraform resources, refer to the Instaclustr Terraform documentation.
How to Enable FSxN Integration
Once you have provisioned a compatible ClickHouse cluster, the following steps explain how to integrate it with FSxN functionality, using either the Instaclustr Console, API, or Terraform provider.
Using the Console
- In Console, expand the ClickHouse cluster options on the sidebar and select the Integrations tab.
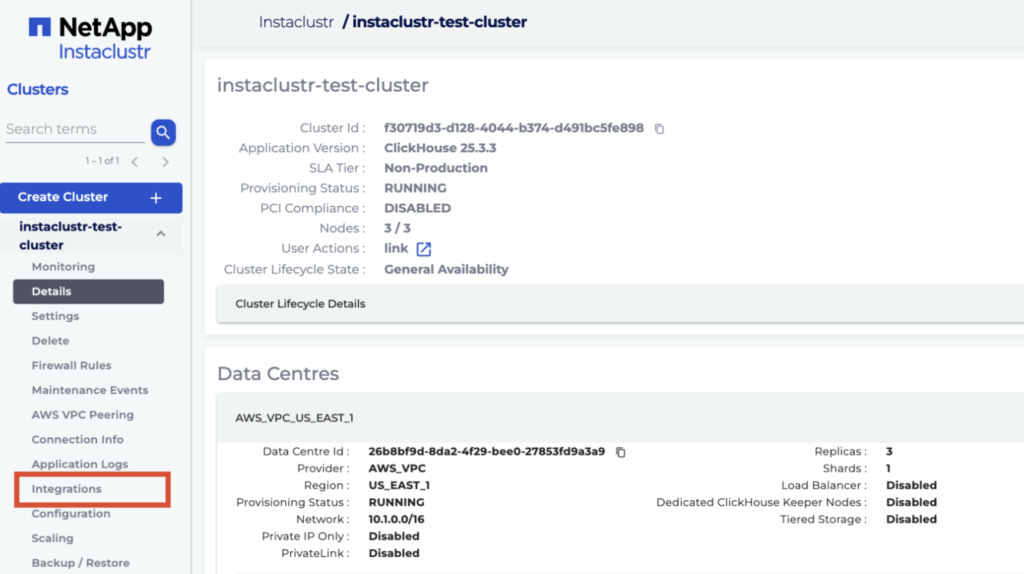
- Click Configure for the row with type AWS S3 FSxN.

- On the new page, you will be presented with 3 different options for integrating with FSxN:
- Your own file system: Select this option if you wish to integrate with a file system you have already created by yourself within your AWS account (NOT via the Instaclustr platform). Enter the details for your file system in the text boxes.
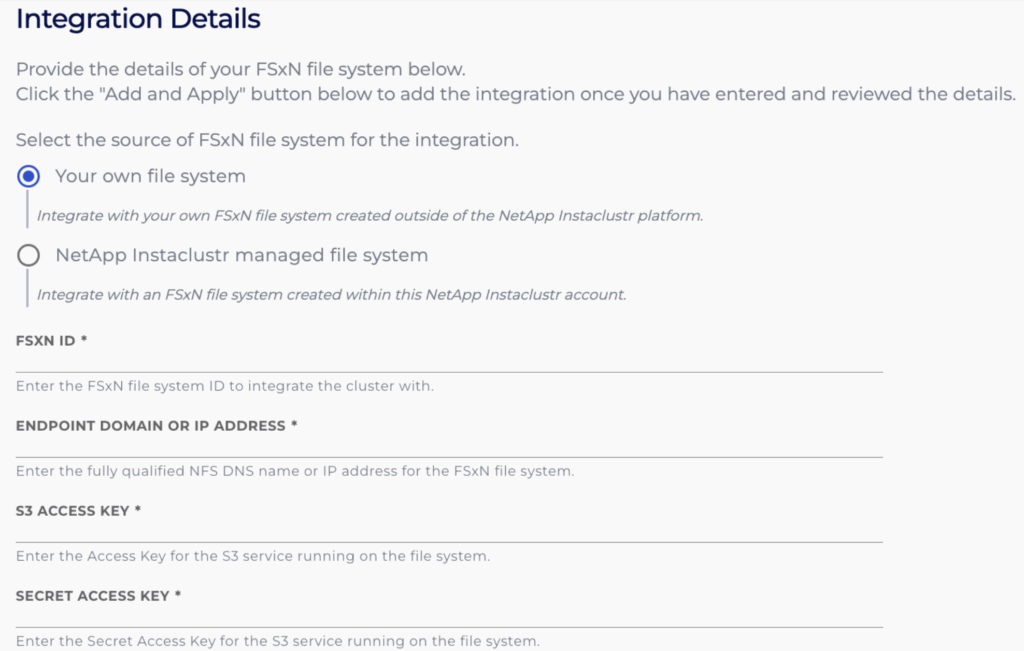
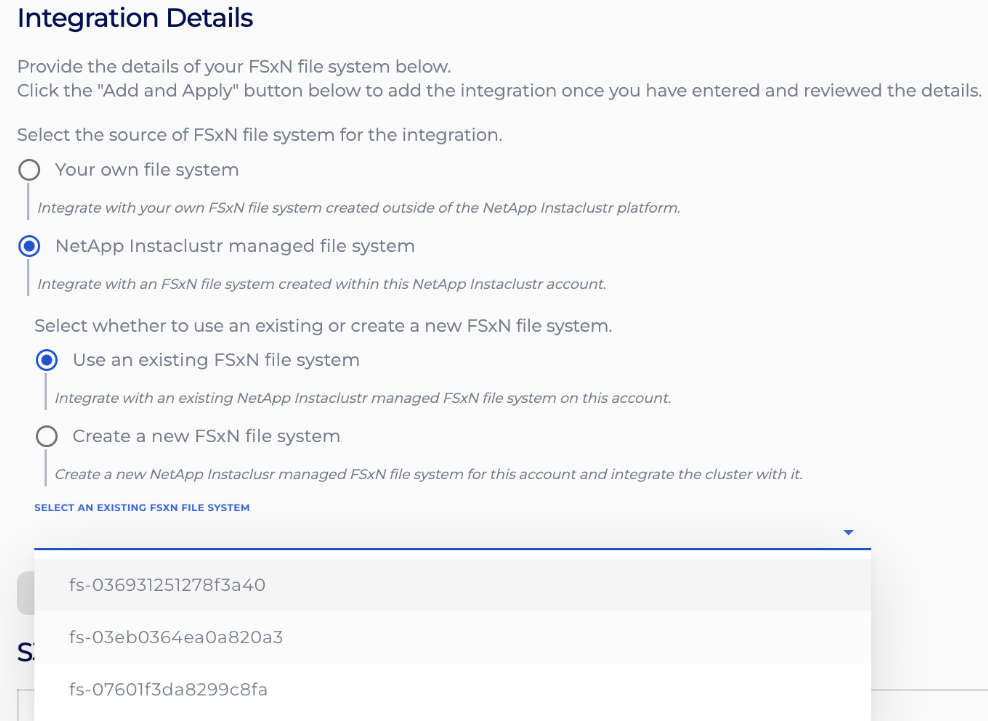
- NetApp Instaclustr managed file system → Use an existing FSxN file system: Select this option if you wish to integrate with a file system you have already created in your Instaclustr account via the Instaclustr platform. Select your file system from the dropdown.
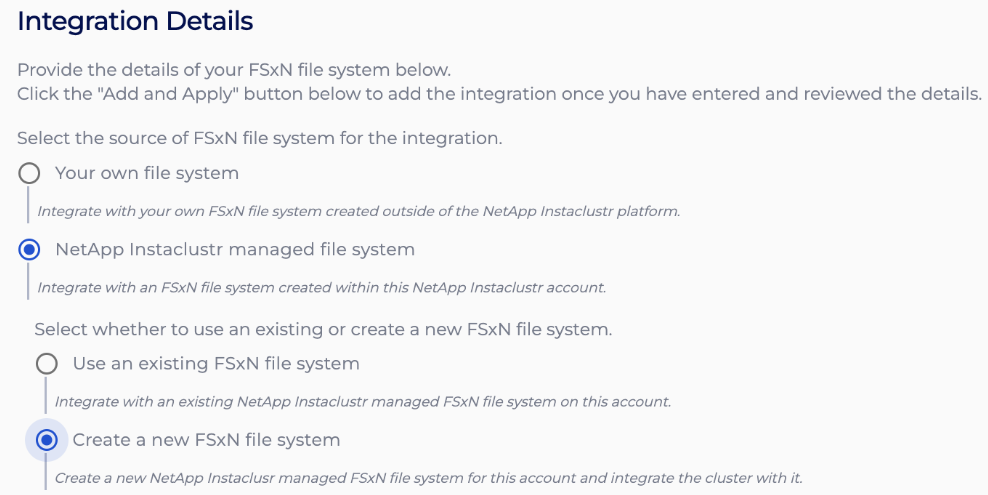
- NetApp Instaclustr managed file system → Create a new FSxN file system: Select this option if you wish Instaclustr to create a new file system for you and let your ClickHouse cluster integrate with it.
NOTE: If you create a file system this way, you will not be able to delete the associated ClickHouse cluster without first deleting the file system. For instructions on deleting an Instaclustr-managed file system, refer to the “How to Manage FSxN File Systems Created Within the Instaclustr Platform” heading below.
- Your own file system: Select this option if you wish to integrate with a file system you have already created by yourself within your AWS account (NOT via the Instaclustr platform). Enter the details for your file system in the text boxes.
- Once you have ensured they are correct, click Add and Apply to apply the integration and return to the previous Integrations page. Clicking Cancel will return to the Integrations page while discarding the integration.
- After returning to the Integrations page, the status for the AWS S3 FSxN integration row will indicate that your integration is being processed, and you will be momentarily blocked from accessing the page. After processing has finished, you will be allowed to re-enter the page.

- If you return to the FSxN integration page, you will see all your integrations listed in the S3 FSxN Integrations table, with their statuses indicated by the Status field. Clicking Delete for an integration will cause it to be deleted from the cluster.

NOTE: If any of your attempted integrations are marked as FAILED delete and try adding it again ensuring all information are entered correctly. If this still does not seem to resolve the issue, contact [email protected] for assistance.
Using the API
You can create, view and remove your FSxN integrations using the Instaclustr API. An example for the POST endpoint is provided below.
|
1 |
POST https://api.instaclustr.com/cluster-management/v2/resources/applications/clickhouse/integrations/s3-fsxn/v2 |
There are 3 different payload structures depending on how you wish to integrate your ClickHouse cluster with FSxN.
- If you wish to integrate with a file system you have already created by yourself within your AWS account (i.e., NOT via the Instaclustr platform):
123456789{clusterId: '<CLUSTER ID>',fsxnFilesystem: {fsxnId: '<FSXN ID>',endpointAddress: '<SVM NFS DNS>',accessKeyId: '<ACCESS KEY ID>',secretAccessKey: '<SECRET ACCESS KEY>'}} - If you wish to create a new file system to integrate with from the NetApp Instaclustr platform:
123{clusterId: '<CLUSTER ID>'}
NOTE: If you create a file system this way, you will not be able to delete the associated cluster without first deleting the file system. For instructions on deleting an Instaclustr-managed file system, refer to the “How to Manage FSxN File Systems Created Within the Instaclustr Platform” heading below. - If you wish to integrate with a file system you have already created via the Instaclustr platform:
123456{clusterId: '<CLUSTER ID>',fsxnFilesystem: {fsxnId: '<FSXN ID>'}}
For further details on API endpoints, refer to the Instaclustr API documentation.
Using the Terraform Provider
You can manage your FSxN integrations using Terraform. The steps are as follows:
- Follow this support document to set up your Instaclustr Terraform Provider V2.
- Populate the resource template below with information about the integration.
- If you wish to integrate with a file system you have already created by yourself within your AWS account (i.e., NOT via the Instaclustr platform):
123456789resource "instaclustr_clickhouse_integration_s3_fsxn_v2" "example" {fsxn_filesystem {fsxn_id = "<FSXN ID>",endpoint_address = "<SVM ENDPOINT ADDRESS>",access_key_id = "<ACCESS KEY ID>",secret_access_key = "<SECRET ACCESS KEY>"}cluster_id = "<CLUSTER ID>"} - If you wish to create a new file system to integrate with from the NetApp Instaclustr platform:
123resource "instaclustr_aws_fsxn_v2" "example_fsxn_p2" {cluster_id = "<CLUSTER ID>"}
NOTE: If you create a file system this way, you will not be able to delete the associated cluster without first deleting the file system. For instructions on deleting an Instaclustr-managed file system, refer to the “How to Manage FSxN File Systems Created Within the Instaclustr Platform” heading below. - If you wish to integrate with a file system you have already created via the Instaclustr platform (i.e., the “instaclustr_aws_fsxn_v2” resource above):
123456resource "instaclustr_clickhouse_integration_s3_fsxn_v2" "example" {fsxn_filesystem {fsxn_id = "<FSXN ID>"}cluster_id = "<CLUSTER ID>"}
- If you wish to integrate with a file system you have already created by yourself within your AWS account (i.e., NOT via the Instaclustr platform):
- Follow the Terraform init, plan and apply cycle to provision the integration.
For further details on Terraform resources, refer to the Instaclustr Terraform documentation.
How to Use ClickHouse S3 Table Engine with FSxN
NOTE: For detailed information, refer to the official S3 Table Engine documentation.
Creating an S3 Table
Create a table using the S3 Table Engine with the “Named Collection” of the integration (copy from the “S3 FSxN Integrations” table on Console) and file you wish to manage with ClickHouse, such as the below example:
|
1 2 |
CREATE TABLE s3_fsxn_table (id Int32, name String) ENGINE = S3(<NAMED_COLLECTION_NAME>, filename='<S3_BUCKET_NAME>/<FILE_NAME>'); |
Note that you must not provide S3_BUCKET_NAME if the file system is created and managed by Instaclustr.
Loading Data
Load data into the S3 table by inserting data directly, such as the below example:
|
1 |
INSERT INTO s3_table VALUES (1, 'Alice'), (2, 'Bob'); |
Querying Data
Query data from the S3 table as you would with any other table, such as the below example:
|
1 |
SELECT * FROM s3_table; |
As an alternative to first creating a new table using the S3 Table Engine, data can also be queried directly from the file system with the S3 Table Function, such as the below example:
|
1 |
SELECT * FROM s3(<NAMED_COLLECTION>, filename=<S3_BUCKET_NAME>/<FILE_NAME>'); |
How to Manage FSxN File Systems Created Within the Instaclustr Platform
FSxN file systems created within the Instaclustr platform can be managed within the platform as well. The following steps explain how to view and delete these file systems, using either the Instaclustr Console, API, or Terraform provider.
Using the Console
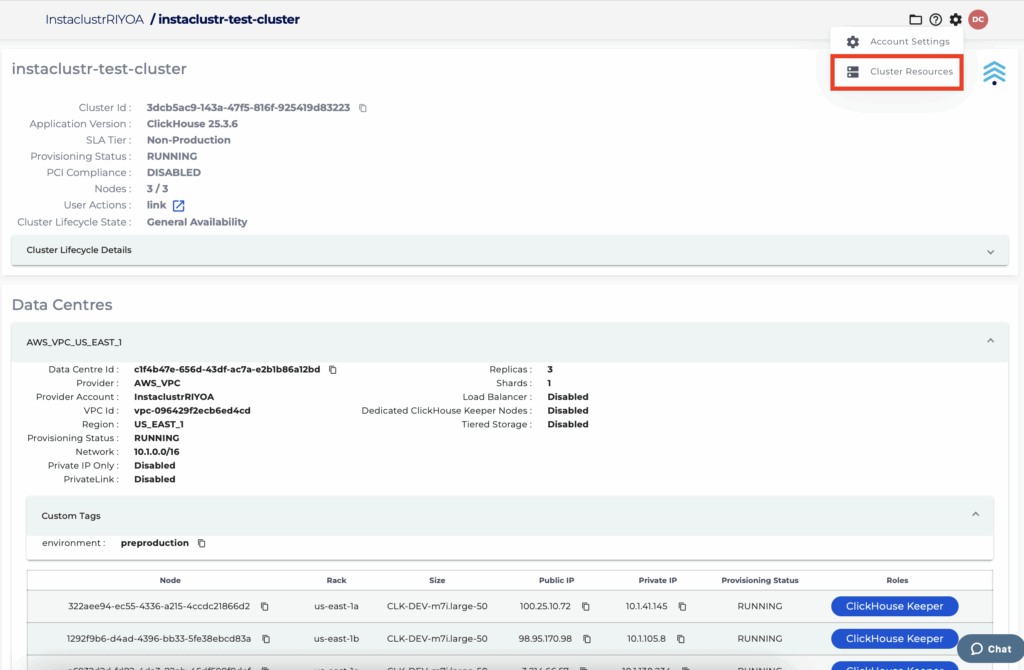
- In Console, click the gear icon in the top-right corner and select Cluster Resources.
- Select the FSxNs tab to view information for your file systems, including the AWS account and VPC it is provisioned in, as well as its provisioning status.

- To delete a file system previously provisioned within your account, click the Delete button for that file system. Note that you cannot delete a file system that is currently integrated with a ClickHouse cluster (for instructions on deleting an integration, refer to the “How to Enable FSxN Integration” heading above).

Using the API
You can manage FSxN file systems within your account using the Instaclustr API. Use the POST endpoint provided below to create an FSxN file system in the same VPC as the provided ClickHouse cluster:
|
1 |
POST https://api.instaclustr.com/cluster-management/v2/resources/applications/clickhouse/clusters/v2 |
|
1 2 3 |
{ clusterId: '<CLUSTER ID>' } |
Similarly, to delete an existing FSxN file system, use the DELETE endpoint provided below:
file system in the same VPC as the provided ClickHouse cluster:
|
1 |
DELETE https://api.instaclustr.com/cluster-management/v2/resources/providers/aws/fsxn/v2/<FSXN ID> |
For further details on API endpoints, refer to the Instaclustr API documentation.
Using the Terraform Provider
You can manage file systems within your account using Terraform. The steps are as follows:
- Follow this support document to set up your Instaclustr Terraform Provider V2.
- Follow the resource template below for guidance on cluster details required for compatibility with FSxN integration. Refer to the resource documentation page for details on all configurable parameters.
123resource "instaclustr_aws_fsxn_v2" "example" {cluster_id = "<CLUSTER ID>"} - Follow the Terraform init, plan and apply cycle to provision the FSxN file system.
For further details on Terraform resources, refer to the Instaclustr Terraform documentation.