AWS FSx for NetApp ONTAP Integration: Self-Managed FSx
Use this guide if you have an existing Amazon FSx for NetApp ONTAP file system created outside the Instaclustr platform and you want to integrate it with a NetApp Instaclustr-managed ClickHouse cluster for S3-compatible access.
NetApp Instaclustr-managed ClickHouse with FSx for ONTAP is a full lifecycle solution eliminating the self-managed burden for you. Refer to the NetApp Instaclustr-Managed FSx for ONTAP guide for instructions on integrating the NetApp Instaclustr fully managed solution.
Overview
By following this guide, you will connect your self‑managed Amazon FSx for NetApp ONTAP file system to a NetApp Instaclustr-managed ClickHouse cluster provisioned in an AWS RIYOA account, whether they reside in the same or different AWS accounts. This guide provides instructions for:
- How to enable FSx for ONTAP integration via NetApp Instaclustr Console, API or Terraform
- How to self-manage FSx for ONTAP network configuration
At the end of this process, your NetApp Instaclustr-managed ClickHouse cluster will have an active FSx for ONTAP integration and a Named Collection that can be used with the ClickHouse S3 table engine and S3 table functions to query data.
Click here to learn more about AWS FSx for NetApp ONTAP integration, including how to use it for accessing file system data through ClickHouse.
Before, proceeding, please note the following:
Limitations
- Ensure that each NetApp Instaclustr-managed ClickHouse cluster and FSx for ONTAP uses a unique CIDR range. Overlapping CIDRs will prevent successful integration.
Prerequisites
- The NetApp Instaclustr-managed ClickHouse cluster is provisioned in an AWS RIYOA provider account.
- NetApp Instaclustr-managed network setup: Please follow the RIYOA Setup Guide before proceeding. These guides are available in the NetApp Instaclustr Console and can be accessed by clicking Directory in the top-left corner, then expanding RIYOA Setup under Guides in the sidebar.
- Self managed network setup: If you prefer to manage the networking yourself, you can skip this step, but please note that you will be responsible for ensuring correct networking setup and security. For this, refer to the Manage FSx for ONTAP networking yourself section of this article below.
How to Enable FSx for ONTAP Integration
The following steps explain how to integrate an FSx for ONTAP, once you have provisioned a compatible NetApp Instaclustr-managed ClickHouse cluster. The integration can be enabled on the NetApp Instaclustr Console, API, or Terraform provider.
Using the NetApp Instaclustr Console to enable FSx for ONTAP integration
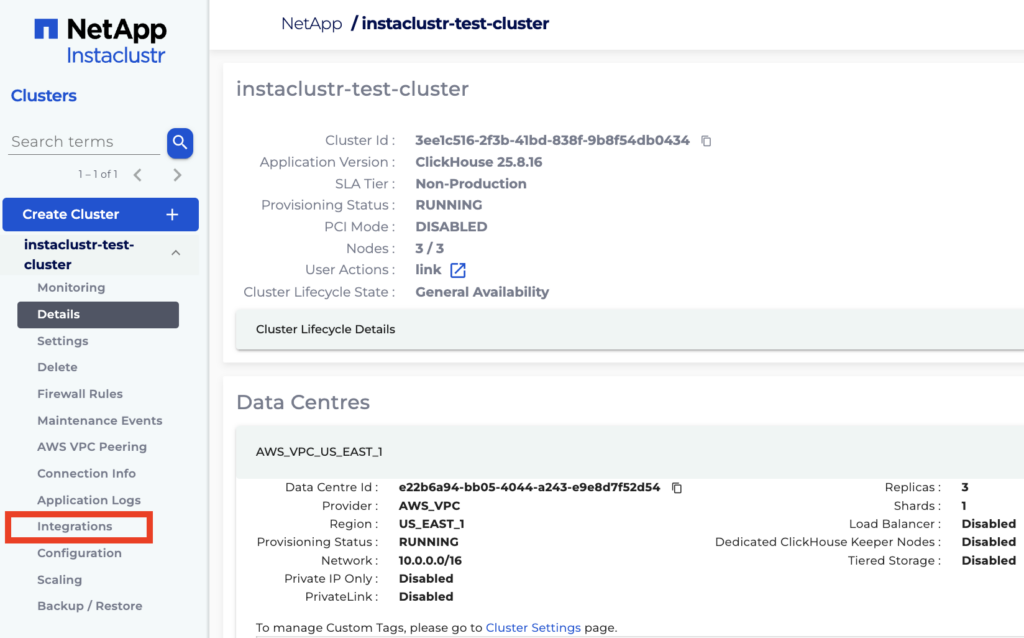
- In Console, expand the NetApp Instaclustr-managed ClickHouse cluster options on the sidebar and select the Integrations option.
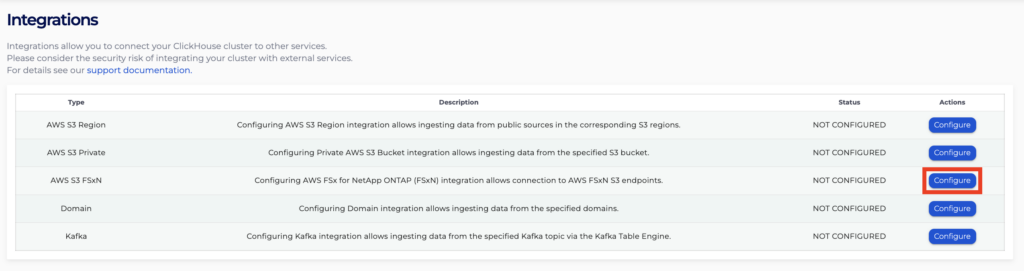
- Click Configure for the row with type AWS S3 FSxN.
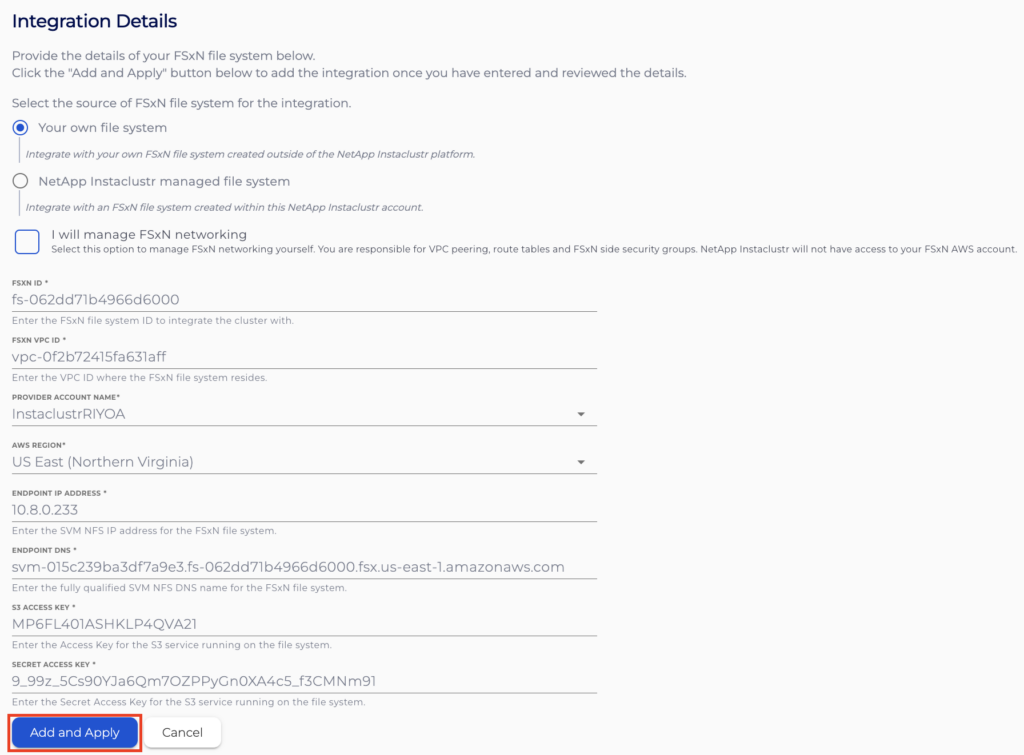
- On the Configure AWS S3 FSxN Integration page, select Your own file system to integrate your existing FSx for ONTAP file system. Enter the required file system details in the provided fields to connect it to your NetApp Instaclustr-managed ClickHouse cluster.
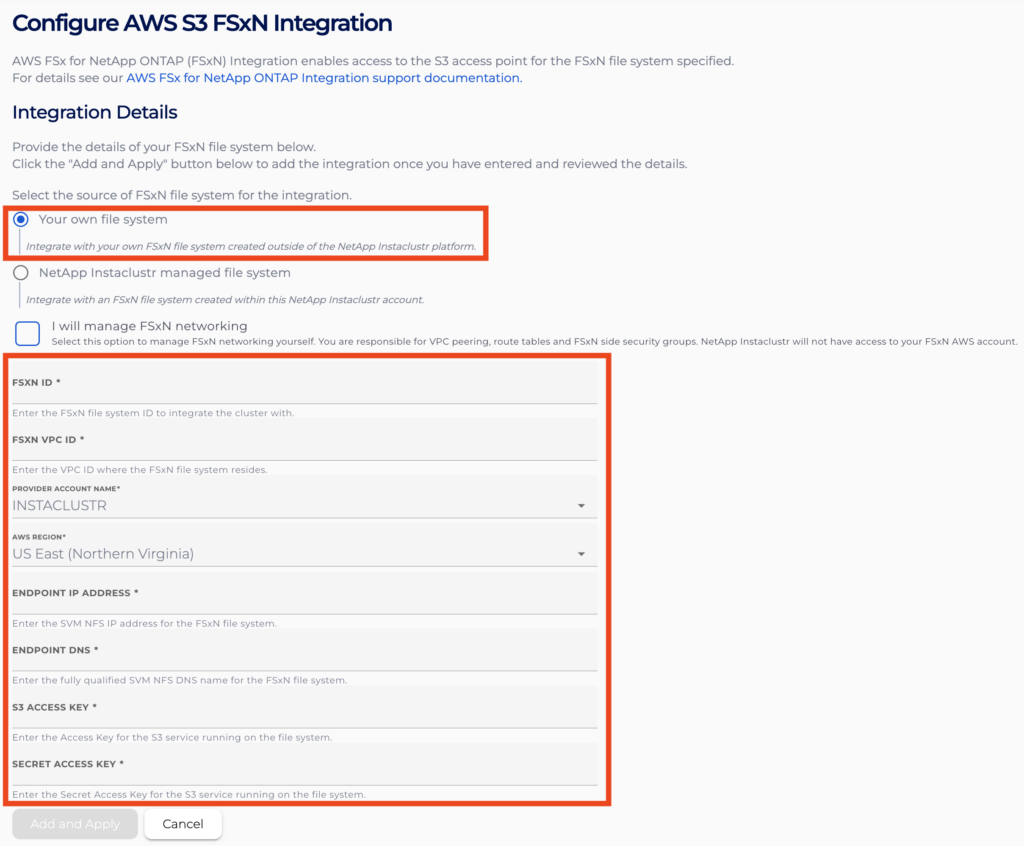
You will also need to configure whether your preference is for NetApp Instaclustr to manage your network configuration or whether you prefer to manage the networking configurations yourself. You can enable this option by selecting the relevant checkbox.
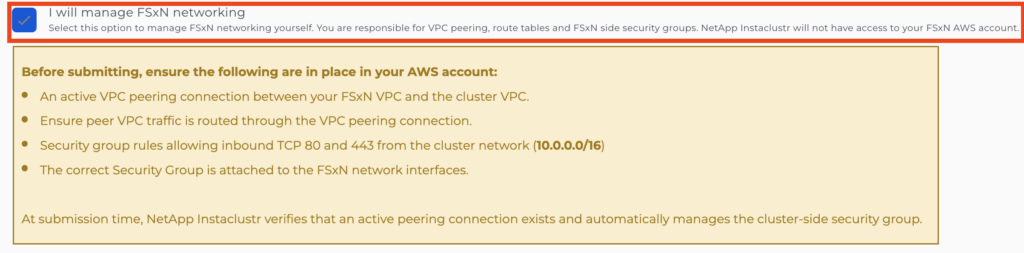
For detailed guidance on configuring networking in your account after integration, please refer to the Manage FSx for ONTAP networking yourself section of this article below. - Once you have ensured that all details are correct, click Add and Apply to apply the integration.
Clicking Cancel will return to the Integrations page while discarding the integration.
- After returning to the Integrations page, the status for the AWS S3 FSxN integration row will indicate that your integration is being processed, and you will be momentarily blocked from accessing the configuration page.

- After processing has finished, you will be allowed to re-enter the configuration page.
- If you return to the S3 FSxN Integrations page, you will see all your existing integrations listed in a table, with their statuses indicated by the Status field. Clicking Delete for an integration will cause it to be deleted from the cluster.

Note: If an integration shows a FAILED status, try deleting it and adding it again, making sure all details are entered correctly.
If this still does not seem to resolve the issue, contact NetApp Instaclustr Support for assistance.
Once your integration has been applied, you can refer to How to Use ClickHouse S3 Table Engine with FSx for ONTAP for guidance on using your integration.
Using the NetApp Instaclustr API to enable FSx for ONTAP integration
You can create, view and remove your FSx for ONTAP integrations using the NetApp Instaclustr API. An example payload for the POST endpoint is provided below.
Please refer to the endpoint documentation page for further details on all configurable parameters.
Endpoint:
|
1 |
POST https://api.instaclustr.com/cluster-management/v2/resources/applications/clickhouse/clusters/v2 |
Payload:
|
1 2 3 4 5 6 7 8 9 10 11 12 13 |
{ clusterId: '<CLUSTER ID>', fsxnFilesystem: { fsxnId: '<FSX FOR ONTAP ID>', endpointAddress: '<SVM NFS DNS>', endpointDns: '<ENDPOINT DNS>', accessKeyId: '<ACCESS KEY ID>', secretAccessKey: '<SECRET ACCESS KEY>', providerAccountName: '<PROVIDER ACCOUNT>', vpcId: '<VPC ID>', region: '<FSx for ONTAP Region>' } } |
(Optional) If you want to manage FSx for ONTAP networking yourself and your FSx for ONTAP file system and NetApp Instaclustr-managed ClickHouse cluster reside in different AWS accounts, include the parameter below:
|
1 2 3 4 5 6 7 8 |
{ clusterId: '<CLUSTER ID>', fdxnFilesystem: { ... selfManagedNetwork: 'true', ... } } |
When selfManagedNetwork is set to true, you must omit the providerAccountName and region fields.
For further details on NetApp Instaclustr API endpoints, refer to the NetApp Instaclustr API documentation.
Using the NetApp Instaclustr Terraform Provider
You can manage your FSx for ONTAP integrations using NetApp Instaclustr Terraform. The steps are as follows:
- Follow this support document to set up your NetApp Instaclustr Terraform Provider V2.
- Populate the resource template below with the required integration details:
12345678910111213resource "instaclustr_clickhouse_integration_s3_fsxn_v2" "example" {fsxn_filesystem {fsxn_id = "<FSX FOR ONTAP ID>",endpoint_address = "<SVM ENDPOINT ADDRESS>",endpoint_dns = "<ENDPOINT DNS>",access_key_id = "<ACCESS KEY ID>",secret_access_key = "<SECRET ACCESS KEY>",providerAccountName = "<PROVIDER ACCOUNT>",vpc_id = "<VPC ID>",region = '<FSx for ONTAP REGION>'}cluster_id = "<CLUSTER ID>"}
(Optional) If you want to manage FSx for ONTAP networking yourself and your FSx for ONTAP file system and NetApp Instaclustr-managed ClickHouse cluster reside in different AWS accounts, include selfManagedNetwork = true within the fsxn_filesystem block. When selfManagedNetwork is set to true, you must omit the providerAccountName and region fields.
Refer to the resource documentation page for details on all configurable parameters.
Once your integration has been applied, you can refer to How to Use ClickHouse S3 Table Engine with FSx for ONTAP for guidance on using your integration.
How to Self-Manage FSx for ONTAP Network Configuration
Note: This section is relevant only if you:
- have your own FSx for NetApp ONTAP file system in a different AWS Account from your NetApp Instaclustr-managed ClickHouse Cluster; and
- want to manage the networking configuration yourself to connect it to a NetApp Instaclustr-managed ClickHouse cluster.
Proper networking configuration is required for communication between your NetApp Instaclustr-managed ClickHouse cluster and the FSx for ONTAP. To enable connectivity, you’ll need to set up an active VPC peering connection and ensure the correct routing tables are in place between your FSx for ONTAP VPC and the NetApp Instaclustr-managed ClickHouse cluster VPC.
You can follow this guide for step‑by‑step instructions on how to create, update, and delete VPC peering connections.
Create and Attach an AWS Security Group
To allow communication between your NetApp Instaclustr-managed ClickHouse cluster and FSx for ONTAP file system, an appropriate security group must be created and attached to your FSx for ONTAP resource. This security group should be configured to allow inbound traffic from the ClickHouse cluster on the required ports.
ClickHouse uses ports 80 for HTTP and 443 for HTTPS connections. Ensuring these ports are allowed is essential for successful connectivity and data access between ClickHouse and FSx for ONTAP.
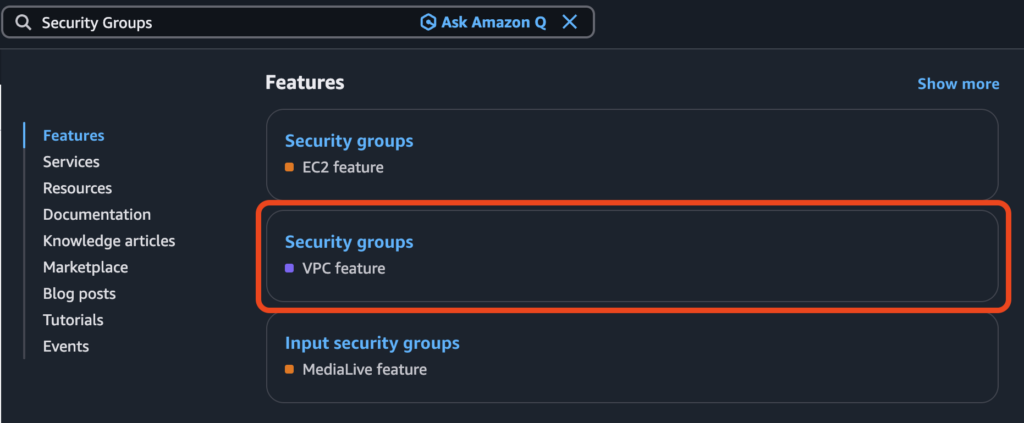
- Log into your AWS Account where your FSx for ONTAP resides.
- Select the Region of your FSx for ONTAP, then search for Security Groups and click the option labelled VPC feature.
- Click Create security group.
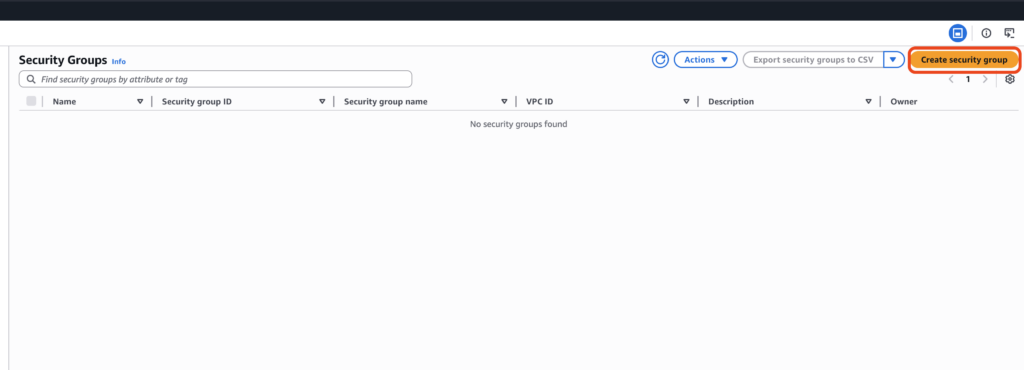
- In the field Security group name, enter a name for the security group.
Note that this name must be unique for the associated VPC and cannot be modified after creation of the group, so it is recommended to use a naming convention which allows easy identification. - In the field Description, enter a short description of the security group (for example, “Allows access to FSx for ONTAP from NetApp Instaclustr-managed ClickHouse”).
- In the field VPC, search for and select the VPC of your FSx for ONTAP.
- Under the heading Inbound rules, click Add rule. The rules created here permit inbound traffic to the FSx for ONTAP from the cluster.
Select Custom TCP in the Type field. Enter 80 in the Port range field. Select Custom in the Source field, then enter the CIDR of your NetApp Instaclustr-managed ClickHouse cluster.Optionally, add a description in the Description field.
- Repeat Step 6 to create a second rule for port 443.
- Confirm your security group configuration matches the sample below. Click Create security group.

- Attach the security group to the relevant network interfaces of your FSx for ONTAP file system. After completing these steps, your network setup will be ready.
Questions
Please contact NetApp Instaclustr Support for any further inquiries.