Set Up BYOC – AWS
Overview & Concepts
Bring Your Own Cloud ( BYOC)
NetApp Instaclustr BYOC (Bring Your Own Cloud) is a deployment model where supported open-source technologies are managed by NetApp Instaclustr but run directly inside your own cloud account. NetApp manages the operations, while you retain full ownership and security control of your underlying infrastructure and data.
Key concepts
| Term | Description |
| Provider Account | Instaclustr-side record that connects your Instaclustr account to a specific cloud account (such as AWS) |
| Cross-account access role | The role or identity in your cloud account that Instaclustr assumes to provision and manage clusters on your behalf. Access is secured using your Instaclustr Account UUID as the cross-account trust identifier. |
| Backup storage | Object storage in your cloud account (for example, an S3 bucket in AWS) used for cluster backups. |
| Status lifecycle | PROVISIONING (Pending Validation) → RUNNING (Validated) / FAILED. |
Prerequisites & Requirements – AWS
Before starting, ensure you have:
- Instaclustr Account Owner role
- An AWS account with permissions to deploy CloudFormation/Terraform and create IAM roles, S3 buckets, and EC2 key pairs.
Note: If you do not have these permissions yourself, you can download the CloudFormation or Terraform template from the setup workflow and share it with someone in your organization who can deploy it in your AWS account
Information you’ll need:
| Item | Details |
| AWS Account ID | Your 12-digit AWS Account ID |
| Target Region | The AWS region for your first data center (one per setup; additional regions can be added later via support) |
| S3 Backup Bucket Name | 3–63 characters, lowercase alphanumeric and hyphens. Cannot start/end with a hyphen. Must be globally unique. |
| IAM Role Name (optional) | Defaults to instaclustr-<your-instaclustr-account-id> if not specified |
API/Terraform users will need Provisioning API key.
Setting up a BYOC Provider Account (Console)
Step 1 — Navigate to BYOC Setup
Log in to your Instaclustr Console. You can start setup from either:
- The Set Up BYOC tile on the landing page, or
- Account Settings (gear icon) → BYOC Provider Accounts → Set Up BYOC
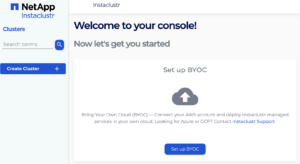
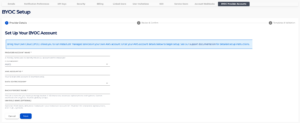
Step 2 — Enter Provider Details
Fill in the following fields:
| Field | Description |
| Provider Account Name | A friendly name used to identify this BYOC account within Instaclustr. This is not an AWS resource name. |
| Cloud Provider | Select AWS. |
| AWS Account ID | Your 12-digit AWS Account ID. |
| Data Centre Region | The AWS region where your cluster will run. In the initial release, only one region can be selected per setup. To add more regions later, contact support. |
| Backup Bucket Name | The S3 bucket name for cluster backups. 3–63 characters, lowercase alphanumeric and hyphens. Cannot start/end with a hyphen. Must be globally unique. |
| IAM Role Name (optional) | The role Instaclustr assumes to provision clusters in your account. Defaults to instaclustr-<your-instaclustr-account-id> if left blank. |
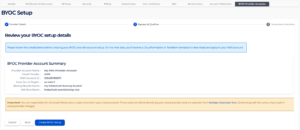
Step 3 — Review & Confirm
Review your details. On the next step, you’ll receive a CloudFormation or Terraform template to download and apply to your AWS account.
Click Create BYOC Setup to confirm.
Your provider account is now created with a status of Pending Validation. It cannot be used for cluster creation until validated.
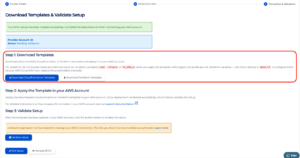
Step 4 — Download the Templates
From the BYOC setup page, download either:
- AWS CloudFormation (JSON template) — recommended for console-driven workflows
- Terraform (main.tf in a ZIP) — for teams that prefer Infrastructure as Code
Both templates are functionally equivalent and create the same resources in your AWS account.
Use “Edit Setup” at this step if you need to modify the provider account details.
Click here to read what the BYOC Template does in your cloud account.
Step 5 – Update the Template for Terraform only
Update Placeholders
The downloaded terraform template contains placeholders for the values you specified during setup. Replace:
| Placeholder | Replace With |
| @@S3_BACKUP_BUCKET_NAME@@ | The Backup Bucket Name from your setup |
| @@IAM_ROLE_NAME@@ | The IAM Role Name from your setup |
| @@AWS_REGION@@ | AWS region (e.g., us-east-1) |
| @@AWS_PROFILE@@ | Your AWS CLI profile with appropriate permissions |
Important: The bucket name and IAM role name in the template must exactly match what you entered during setup. If they differ, validation will fail.
Step 6 – Deploy in Your AWS Account
Option A: AWS CloudFormation
- Sign in to the AWS CloudFormation console in the same AWS account you registered for BYOC.
- Choose Create stack → With new resources (standard).
- Under Specify template, choose Upload a template file and select your downloaded JSON file.
- Enter a Stack name (e.g. instaclustr-byoc-setup).
- On Specify stack details, confirm and click next:
- BucketName — your backup bucket name from the Console
- IAMRoleName — your IAM role name from the Console
- Leave other parameters at their defaults unless instructed otherwise.
- Tick the check box on Acknowledge IAM capability requirements (the template creates IAM roles and policies) and click next.
- Create the stack and wait until the status is CREATE_COMPLETE.
Option B: Terraform
- Unzip the downloaded Terraform template.
- Edit main.tf — replace all placeholders as described in Step 2 above.
- From the directory containing main.tf, run:
- terraform init
- terraform plan
- terraform apply
- Confirm the plan creates the S3 bucket, IAM role, IAM policy, and EC2 key pair, then apply.
Step 7 – Validating Your Setup
Validation is where Instaclustr verifies your AWS infrastructure (IAM role, S3 bucket, EC2 key pair, and permissions) and activates the provider account.
When to Validate
Only validate after:
- Your CloudFormation stack status is CREATE_COMPLETE, or
- Your Terraform apply has completed successfully
Do not validate while the stack is still creating, updating, or in a failed state.
How to Validate
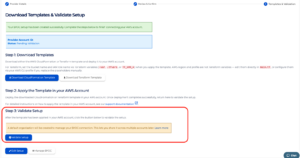
After the template has been applied in your AWS account, click the Validate Setup button.
You can trigger validation from either:
- Option A: BYOC Setup Wizard — If you’re still in the setup flow, click Validate Setup in Step 3.
- Option B: Provider Account Detail Page — If you navigated away, go to BYOC Provider Accounts → open your provider account → click Validate Setup.
On Successful Validation
Your BYOC account has been successfully validated and is ready for use. You can now create a cluster using this provider account by selecting it in the Provider Account drop-down on the Data Centre Options page when creating a cluster.
Note: On successful validation, Instaclustr creates a default organization (if your account doesn’t already belong to one) and links the BYOC provider account to it. This allows you to share the provider account with other accounts in the organization later if needed. You can view your organization from the Account page or under Organisations in the console.
If Validation Fails
- Common fixes:
- Ensure you’ve applied the downloaded template (CloudFormation or Terraform) in your AWS account
- Check that the AWS Account ID you entered is correct
- Verify the stack/deployment completed successfully (not in a failed or rollback state)
- Confirm the IAM Role Name matches what was specified during setup
- If you applied the template recently, wait a few minutes for IAM propagation and retry
Retrying After a Failed Validation
You can fix the issue and retry without creating a new provider account:
- Open the provider account detail page (status will show Failed)
- Click Edit Setup to update fields such as Backup Bucket Name, AWS Account ID, IAM Role Name, or Data Centre Region if needed
- Fix or redeploy the AWS resources as required
- Click Validate Setup again
Still not working? Contact support
Terraform API Note: If you create a BYOC provider account setup via the Instaclustr Terraform provider (rather than the Console), validation is triggered automatically as part of the create request. You do not need to separately click Validate Setup in the Console for Terraform-initiated setups.
Ready to deploy Clusters?
Creating a Cluster with Your BYOC Provider Account
BYOC cluster creation uses the standard Instaclustr Create Cluster wizard. The key difference is selecting your BYOC provider account instead of the default Instaclustr provider account — your cluster then runs in your own cloud environment.
You can now provision a new cluster using this provider account by selecting it in the Provider Account drop-down on the Data Centre Options page when creating a cluster.
Shared provider accounts: If your Instaclustr account is a member of an organization and has received a shared BYOC provider account, you can create clusters using that shared provider account without deploying your own CloudFormation or Terraform template.
For detailed instructions, see:
- Creating a Cassandra Cluster
- Creating a Kafka Cluster
- Creating an OpenSearch Cluster
- Creating a PostgreSQL Cluster
- Creating a Cadence Cluster
- Creating a ClickHouse Cluster
- Creating an MCP Gateway Cluster
Want to add more AWS regions? Contact support to add new data centers to this provider account.
Related Documentation
For advanced setup methods and reference material, see:
| Document | Description |
| Set Up a BYOC Provider Account using the API | Step-by-step API setup using curl and the Provisioning API |
| Setting Up a BYOC Provider Account Using Terraform Provider | Full Terraform-native setup using the Instaclustr Terraform provider |
| Sharing BYOC Provider Accounts | How to share a validated provider account with other accounts in your organisation |
| BYOC Template Technical Reference | Detailed breakdown of what the CloudFormation and Terraform templates create in your AWS account |