Cluster DNS
With Cluster DNS, your applications connect to Apache Cassandra® or Apache Kafka® using simple, stable hostnames instead of long lists of IP addresses. Instaclustr keeps those names up to date on Amazon Route 53 when nodes change—after scaling, replacements, or maintenance—so you spend less time updating client configuration.
Why use it
- Easier connection setup — Point clients at a few hostnames per data centre (for example the nodes and cassandra names for Cassandra, or nodes and kafka for Kafka) instead of every node IP.
- Less churn when infrastructure changes — DNS is updated for you as the cluster evolves, so clients that use these names are less likely to need emergency config changes.
Where Cluster DNS is available
You can use Cluster DNS if:
- Your cluster is Apache Cassandra® or Apache Kafka® on AWS (Run in Instaclustr’s Account or Bring Your Own Cloud).
- Cluster DNS has been turned on for your Instaclustr account. If you do not see the option when creating a cluster or on the Network & Access settings page, email [email protected] and we can check your account.
Cluster DNS is not available on Azure or Google Cloud, and it is not supported together with AWS PrivateLink on the same cluster.
Summary of limitations
- Cloud Provider— AWS only; not available on Azure or Google Cloud.
- PrivateLink — Not compatible with Cluster DNS on the same cluster.
- Account — The feature must be enabled for your Instaclustr account before it appears.
- Existing clusters — Enabled by contacting Support, not via a Console toggle.
- Irreversible — Cluster DNS cannot be disabled once it is enabled for a data centre.
The hostnames you will use
For each data centre where Cluster DNS is enabled, Instaclustr creates a dedicated DNS zone. The zone name is unique to that data centre (for example it may look like <identifier>.cnodes.io). You do not need to construct it yourself: the Instaclustr Console Connection Info tab shows Hosted zone, Hosted zone ID, and the exact hostnames to copy.
Those names resolve to your nodes’ addresses. If nodes have public IPs, DNS will typically use those; otherwise private IPs are used, which matches how you already reach the cluster (see Public hosted zone vs private hosted zone below).
Public hosted zone vs private hosted zone
Whether a data centre’s DNS zone is public or private depends on how the data centre itself is reachable:
- Public network data centres, or data centres using a Let’s Encrypt certificate (for example, Kafka clusters with the Karapace REST Proxy / Schema Registry enabled) — the hosted zone is public. It’s provisioned in Instaclustr’s own AWS account and delegated from the parent domain, so the hostnames resolve from the public internet.
- Private network data centres without a Let’s Encrypt certificate — the hosted zone is private. It’s provisioned in the AWS account where your nodes run (your own account for Bring Your Own Cloud, or Instaclustr’s account for Run in Instaclustr’s Account) and associated with the cluster’s VPC. Node private IPs are published as records, so the hostnames only resolve from that VPC — and from any other VPCs you associate with the zone (see VPC peering on AWS below).
How it works for Instaclustr for Apache Cassandra Clusters
When Cluster DNS is enabled on an AWS Cassandra data centre, Instaclustr publishes Route 53 DNS records in that data centre’s zone so your drivers can use hostnames instead of raw IPs.
What you get
- Two logical names in the zone,
nodesandcassandra, each as a full hostname (for example nodes.<your-zone> and cassandra.<your-zone>). Either or both can be used as Cassandra contact points in the same way you would pass node IP addresses.
- Values are kept in sync with the nodes in that data centre. If you have several data centres, each one has its own zone and its own pair of names.
Enabling it
- New clusters — In the Console, turn on Cluster DNS in the Cassandra create-cluster flow for the AWS data centre. You can also set the equivalent flag on the data centre in the Cluster Management API when you create the cluster.
On our managed platform, Cluster DNS can be enabled in step 2 of cluster creation as shown in the screenshot below: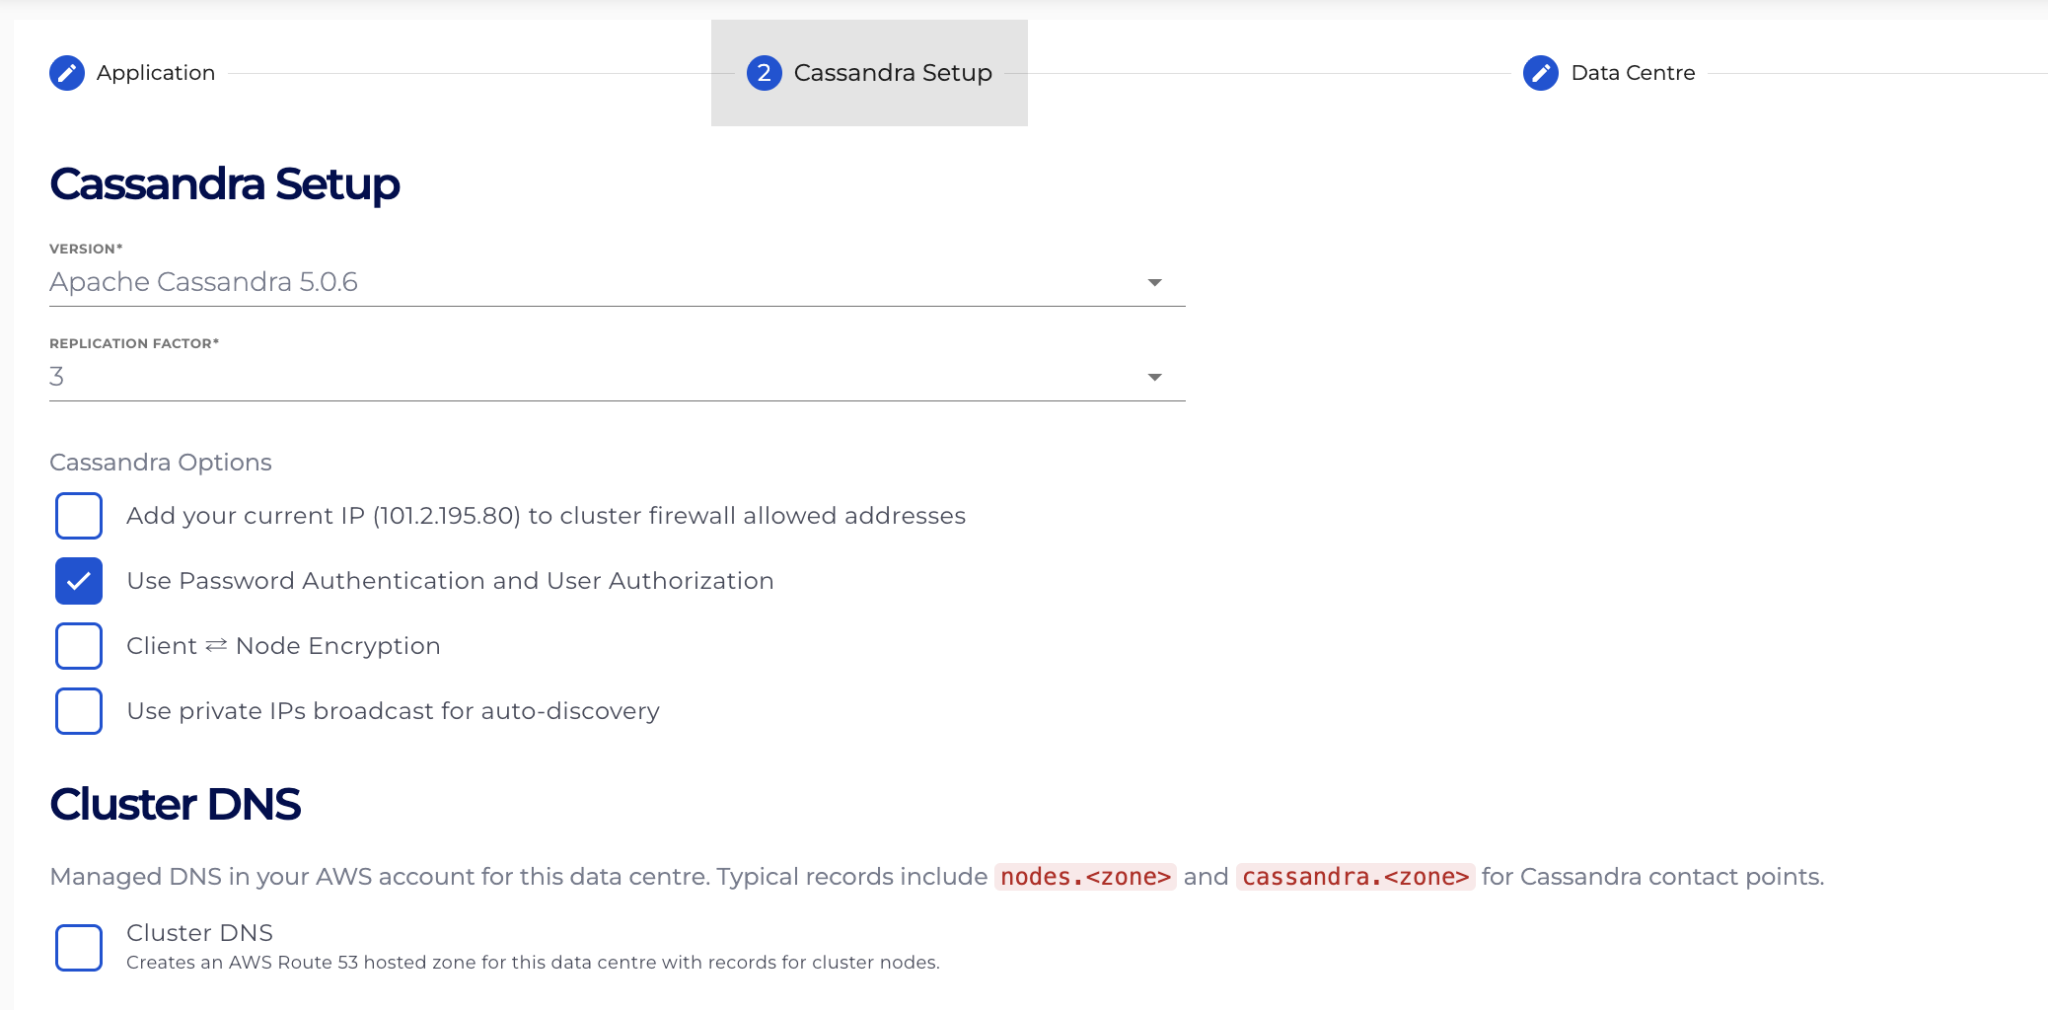
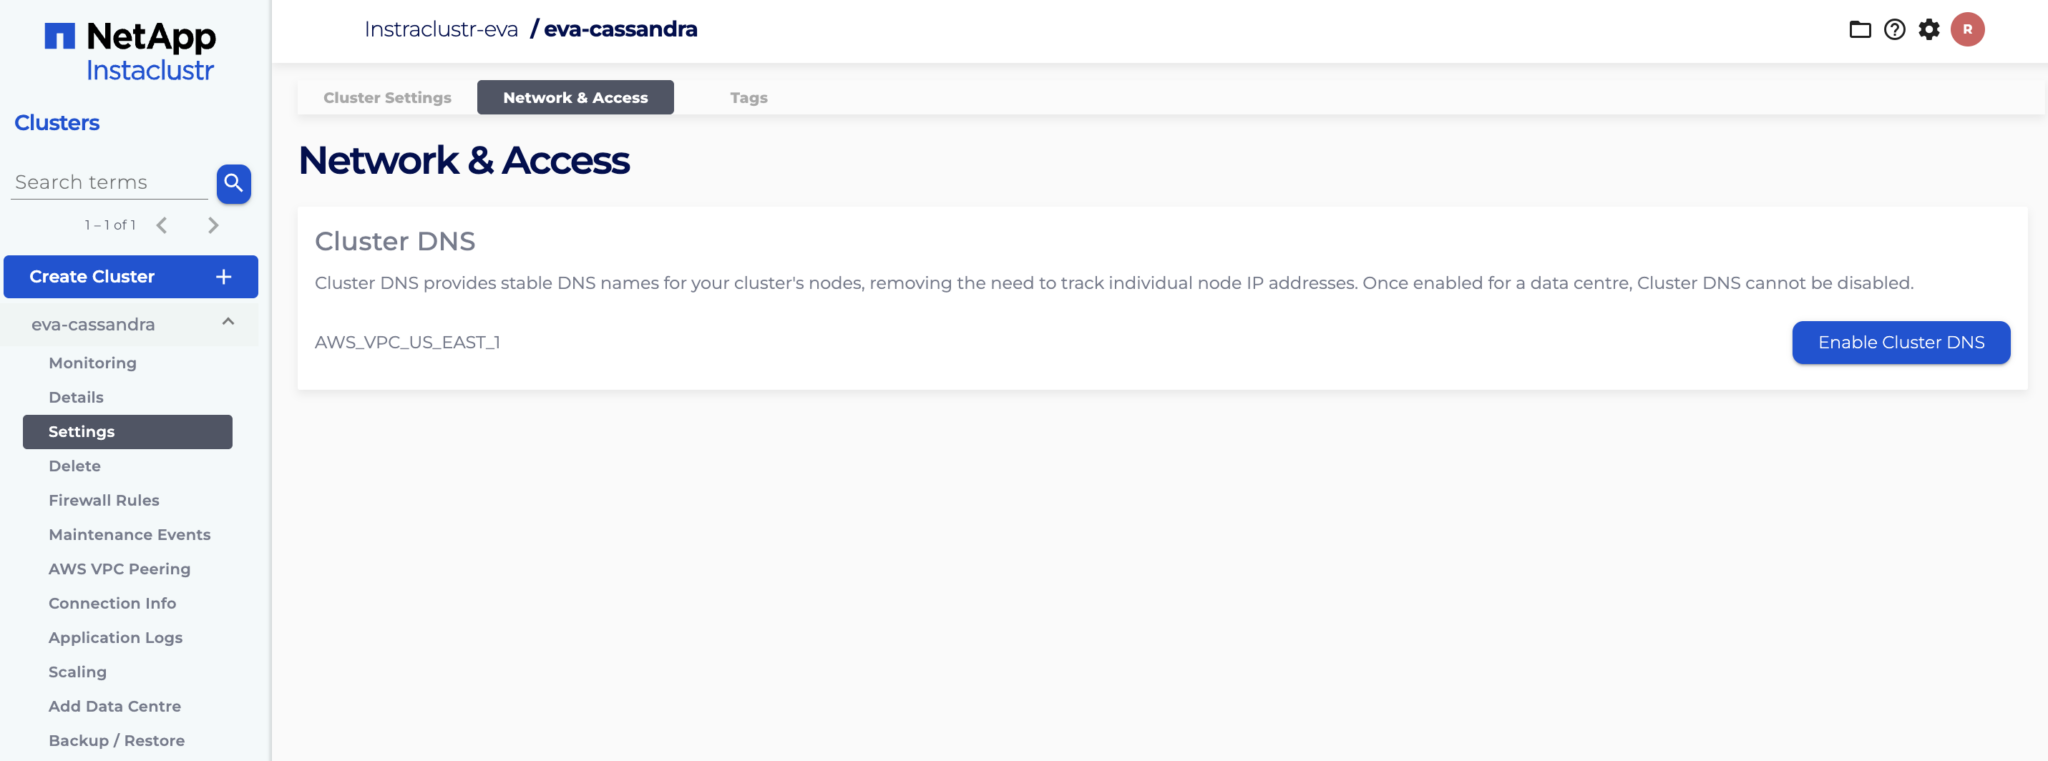
- Existing clusters — You can enable Cluster DNS on a running AWS data centre yourself:
- Using the Console — Open the cluster, go to Settings → Network & Access, and click Enable Cluster DNS for the data centre. Cluster DNS cannot be disabled once it is enabled.
- Using the API — Send a PUT request to the Cassandra cluster endpoint, setting clusterDns to true on the target data centre. Keep all other data centre attributes unchanged.
- Using Terraform — Add cluster_dns = true to the relevant data_centre block in your Terraform configuration and apply the change.
If you do not see the Cluster DNS option, email [email protected] — the feature must be enabled for your account first, and Bring Your Own Cloud clusters need Route 53 permissions in place (see below).
How it works for Instaclustr for Apache Kafka Clusters
When Cluster DNS is enabled on an AWS Kafka data centre, Instaclustr publishes Route 53 DNS records in that data centre’s zone so producers and consumers can bootstrap and discover brokers using hostnames.
What you get
- Two logical names in the zone,
nodesandkafka, each as a full hostname (for example nodes.<your-zone> and kafka.<your-zone>). Use them as bootstrap servers in client configuration instead of listing individual broker IPs. Clients then discover the rest of the brokers in line with normal Kafka behaviour.
- Records track the broker nodes in that data centre; the Console Connection Info section lists the precise FQDNs to copy.
Enabling it
- New clusters — In the Console, enable Cluster DNS in the Kafka create-cluster flow for the AWS data centre. You can also enable it on the data centre object in the Cluster Management API when you create the cluster.
On our managed platform, Cluster DNS can be enabled in step 2 of cluster creation as shown in the screenshot below: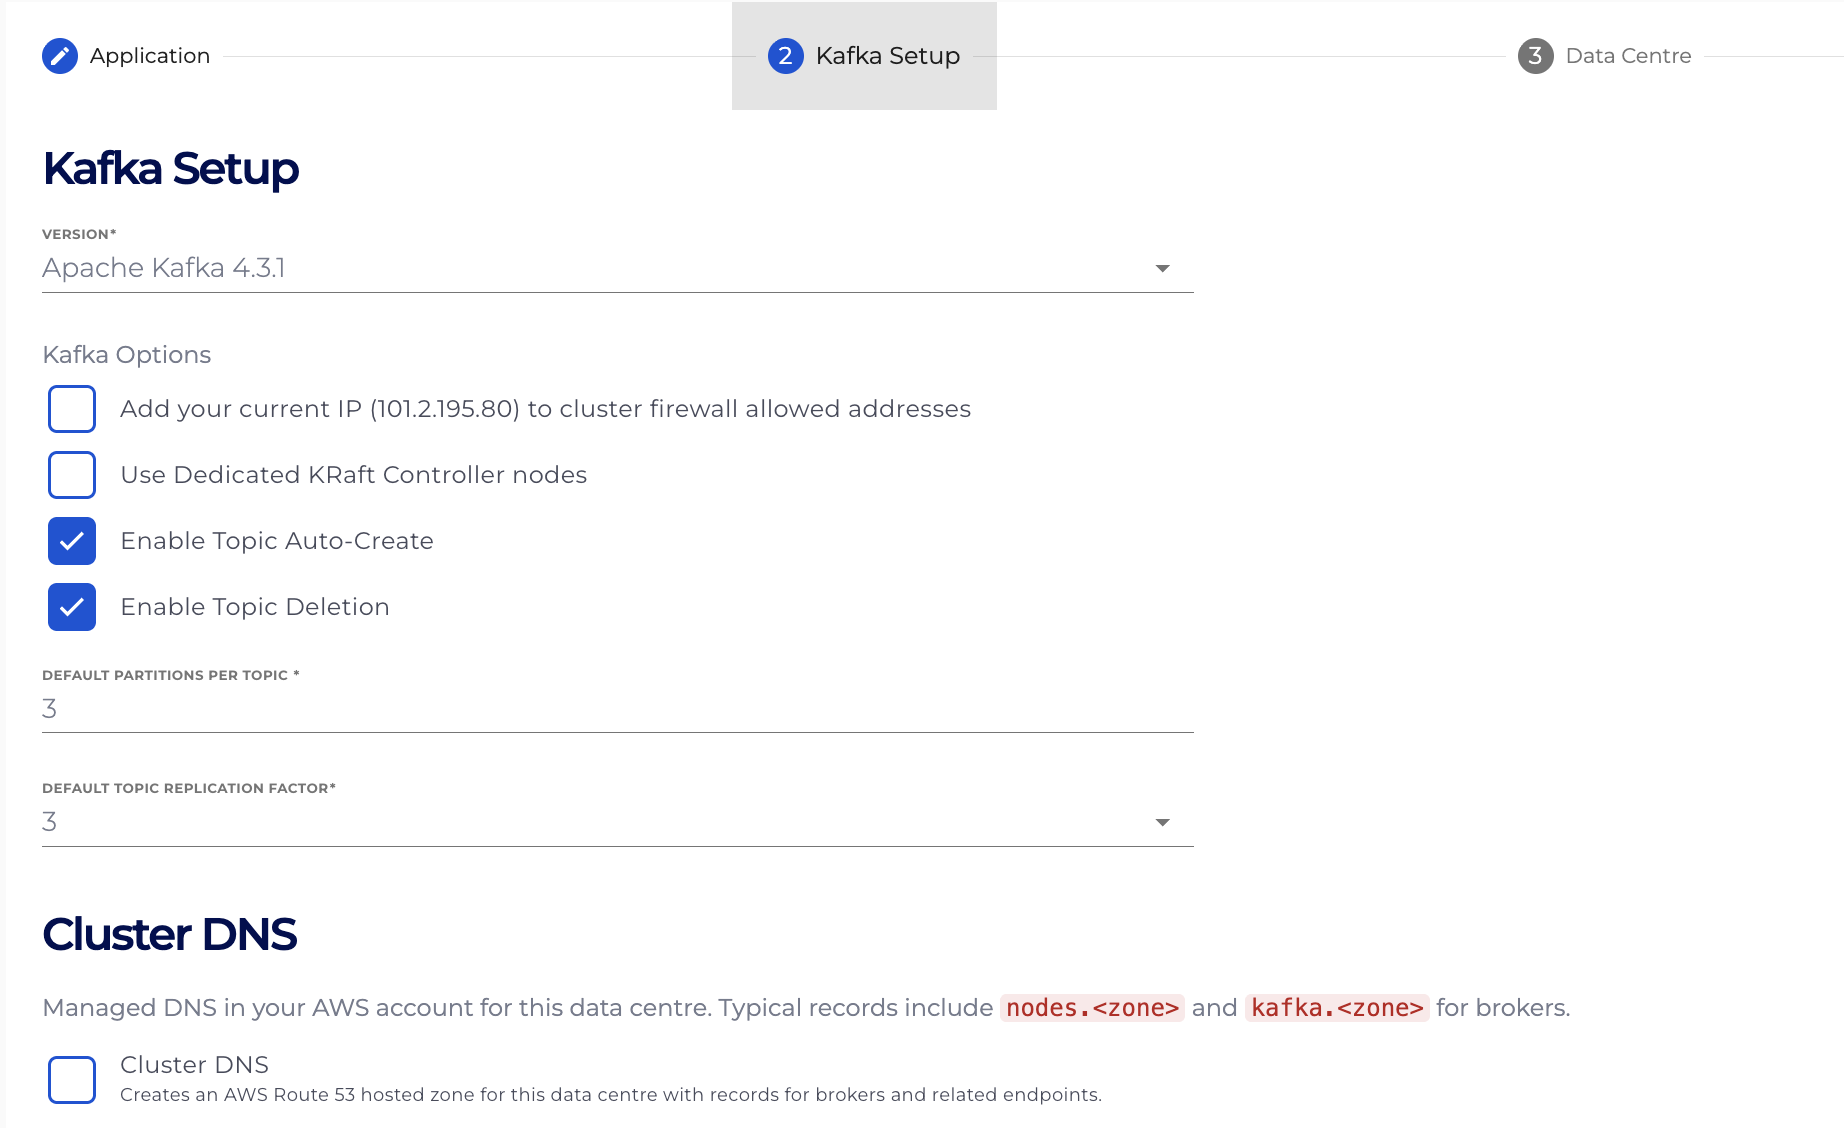
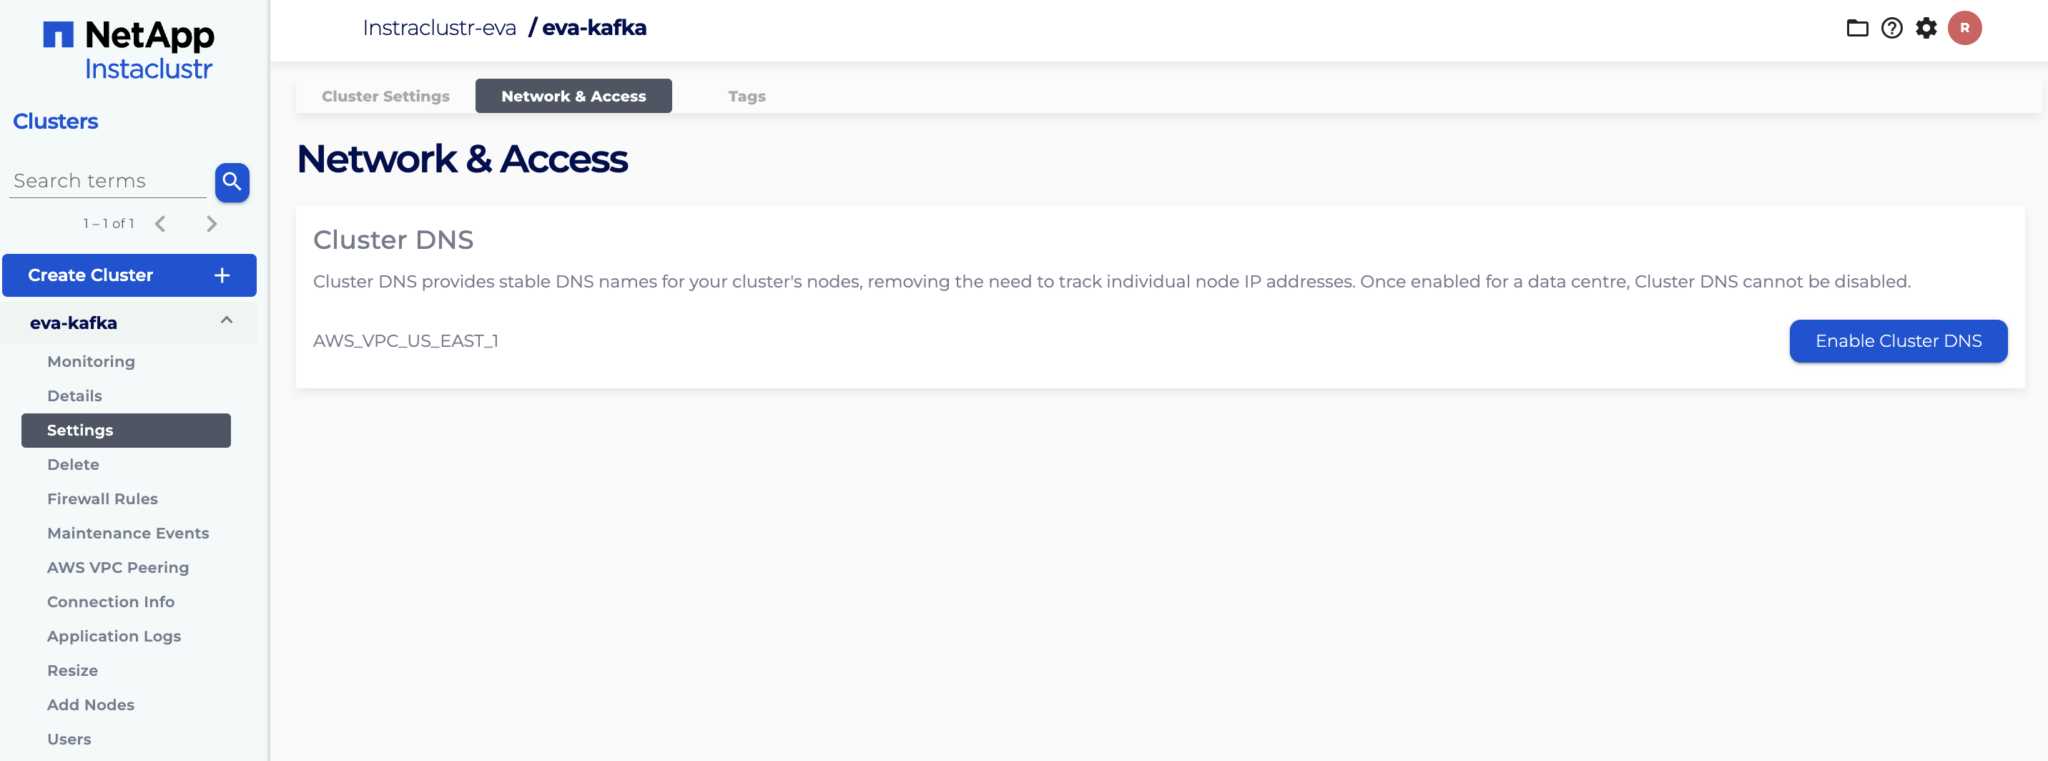
- Existing clusters — You can enable Cluster DNS on a running AWS data centre yourself:
- Using the Console — Open the cluster, go to Settings → Network & Access, and click Enable Cluster DNS for the data centre. Cluster DNS cannot be disabled once it is enabled.
- Using the API — Send a PUT request to the Kafka cluster v3 endpoint, setting clusterDns to true on the target data centre. Keep all other data centre attributes unchanged. Note: only the v3 Kafka API endpoint supports Cluster DNS.
- Using Terraform — Add cluster_dns = true to the relevant data_centre block in your instaclustr_kafka_cluster_v3 resource and apply the change.
If you do not see the Cluster DNS option, email [email protected] — the feature must be enabled for your account first, and Bring Your Own Cloud clusters need Route 53 permissions in place (see below).
If you use Bring Your Own Cloud (BYOC)
We need permission to manage Route 53 in your AWS account for Cluster DNS to work. Follow the AWS Standard Setup guide in the Instaclustr Console, section 3.5.1. Optional: Route 53 permissions for Cluster DNS (BYOC), and add the extra policy statement there before you rely on Cluster DNS.
VPC peering on AWS
If you connect to the cluster with AWS VPC peering and you have a private DNS zone, the peered VPC can be associated with that private hosted zone so that DNS queries from that VPC are answered using the zone’s records.
On the Connection Info page, the peered VPC will be shown as Authorised when it is authorised to be associated with the private hosted zone, and you will need to initiate the association using AWS console or CLI according to AWS’s documentation.
When the peered VPC is associated, the status will be shown as Associated.
Need help?
Contact [email protected] and we will walk you through setup, permissions, or connection issues.