Creating a PostgreSQL Cluster in the Same VPC as an Existing FSx for NetApp ONTAP
You can provision a NetApp Instaclustr-managed PostgreSQL cluster into the same Amazon Virtual Private Cloud (VPC) as an existing Amazon FSx for NetApp ONTAP filesystem. This is supported for AWS Bring Your Own Cloud (BYOC) accounts (previously RIYOA), using the NetApp Instaclustr Console or the NetApp Instaclustr Terraform Provider V2.
Before You Begin
Complete the following for each FSx for NetApp ONTAP filesystem you will attach to the cluster.
1. Create a dedicated ONTAP admin user
From a host that can reach the filesystem management endpoint (typically a host in the same VPC, or connected by VPN or AWS Direct Connect), create a dedicated ONTAP user with the fsxadmin role. Do not hand over your primary fsxadmin user. NetApp Instaclustr rotates the password of the user you register.
|
1 2 3 4 5 6 7 8 9 10 11 12 13 14 15 |
curl -X POST "https://<AWS_FILESYSTEM_MANAGEMENT_ENDPOINT>/api/security/accounts" \ -u "fsxadmin:<FSXADMIN_PASSWORD>" \ -H "Content-Type: application/json" \ -H "Accept: application/json" \ -d '{ "name": "instaclustr-admin", "password": "<INSTACLUSTR_ADMIN_PASSWORD>", "applications": [ { "application": "http", "authentication_methods": ["password"] } ], "role": { "name": "fsxadmin" } }' |
Replace <AWS_FILESYSTEM_MANAGEMENT_ENDPOINT> with the management DNS name of the filesystem, <FSXADMIN_PASSWORD> with the current fsxadmin password, and <INSTACLUSTR_ADMIN_PASSWORD> with the password you will register with NetApp Instaclustr.
Note: The username instaclustr-admin is a recommended convention. If you use a different name, register that same name in the next step. The password must contain only letters and numbers. This is a restriction of the ONTAP API and is enforced when you register the credential.
2. Register the credential with NetApp Instaclustr
Register the username and password against the filesystem ID using the Console or Terraform, as described below. You must complete registration before you create the cluster. Provisioning fails validation if no credential is registered for a mapped filesystem.
3. Plan your network
Choose a PostgreSQL data centre network CIDR that does not overlap any subnet already in use, including the subnets used by FSx for NetApp ONTAP. The Console and Terraform workflows handle this CIDR differently:
-
In the Console workflow, the data centre network CIDR must sit inside an existing CIDR block of the selected VPC.
-
In the Terraform workflow, set
add_secondary_cidr_to_vpc = trueso Instaclustr associates the data centre network as a secondary CIDR on the VPC. That CIDR must not overlap any CIDR already associated with the VPC.
Limitations
-
Bring Your Own (BYO) FSx for NetApp ONTAP is only supported for NetApp Instaclustr-managed PostgreSQL clusters provisioned within AWS BYOC accounts.
-
The FSx filesystem must be an ONTAP filesystem in the
AVAILABLEstate, in the same AWS region and the same VPC as the cluster. -
You must provide one filesystem mapping per rack (availability zone) used by the data centre. A single-AZ cluster needs one mapping; a multi-AZ cluster needs one mapping per availability zone.
-
After you register a credential, NetApp Instaclustr rotates that ONTAP user’s password. Do not continue to use the registered user for your own administration.
-
De-registering a credential (Console Delete, or destroying the Terraform credential resource) removes the registration from NetApp Instaclustr only. It does not delete the dedicated ONTAP admin user on the filesystem. After you de-register, delete that user from the filesystem yourself if you no longer need it. Use your primary
fsxadminaccount to do this; the dedicated user’s password has already been rotated and is no longer the password you submitted.
Using the NetApp Instaclustr Console
Register your FSx for NetApp ONTAP credentials against your account first, then create the cluster.
Register the FSxN Credentials
-
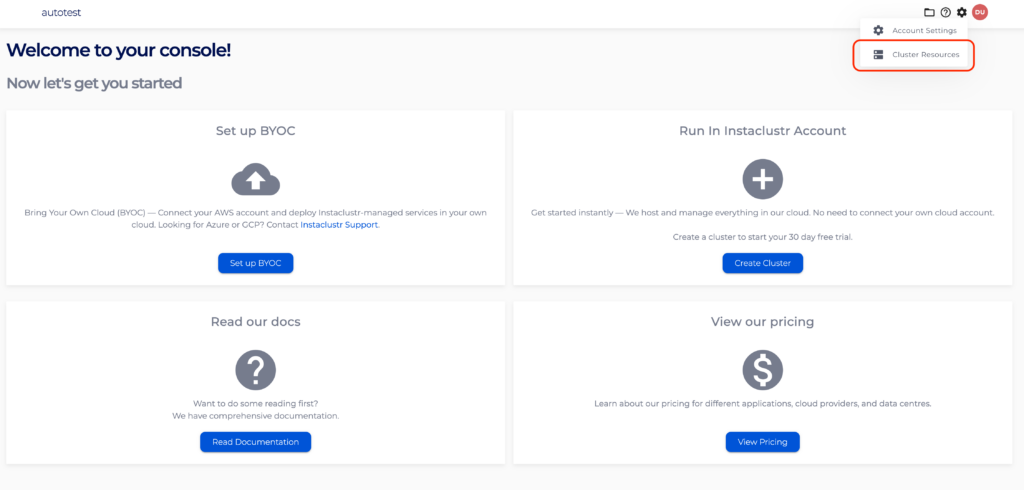
In the NetApp Instaclustr Console, open the account menu in the top-right corner and select Cluster Resources.
-
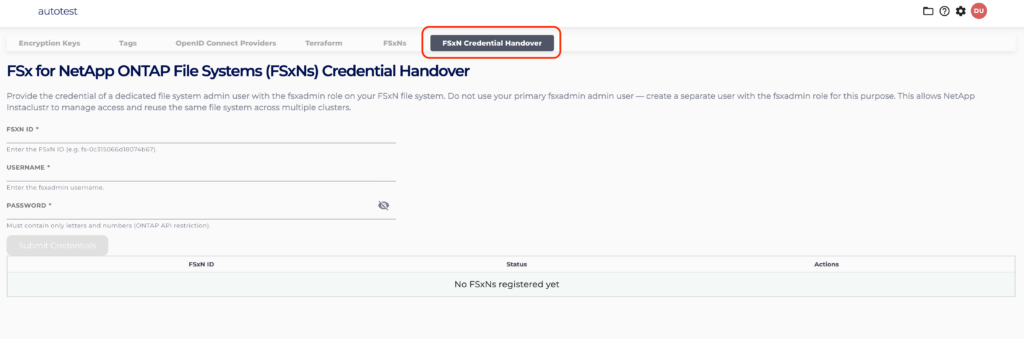
Select the FSxN Credential Handover tab.
-
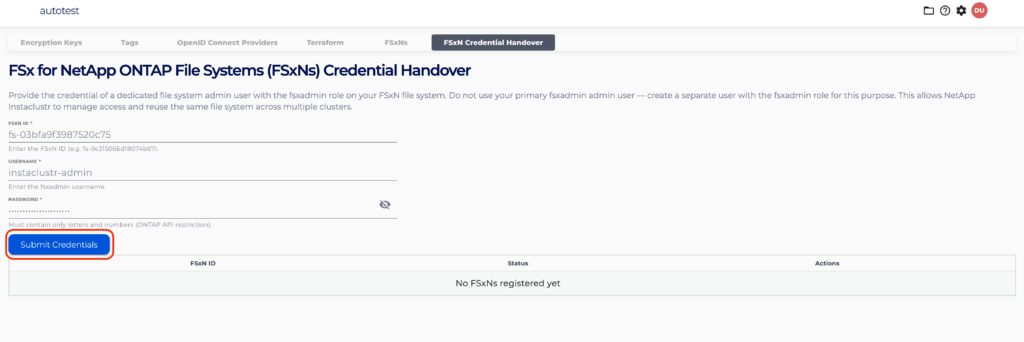
Complete the form and select Submit Credentials.
-
FSxN ID: the ID of your existing filesystem, in the format
fs-followed by 17 hexadecimal characters (for examplefs-0c315066d18074b67). -
Username: the dedicated ONTAP user you created with the
fsxadminrole, for exampleinstaclustr-admin. Do not use your primaryfsxadminuser. -
Password: the password for that user. It must contain only letters and numbers.
-
-
Confirm that Submitted FSxN credentials successfully is displayed and that the filesystem appears in the table below the form with its FSxN ID and status. You can remove a registration using the Delete action while the filesystem is not in use by a cluster. De-registering does not delete the dedicated ONTAP admin user on the filesystem. After you de-register, delete that user from the filesystem yourself if you no longer need it, using your primary
fsxadminaccount.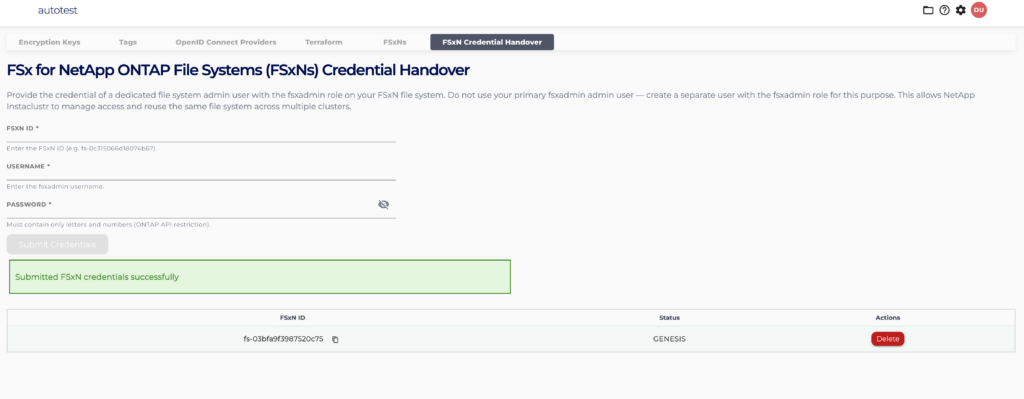
-
Repeat steps 3 and 4 for every FSx filesystem you intend to attach to the cluster. A multi-rack cluster needs one registered filesystem per rack.
Create the PostgreSQL Cluster
Start the cluster creation workflow and continue to the Data Centre step. The values below must be consistent with each other and with your existing filesystems, otherwise validation fails.
-
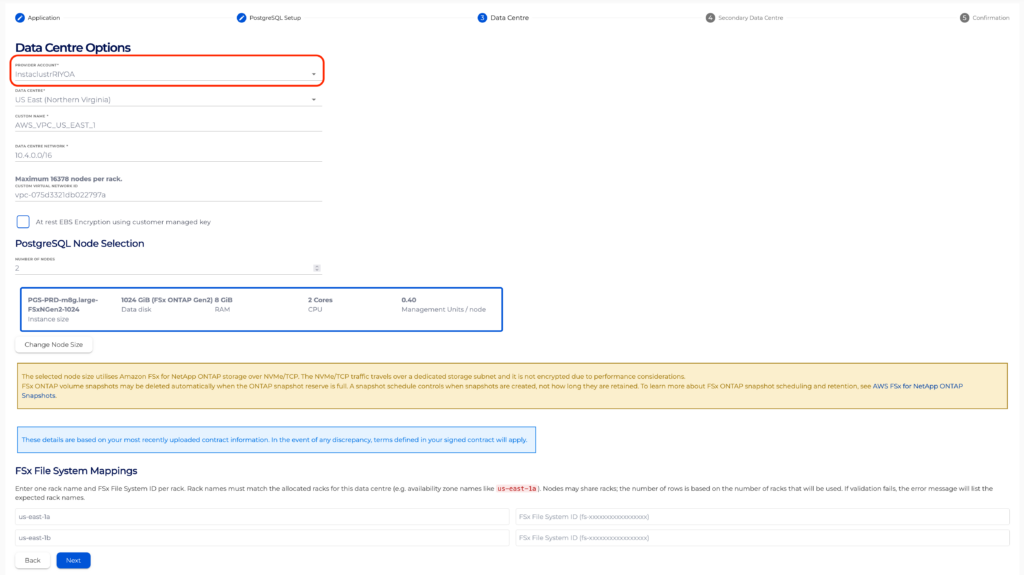
Set Provider Account to the AWS BYOC provider account that owns the FSx filesystems. BYO FSx is not available on NetApp Instaclustr-owned accounts.
-
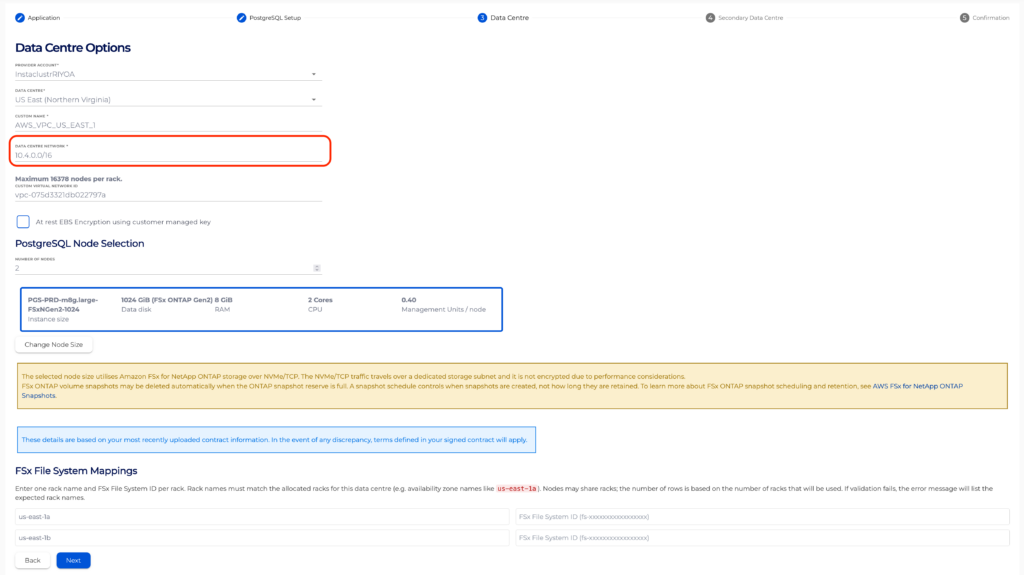
Select the Data Centre region that matches the region of your FSx filesystems. Enter the Data Centre Network. This CIDR must sit inside an existing CIDR block of the VPC you select in the next step, and must not overlap any subnet already in use, including the subnets used by FSx for NetApp ONTAP.
-
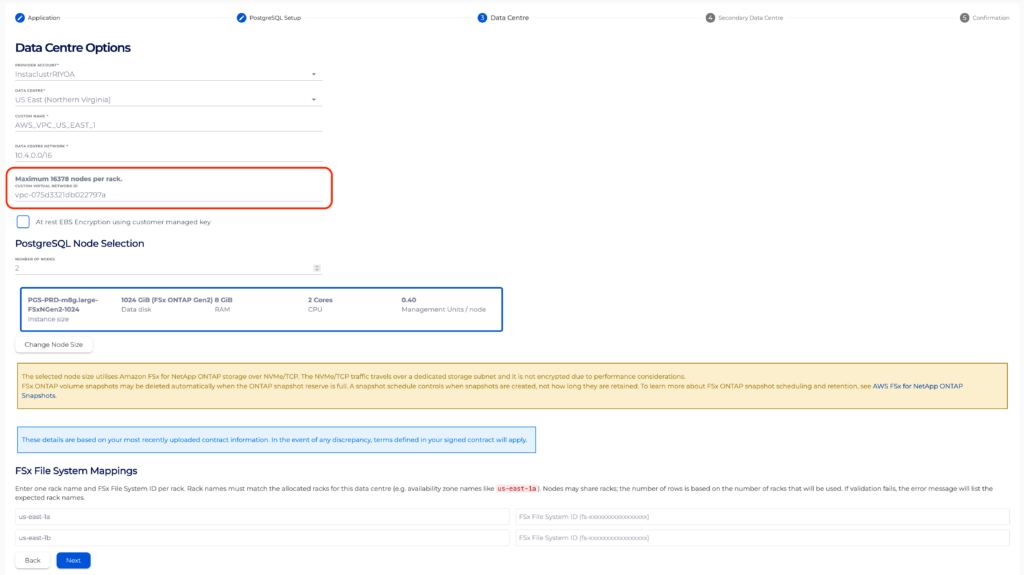
Enter the VPC ID of the VPC that contains your FSx filesystems in the custom virtual network field. The FSx filesystems must be in this VPC.
-
Under PostgreSQL Node Selection, set the number of nodes and select a node size backed by FSx for NetApp ONTAP, for example
PGS-PRD-m8g.large-FSxNGen2-1024. The FSx File System Mappings section only appears when an FSx-backed node size is selected.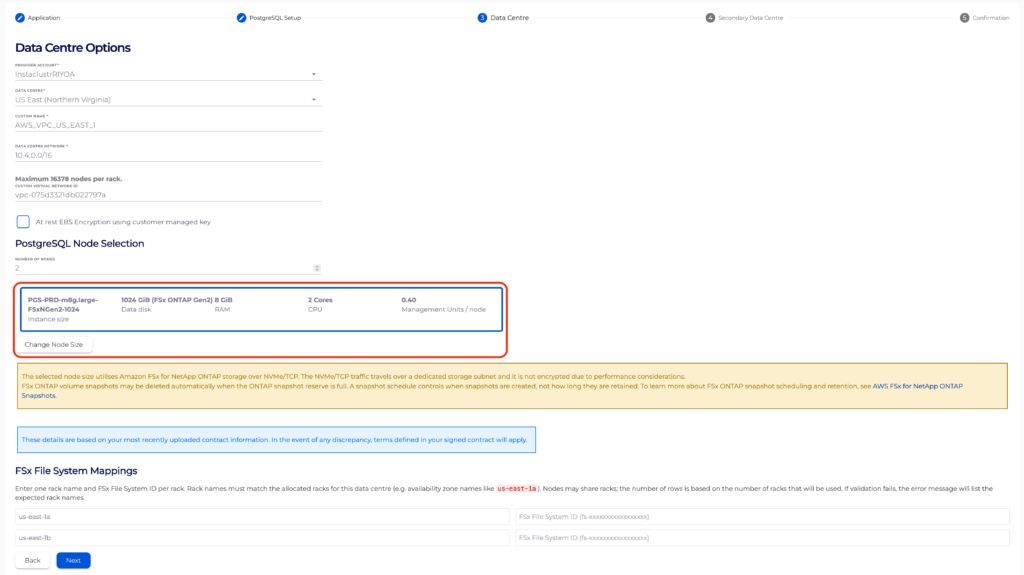
-
In FSx File System Mappings, enter one rack name and FSx File System ID per rack. Rack names must match the racks allocated to this data centre, which are availability zone names such as
us-east-1a. Every row must be completed, and every filesystem ID must already be registered in step 3.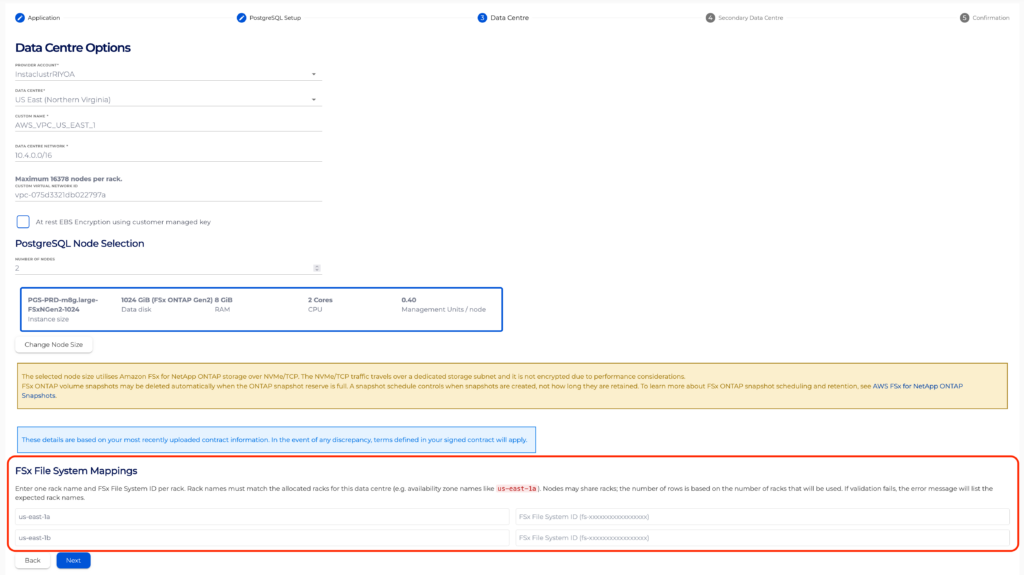
-
Select Next, complete the remaining steps of the workflow, review the Confirmation page, and create the cluster.
If validation fails, the error message names the problem directly. A rack name mismatch lists the expected rack names, and an unregistered filesystem reports that no credential is registered for that filesystem ID.
Using the NetApp Instaclustr Terraform Provider
You can manage an Instaclustr-managed PostgreSQL cluster that uses an existing FSx for NetApp ONTAP filesystem with the Instaclustr Terraform Provider V2.
-
Follow the support documentation to set up the Instaclustr Terraform Provider V2.
-
Register credentials for each filesystem, then create the PostgreSQL cluster. Use a separate
instaclustr_aws_fsxn_filesystem_credential_v2resource per filesystem. Putcustom_virtual_network_id,add_secondary_cidr_to_vpc, andfsx_file_system_mappingsinsidedata_centre.aws_settings. Setrack_nameto the availability zone name (for exampleus-east-1a), not a filesystem-derived name.
The example below shows only the FSx BYO fields. You still need the other required arguments for instaclustr_postgresql_cluster_v2 (cluster name, PostgreSQL version, SLA tier, data centre name, region, node size, node count, network CIDR, and so on). See the PostgreSQL cluster resource documentation.
|
1 2 3 4 5 6 7 8 9 10 11 12 13 14 15 16 17 18 19 20 21 22 23 24 25 26 27 28 29 30 31 32 33 34 35 36 37 38 39 |
resource "instaclustr_aws_fsxn_filesystem_credential_v2" "fs1" { filesystem_id = "<AWS_FILESYSTEM_ID_1>" username = "instaclustr-admin" password = "<INSTACLUSTR_ADMIN_PASSWORD_1>" } resource "instaclustr_aws_fsxn_filesystem_credential_v2" "fs2" { filesystem_id = "<AWS_FILESYSTEM_ID_2>" username = "instaclustr-admin" password = "<INSTACLUSTR_ADMIN_PASSWORD_2>" } resource "instaclustr_postgresql_cluster_v2" "byo_sharing" { # ... required cluster arguments ... data_centre { # ... required data centre arguments, including network = "<NON_OVERLAPPING_CIDR>" ... aws_settings { custom_virtual_network_id = "<VPC_ID>" add_secondary_cidr_to_vpc = true fsx_file_system_mappings { rack_name = "us-east-1a" fsx_file_system_id = "<AWS_FILESYSTEM_ID_1>" } fsx_file_system_mappings { rack_name = "us-east-1b" fsx_file_system_id = "<AWS_FILESYSTEM_ID_2>" } } } depends_on = [ instaclustr_aws_fsxn_filesystem_credential_v2.fs1, instaclustr_aws_fsxn_filesystem_credential_v2.fs2, ] } |
For a single-AZ cluster, include only one credential resource and one fsx_file_system_mappings block.
-
Run
terraform init,terraform plan, andterraform applyto provision the cluster.
Destroying instaclustr_aws_fsxn_filesystem_credential_v2 de-registers the credential from NetApp Instaclustr. It does not delete the dedicated ONTAP admin user on the filesystem. After destroy, delete that user from the filesystem yourself if you no longer need it, using your primary fsxadmin account.
For further details on Terraform resources, refer to the Instaclustr Terraform documentation.
Next Steps
Instaclustr recommends reviewing the support documentation for AWS FSx for NetApp ONTAP snapshotting and fast forking once your cluster is provisioned.
Contact NetApp Instaclustr Support if there is any issue in provisioning your cluster.