


Connecting to a PrivateLink Apache Kafka cluster with AWS CloudFormation
Overview
This page includes the required AWS CloudFormation templates for connecting to a PrivateLink Kafka Cluster and the general steps of using the AWS CloudFormation template. For a manual approach, please refer to Connecting to a PrivateLink Kafka Cluster.
Table of Contents
AWS CloudFormation Template For PrivateLink Kafka Cluster without Kafka AddOns (JSON)
1 2 3 4 5 6 7 8 9 10 11 12 13 14 15 16 17 18 19 20 21 22 23 24 25 26 27 28 29 30 31 32 33 34 35 36 37 38 39 40 41 42 43 44 45 46 47 48 49 50 51 52 53 54 55 56 57 58 59 60 61 62 63 64 65 66 67 68 69 70 71 72 73 74 75 76 77 78 79 80 81 82 83 84 85 86 87 88 89 90 91 92 93 94 95 96 97 98 99 100 101 102 103 104 105 106 107 108 109 110 111 112 113 114 115 116 117 118 119 120 121 122 123 124 125 126 127 128 129 | { "AWSTemplateFormatVersion": "2010-09-09", "Description": "Creation of PrivateLink Client Connection Resources as of 2022-12-06", "Parameters":{ "ClientVPC":{ "Type": "String", "Description" : "The Client VPC that will connect to the PrivateLink Cluster" }, "ClientCIDRIp":{ "Type": "String", "Description": "The Client CIDR that will connect to the PrivateLink Cluster" }, "ClusterBrokers":{ "Type":"Number", "Description": "The number of broker nodes in PrivateLink cluster" }, "ClientSubnets":{ "Type":"CommaDelimitedList", "Description":"The Client subnets that will connect to the PrivateLink Cluster, eg. subnet-01,subnet02" }, "ClusterEndpointServiceName":{ "Type":"String", "Description": "This would be in the console connection info page" }, "ClusterRegion":{ "Type":"String", "Description":"The PrivateLink Cluster region should be the same as the Client region" }, "HostedZoneName":{ "Type":"String", "Description": "The name of the hosted zone that holds the domain of your advertisedHostName" }, "HostedZoneSubdomain":{ "Type":"String", "Description": "The subdomain of the advertisedhostname, which is advertisedhostname - domain (e.g., hosted zone is test.com, the advertised host name is alice.test.com, then you should fill alice here)" }, "HostedZoneExistingID":{ "Type": "String", "Default": "", "Description": "By default, we will create new hosted zone, but if you have privatelink clusters with the same hosted zone, please enter that hosted zone's ID" } }, "Conditions": { "CreateHostedZone": { "Fn::Equals": [ { "Ref": "HostedZoneExistingID" }, "" ] } }, "Resources": { "InstanceSecurityGroup": { "Type": "AWS::EC2::SecurityGroup", "Properties": { "GroupDescription": "Allows access to Kafka cluster via PrivateLink", "GroupName": {"Fn::Join":["-",[{"Ref": "AWS::StackName"},"kafka-privatelink-security-group"]]}, "SecurityGroupIngress": [ { "IpProtocol": "tcp", "FromPort": 9091, "ToPort": 9091, "CidrIp": { "Ref" : "ClientCIDRIp"} }, { "IpProtocol": "tcp", "FromPort": 6001, "ToPort": {"Fn::Join":["",["600",{"Ref": "ClusterBrokers"}]]}, "CidrIp": { "Ref" : "ClientCIDRIp"} } ], "VpcId": { "Ref" : "ClientVPC"} } }, "Endpoint": { "Type": "AWS::EC2::VPCEndpoint", "Properties": { "ServiceName": { "Ref" : "ClusterEndpointServiceName"}, "SecurityGroupIds": [ {"Ref": "InstanceSecurityGroup"} ], "SubnetIds": {"Ref": "ClientSubnets"}, "VpcEndpointType": "Interface", "VpcId": { "Ref" : "ClientVPC"} } }, "myDNS": { "Type": "AWS::Route53::HostedZone", "Condition": "CreateHostedZone", "Properties": { "HostedZoneConfig": { "Comment": "PrivateLink Records" }, "Name": {"Ref": "HostedZoneName"}, "VPCs": [ { "VPCId": { "Ref" : "ClientVPC"}, "VPCRegion": { "Ref" : "ClusterRegion"} } ] } }, "myDNSRecord" : { "Type" : "AWS::Route53::RecordSet", "Properties" : { "AliasTarget": { "DNSName" : { "Fn::Select": ["1", { "Fn::Split":[ ":", {"Fn::Select":["0", {"Fn::GetAtt": ["Endpoint","DnsEntries"]}]} ] } ]}, "HostedZoneId" : { "Fn::Select": ["0", { "Fn::Split":[ ":", {"Fn::Select":["0", {"Fn::GetAtt": ["Endpoint","DnsEntries"]}]} ] } ]} }, "HostedZoneId" : {"Fn::If": ["CreateHostedZone",{"Ref":"myDNS"}, {"Ref":"HostedZoneExistingID"}]}, "Name" : {"Fn::Join":[".",[{"Ref":"HostedZoneSubdomain"},{"Ref": "HostedZoneName"}]]}, "Type" : "A" } } } } |
AWS CloudFormation Template For PrivateLink Kafka Cluster without Kafka AddOns (YAML)
1 2 3 4 5 6 7 8 9 10 11 12 13 14 15 16 17 18 19 20 21 22 23 24 25 26 27 28 29 30 31 32 33 34 35 36 37 38 39 40 41 42 43 44 45 46 47 48 49 50 51 52 53 54 55 56 57 58 59 60 61 62 63 64 65 66 67 68 69 70 71 72 73 74 75 76 77 78 79 80 81 82 83 84 85 86 | AWSTemplateFormatVersion: 2010-09-09 Description: Creation of PrivateLink Client Connection Resources as of 2022-12-06 Parameters: ClientVPC: Type: String Description: The Client VPC that will connect to the PrivateLink Cluster ClientCIDRIp: Type: String Description: The Client CIDR that will connect to the PrivateLink Cluster ClusterBrokers: Type: Number Description: The number of broker nodes in PrivateLink cluster ClientSubnets: Type: CommaDelimitedList Description: >- The Client subnets that will connect to the PrivateLink Cluster, eg. subnet-01,subnet02 ClusterEndpointServiceName: Type: String Description: This would be in the console connection info page ClusterRegion: Type: String Description: The PrivateLink Cluster region should be the same as the Client region HostedZoneName: Type: String Description: >- The name of the hosted zone that holds the domain of your advertisedHostName HostedZoneSubdomain: Type: String Description: >- The subdomain of the advertisedhostname, which is advertisedhostname - domain (e.g., hosted zone is test.com, the advertised host name is alice.test.com, then you should fill alice here) HostedZoneExistingID: Type: String Default: '' Description: >- By default, we will create new hosted zone, but if you have privatelink clusters with the same hosted zone, please enter that hosted zone's ID Conditions: CreateHostedZone: !Equals [!Ref HostedZoneExistingID, ''] Resources: InstanceSecurityGroup: Type: 'AWS::EC2::SecurityGroup' Properties: GroupDescription: Allows access to Kafka cluster via PrivateLink GroupName: !Join ['-', [!Ref 'AWS::StackName', 'kafka-privatelink-security-group']] SecurityGroupIngress: - IpProtocol: tcp FromPort: 9091 ToPort: 9091 CidrIp: !Ref ClientCIDRIp - IpProtocol: tcp FromPort: 6001 ToPort: !Join ['', ['600', !Ref ClusterBrokers]] CidrIp: !Ref ClientCIDRIp VpcId: !Ref ClientVPC Endpoint: Type: 'AWS::EC2::VPCEndpoint' Properties: ServiceName: !Ref ClusterEndpointServiceName SecurityGroupIds: - !Ref InstanceSecurityGroup SubnetIds: !Ref ClientSubnets VpcEndpointType: Interface VpcId: !Ref ClientVPC myDNS: Type: 'AWS::Route53::HostedZone' Condition: CreateHostedZone Properties: HostedZoneConfig: Comment: PrivateLink Records Name: !Ref HostedZoneName VPCs: - VPCId: !Ref ClientVPC VPCRegion: !Ref ClusterRegion myDNSRecord: Type: 'AWS::Route53::RecordSet' Properties: AliasTarget: DNSName: !Select ['1', !Split [':', !Select ['0', !GetAtt [Endpoint, DnsEntries]]]] HostedZoneId: !Select ['0', !Split [':', !Select ['0', !GetAtt [Endpoint, DnsEntries]]]] HostedZoneId: !If [CreateHostedZone, !Ref myDNS, !Ref HostedZoneExistingID] Name: !Join ['.', [!Ref HostedZoneSubdomain, !Ref HostedZoneName]] Type: A |
Notes on AWS CloudFormation Template For PrivateLink Kafka Cluster with Kafka AddOns
The default templates include both Karapace Schema Registry/Kafka Schema Registry and Karapace Rest Proxy Kafka Add-Ons. Please modify accordingly by referencing the following table. The table applies to both JSON and YAML.
| Kafka Add-Ons | Parameters/Values to keep in the default template |
| Karapace Schema Registry / Kafka Schema Registry |
|
| Karapace Rest Proxy |
|
AWS CloudFormation Template For PrivateLink Kafka Cluster with Kafka AddOns (JSON)
1 2 3 4 5 6 7 8 9 10 11 12 13 14 15 16 17 18 19 20 21 22 23 24 25 26 27 28 29 30 31 32 33 34 35 36 37 38 39 40 41 42 43 44 45 46 47 48 49 50 51 52 53 54 55 56 57 58 59 60 61 62 63 64 65 66 67 68 69 70 71 72 73 74 75 76 77 78 79 80 81 82 83 84 85 86 87 88 89 90 91 92 93 94 95 96 97 98 99 100 101 102 103 104 105 106 107 108 109 110 111 112 113 114 115 116 117 118 119 120 121 122 123 124 125 126 127 128 129 130 131 132 133 134 135 136 137 138 139 140 141 142 143 144 145 146 147 148 149 150 151 152 153 154 155 156 157 158 159 160 161 162 163 164 165 166 167 168 169 170 171 172 173 174 175 176 177 178 179 180 181 182 183 184 185 186 187 188 189 190 191 192 193 194 | { "AWSTemplateFormatVersion": "2010-09-09", "Description": "Creation of PrivateLink Client Connection Resources as of 2022-12-06", "Parameters":{ "ClientVPC":{ "Type": "String", "Description" : "The Client VPC that will connect to the PrivateLink Cluster" }, "ClientCIDRIp":{ "Type": "String", "Description": "The Client CIDR that will connect to the PrivateLink Cluster" }, "ClusterBrokers":{ "Type":"Number", "Description": "The number of broker nodes in PrivateLink cluster" }, "ClientSubnets":{ "Type":"CommaDelimitedList", "Description":"The Client subnets that will connect to the PrivateLink Cluster, eg. subnet-01,subnet02" }, "ClusterEndpointServiceName":{ "Type":"String", "Description": "This would be in the console connection info page" }, "ClusterRegion":{ "Type":"String", "Description":"The PrivateLink Cluster region should be the same as the Client region" }, "HostedZoneName":{ "Type":"String", "Description": "The name of the hosted zone that holds the domain of your advertisedHostName" }, "HostedZoneSubdomain":{ "Type":"String", "Description": "The subdomain of the advertisedhostname, which is advertisedhostname - domain (e.g., hosted zone is test.com, the advertised host name is alice.test.com, then you should fill alice here)" }, "HostedZoneExistingID":{ "Type": "String", "Default": "", "Description": "By default, we will create new hosted zone, but if you have privatelink clusters with the same hosted zone, please enter that hosted zone's ID" }, "InstaclustrDomain":{ "Type":"String", "Description":"The domain of instaclustr add ons, which should be under connection info page. For example: karapace-schema.7a690416c0ae49f89530f6018ab60c0e.cu.instaclustr.com. The `7a690416c0ae49f89530f6018ab60c0e.cu.instaclustr.com` is the domain" }, "RestProxyNodes":{ "Type":"Number", "Description":"The number of Rest Proxy Nodes" } }, "Conditions": { "CreateHostedZone": { "Fn::Equals": [ { "Ref": "HostedZoneExistingID" }, "" ] } }, "Resources": { "InstanceSecurityGroup": { "Type": "AWS::EC2::SecurityGroup", "Properties": { "GroupDescription": "Allows access to Kafka cluster via PrivateLink", "GroupName": {"Fn::Join":["-",[{"Ref": "AWS::StackName"},"kafka-privatelink-security-group"]]}, "SecurityGroupIngress": [ { "IpProtocol": "tcp", "FromPort": 9091, "ToPort": 9091, "CidrIp": { "Ref" : "ClientCIDRIp"} }, { "IpProtocol": "tcp", "FromPort": 6001, "ToPort": {"Fn::Join":["",["600",{"Ref": "ClusterBrokers"}]]}, "CidrIp": { "Ref" : "ClientCIDRIp"} }, { "IpProtocol": "tcp", "FromPort": 8085, "ToPort": 8085, "CidrIp": { "Ref" : "ClientCIDRIp"} }, { "IpProtocol": "tcp", "FromPort": 8083, "ToPort": 8083, "CidrIp": { "Ref" : "ClientCIDRIp"} }, { "IpProtocol": "tcp", "FromPort": 8091, "ToPort": {"Fn::Join":["",["809",{"Ref": "RestProxyNodes"}]]}, "CidrIp": { "Ref" : "ClientCIDRIp"} } ], "VpcId": { "Ref" : "ClientVPC"} } }, "Endpoint": { "Type": "AWS::EC2::VPCEndpoint", "Properties": { "ServiceName": { "Ref" : "ClusterEndpointServiceName"}, "SecurityGroupIds": [ {"Ref": "InstanceSecurityGroup"} ], "SubnetIds": {"Ref": "ClientSubnets"}, "VpcEndpointType": "Interface", "VpcId": { "Ref" : "ClientVPC"} } }, "myDNS": { "Type": "AWS::Route53::HostedZone", "Condition": "CreateHostedZone", "Properties": { "HostedZoneConfig": { "Comment": "PrivateLink Records" }, "Name": {"Ref": "HostedZoneName"}, "VPCs": [ { "VPCId": { "Ref" : "ClientVPC"}, "VPCRegion": { "Ref" : "ClusterRegion"} } ] } }, "myDNSRecord" : { "Type" : "AWS::Route53::RecordSet", "Properties" : { "AliasTarget": { "DNSName" : { "Fn::Select": ["1", { "Fn::Split":[ ":", {"Fn::Select":["0", {"Fn::GetAtt": ["Endpoint","DnsEntries"]}]} ] } ]}, "HostedZoneId" : { "Fn::Select": ["0", { "Fn::Split":[ ":", {"Fn::Select":["0", {"Fn::GetAtt": ["Endpoint","DnsEntries"]}]} ] } ]} }, "HostedZoneId" : {"Fn::If": ["CreateHostedZone",{"Ref":"myDNS"}, {"Ref":"HostedZoneExistingID"}]}, "Name" : {"Fn::Join":[".",[{"Ref":"HostedZoneSubdomain"},{"Ref": "HostedZoneName"}]]}, "Type" : "A" } }, "addOnsDNS": { "Type": "AWS::Route53::HostedZone", "Properties": { "HostedZoneConfig": { "Comment": "AddOns PrivateLink Records" }, "Name": {"Ref": "InstaclustrDomain"}, "VPCs": [ { "VPCId": { "Ref" : "ClientVPC"}, "VPCRegion": { "Ref" : "ClusterRegion"} } ] } }, "addOnsDNSRecord" : { "Type" : "AWS::Route53::RecordSet", "Properties" : { "AliasTarget": { "DNSName" : { "Fn::Select": ["1", { "Fn::Split":[ ":", {"Fn::Select":["0", {"Fn::GetAtt": ["Endpoint","DnsEntries"]}]} ] } ]}, "HostedZoneId" : { "Fn::Select": ["0", { "Fn::Split":[ ":", {"Fn::Select":["0", {"Fn::GetAtt": ["Endpoint","DnsEntries"]}]} ] } ]} }, "HostedZoneId" : {"Ref":"addOnsDNS"}, "Name" : {"Fn::Join":[".",["privatelink",{"Ref": "InstaclustrDomain"}]]}, "Type" : "A" } } } } |
AWS CloudFormation Template For PrivateLink Kafka Cluster with Kafka AddOns (YAML)
1 2 3 4 5 6 7 8 9 10 11 12 13 14 15 16 17 18 19 20 21 22 23 24 25 26 27 28 29 30 31 32 33 34 35 36 37 38 39 40 41 42 43 44 45 46 47 48 49 50 51 52 53 54 55 56 57 58 59 60 61 62 63 64 65 66 67 68 69 70 71 72 73 74 75 76 77 78 79 80 81 82 83 84 85 86 87 88 89 90 91 92 93 94 95 96 97 98 99 100 101 102 103 104 105 106 107 108 109 110 111 112 113 114 115 116 117 118 119 120 121 122 123 124 125 126 127 | AWSTemplateFormatVersion: 2010-09-09 Description: Creation of PrivateLink Client Connection Resources as of 2022-12-06 Parameters: ClientVPC: Type: String Description: The Client VPC that will connect to the PrivateLink Cluster ClientCIDRIp: Type: String Description: The Client CIDR that will connect to the PrivateLink Cluster ClusterBrokers: Type: Number Description: The number of broker nodes in PrivateLink cluster ClientSubnets: Type: CommaDelimitedList Description: >- The Client subnets that will connect to the PrivateLink Cluster, eg. subnet-01,subnet02 ClusterEndpointServiceName: Type: String Description: This would be in the console connection info page ClusterRegion: Type: String Description: The PrivateLink Cluster region should be the same as the Client region HostedZoneName: Type: String Description: >- The name of the hosted zone that holds the domain of your advertisedHostName HostedZoneSubdomain: Type: String Description: >- The subdomain of the advertisedhostname, which is advertisedhostname - domain (e.g., hosted zone is test.com, the advertised host name is alice.test.com, then you should fill alice here) HostedZoneExistingID: Type: String Default: "" Description: >- By default, we will create new hosted zone, but if you have privatelink clusters with the same hosted zone, please enter that hosted zone's ID InstaclustrDomain: Type: String Description: >- The domain of instaclustr add ons, which should be under connection info page. For example: karapace-schema.7a690416c0ae49f89530f6018ab60c0e.cu.instaclustr.com. The `7a690416c0ae49f89530f6018ab60c0e.cu.instaclustr.com` is the domain RestProxyNodes: Type: Number Description: The number of Rest Proxy Nodes Conditions: CreateHostedZone: !Equals [!Ref HostedZoneExistingID, ""] Resources: InstanceSecurityGroup: Type: "AWS::EC2::SecurityGroup" Properties: GroupDescription: Allows access to Kafka cluster via PrivateLink GroupName: !Join ['-', [!Ref 'AWS::StackName', 'kafka-privatelink-security-group']] SecurityGroupIngress: - IpProtocol: tcp FromPort: 9091 ToPort: 9091 CidrIp: !Ref ClientCIDRIp - IpProtocol: tcp FromPort: 6001 ToPort: !Join ['', ['600', !Ref ClusterBrokers]] CidrIp: !Ref ClientCIDRIp - IpProtocol: tcp FromPort: 8085 ToPort: 8085 CidrIp: !Ref ClientCIDRIp - IpProtocol: tcp FromPort: 8083 ToPort: 8083 CidrIp: !Ref ClientCIDRIp - IpProtocol: tcp FromPort: 8091 ToPort: !Join ['', ['809', !Ref RestProxyNodes]] CidrIp: !Ref ClientCIDRIp VpcId: !Ref ClientVPC Endpoint: Type: "AWS::EC2::VPCEndpoint" Properties: ServiceName: !Ref ClusterEndpointServiceName SecurityGroupIds: - !Ref InstanceSecurityGroup SubnetIds: !Ref ClientSubnets VpcEndpointType: Interface VpcId: !Ref ClientVPC myDNS: Type: "AWS::Route53::HostedZone" Condition: CreateHostedZone Properties: HostedZoneConfig: Comment: PrivateLink Records Name: !Ref HostedZoneName VPCs: - VPCId: !Ref ClientVPC VPCRegion: !Ref ClusterRegion myDNSRecord: Type: "AWS::Route53::RecordSet" Properties: AliasTarget: DNSName: !Select ['1', !Split [':', !Select ['0', !GetAtt [Endpoint, DnsEntries]]]] HostedZoneId: !Select ['0', !Split [':', !Select ['0', !GetAtt [Endpoint, DnsEntries]]]] HostedZoneId: !If [CreateHostedZone, !Ref myDNS, !Ref HostedZoneExistingID] Name: !Join ['.', [!Ref HostedZoneSubdomain, !Ref HostedZoneName]] Type: A addOnsDNS: Type: "AWS::Route53::HostedZone" Properties: HostedZoneConfig: Comment: AddOns PrivateLink Records Name: !Ref InstaclustrDomain VPCs: - VPCId: !Ref ClientVPC VPCRegion: !Ref ClusterRegion addOnsDNSRecord: Type: "AWS::Route53::RecordSet" Properties: AliasTarget: DNSName: !Select ['1', !Split [':', !Select ['0', !GetAtt [Endpoint, DnsEntries]]]] HostedZoneId: !Select ['0', !Split [':', !Select ['0', !GetAtt [Endpoint, DnsEntries]]]] HostedZoneId: !Ref addOnsDNS Name: !Join ['.', ['privatelink', !Ref InstaclustrDomain ]] Type: A |
Section 1: Using the AWS CloudFormation template for PrivateLink Kafka Cluster without Kafka AddOns
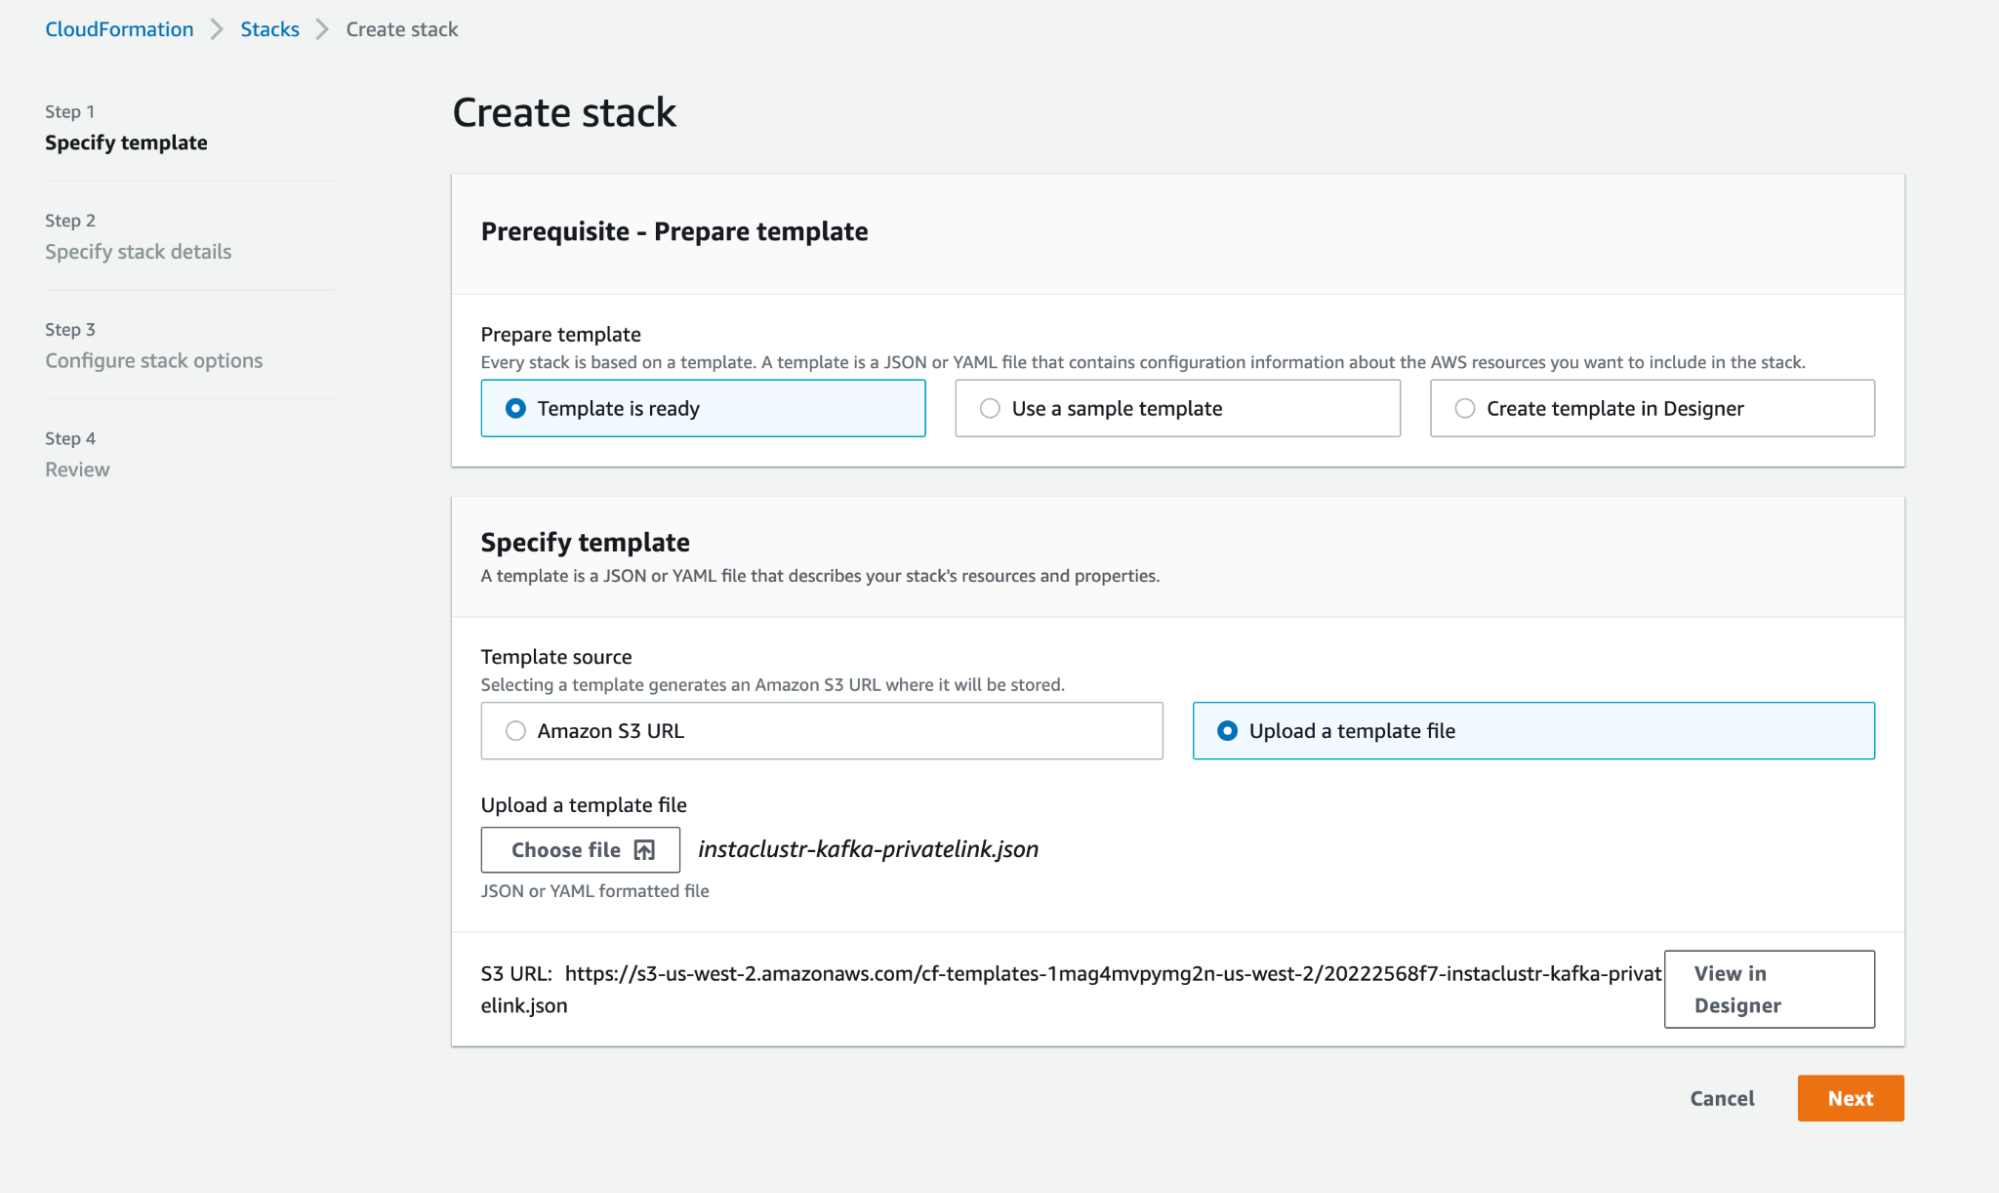
- Download one of the templates above. For this example, we will use the JSON template for PrivateLink Kafka Cluster without Kafka AddOns, with the name instaclustr-kafka-privatelink.json.
- Login into your AWS Account and head to the AWS CloudFormation page. Please ensure the region is the same as the created PrivateLink Kafka Cluster. https://us-west-2.console.aws.amazon.com/cloudformation/home?region=us-west-2#/
- Select “Create Stack” and upload the saved template, instaclustr-kafka-privatelink.json. Select “Next”.

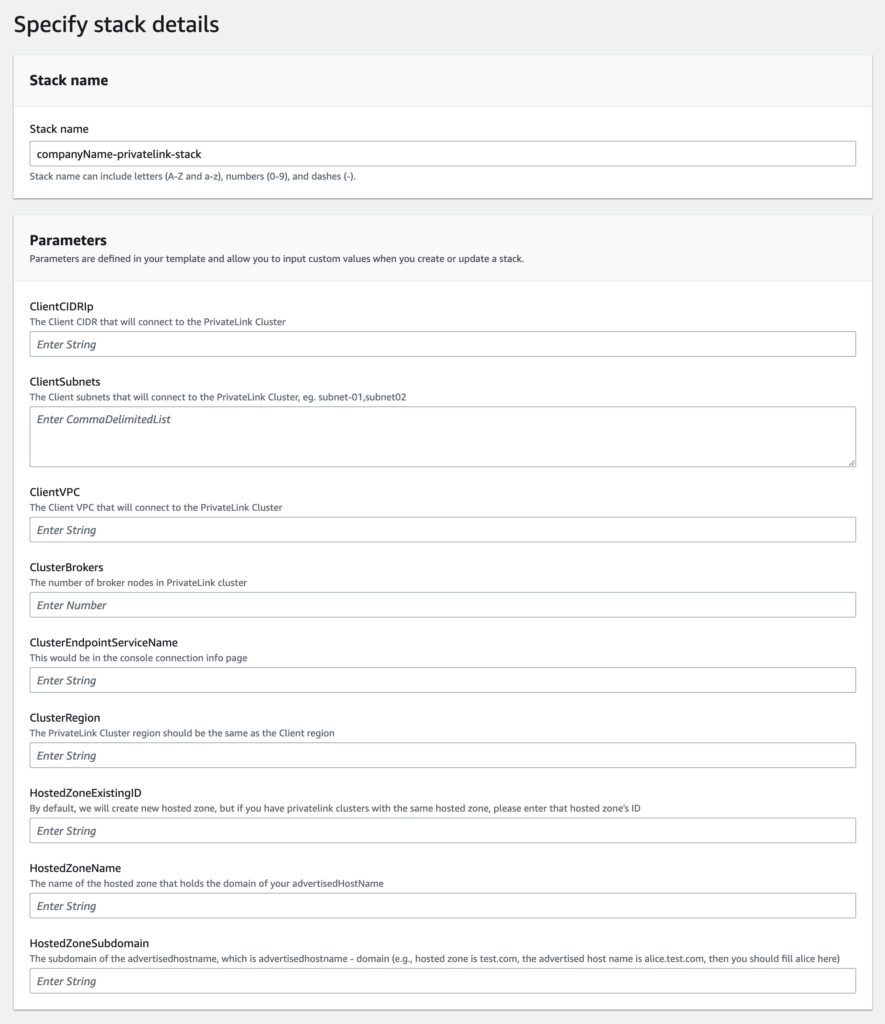
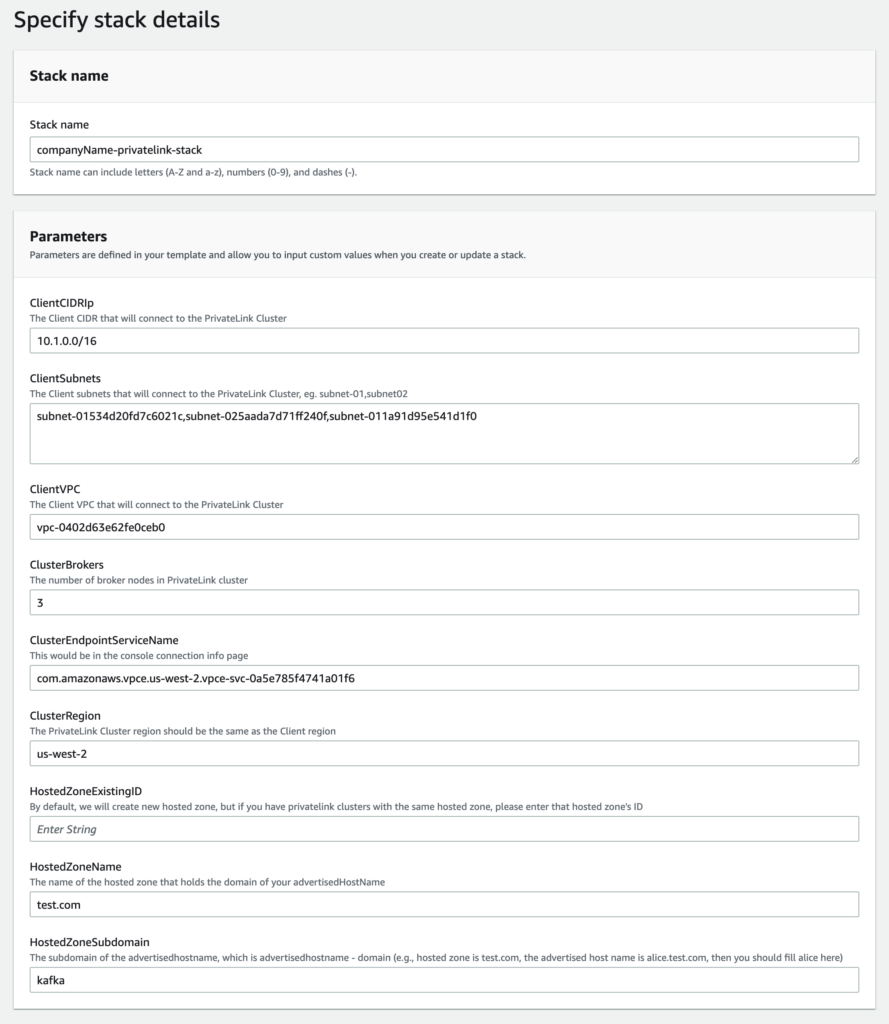
- On the next page, you would see a form similar to the following. Fill the “Stack Name” section. There are a total of 8 parameters to fill, see the relevant steps to get the corresponding values.
- ClientCIDRIp: Step 8
- ClientSubnets: Step 8
- ClientVPC: Step 8
- ClusterBrokers: Step 5
- ClusterEndpointServiceName: Step 6
- ClusterRegion: Step 5
- HostedZoneExistingID: Step 14
- HostedZoneName: Step 6
- HostedZoneSubdomain: Step 6

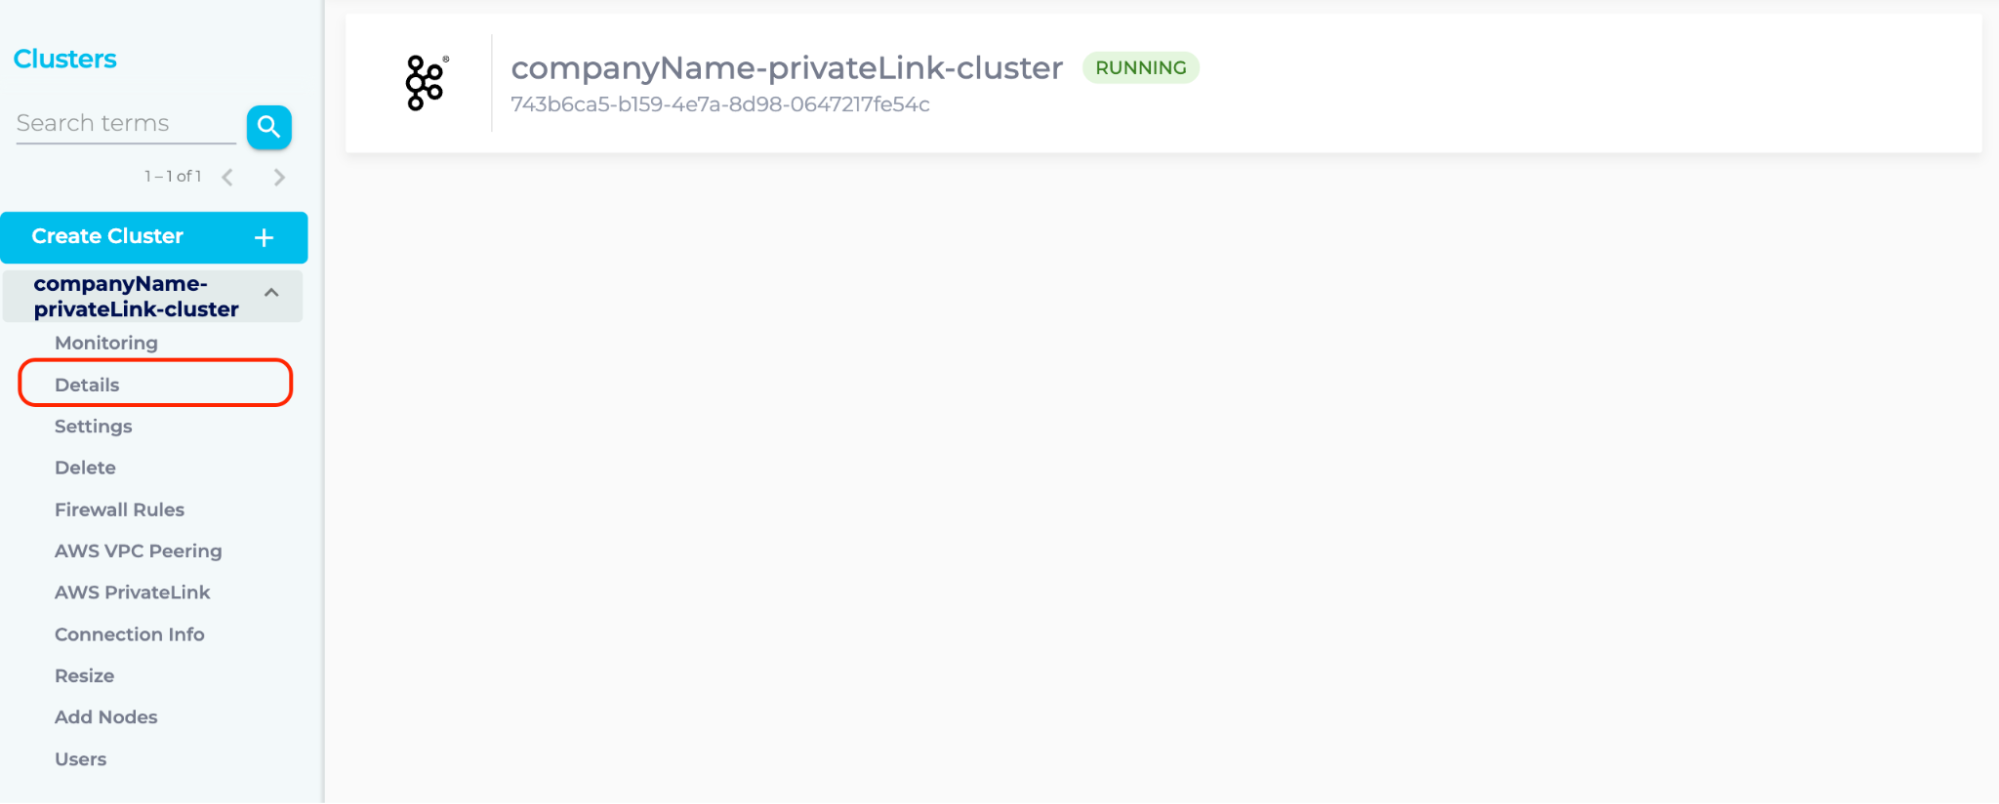
- Log into Instaclustr Console, click the PrivateLink Kafka Cluster created and enter the Details page.
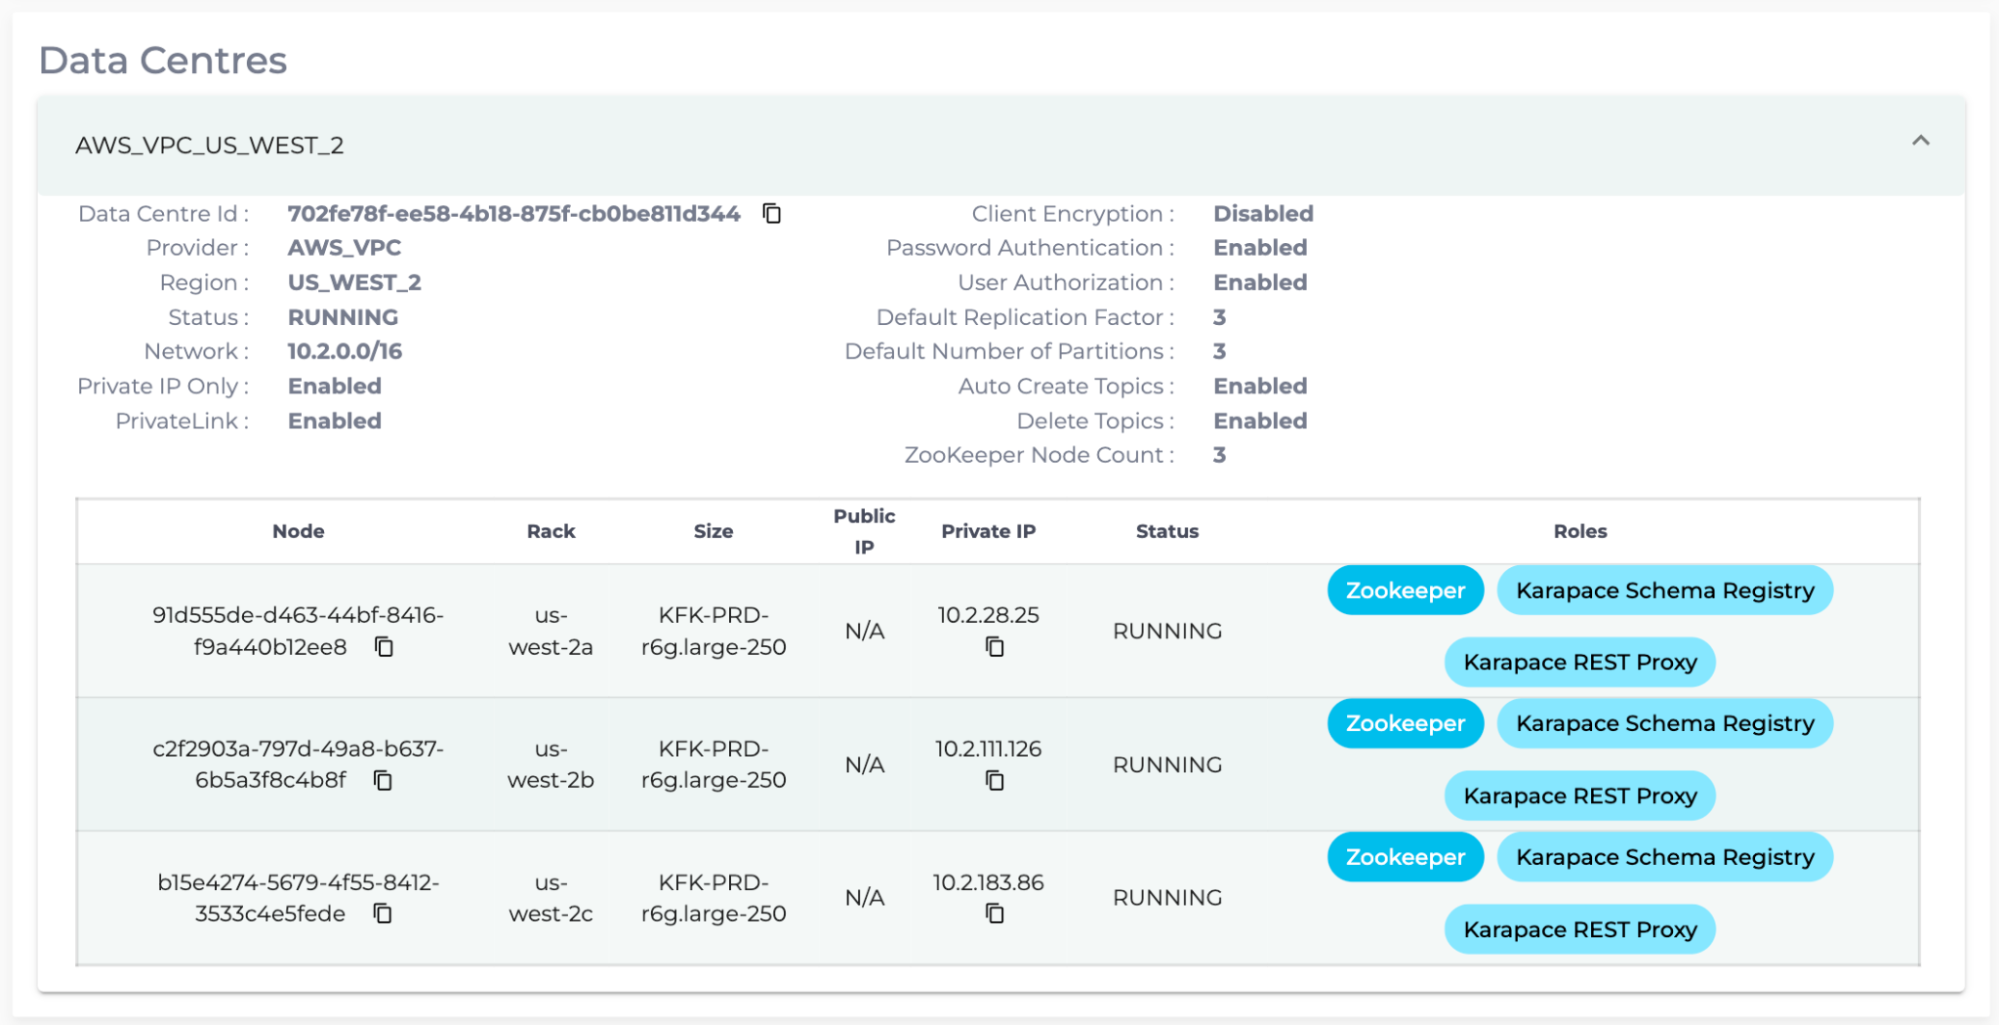
 Count the number of brokers for the “ClusterBrokers” variable. Additionally, the “Region” section is the value for the parameter, “ClusterRegion”. For example, US_EAST_1 is converted to us-east-1. In the following example, “ClusterBrokers” is 3, while “ClusterRegion” is us-west-2.
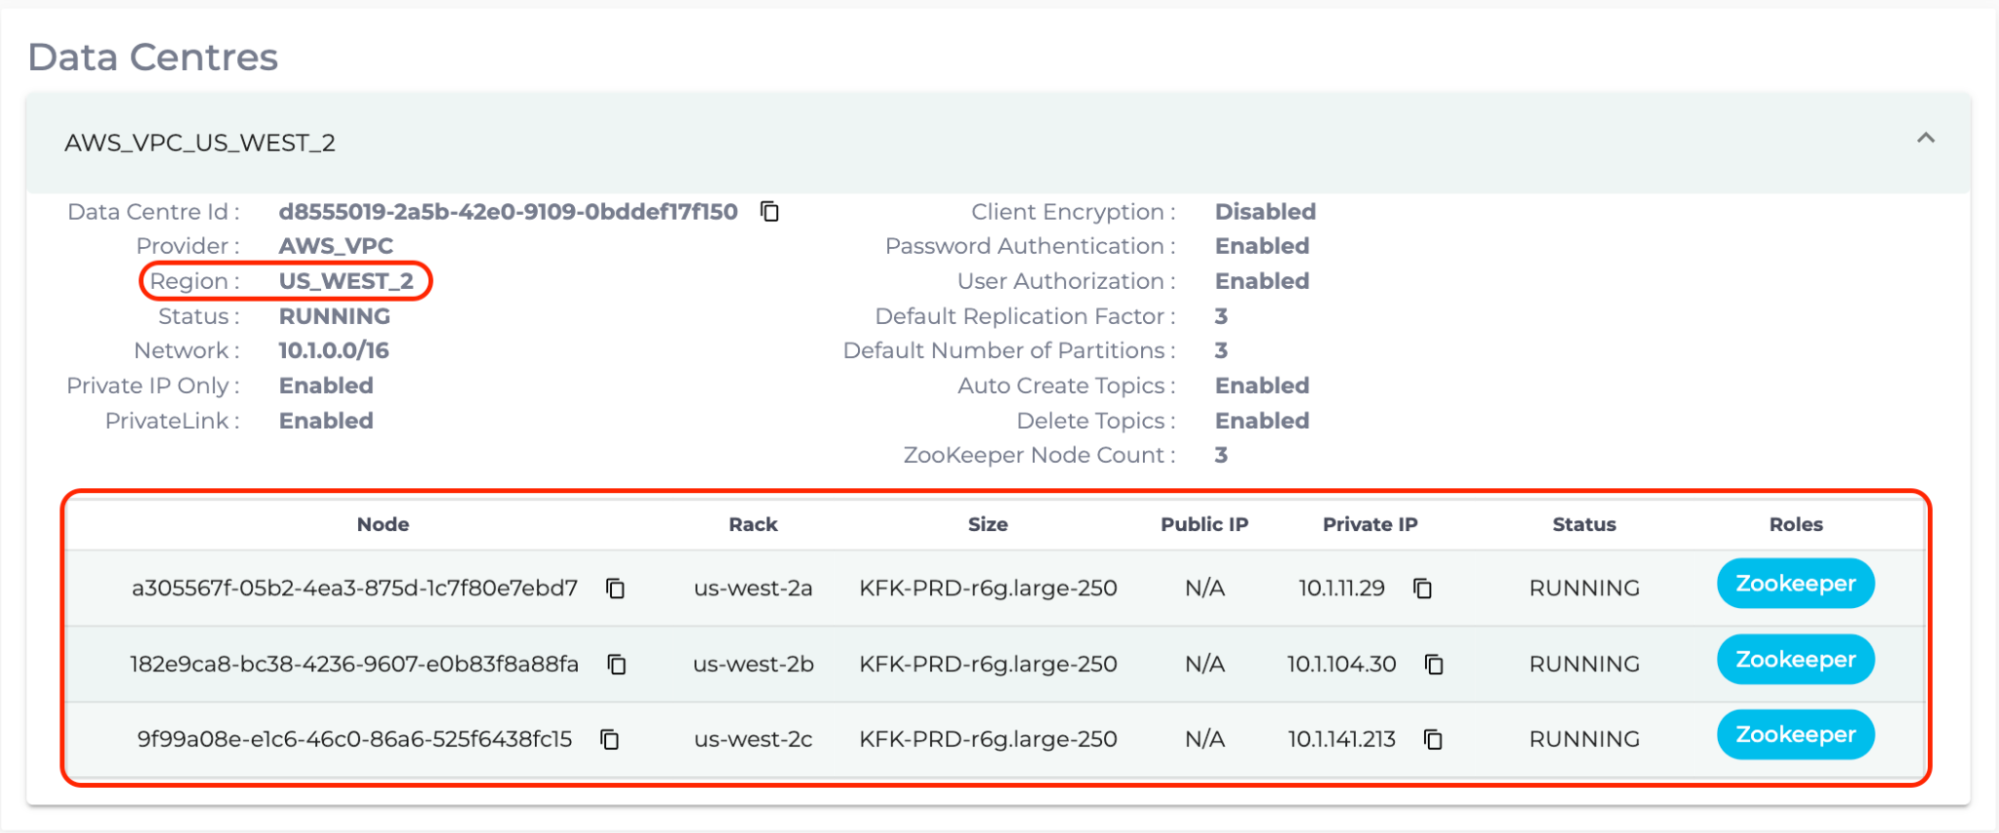
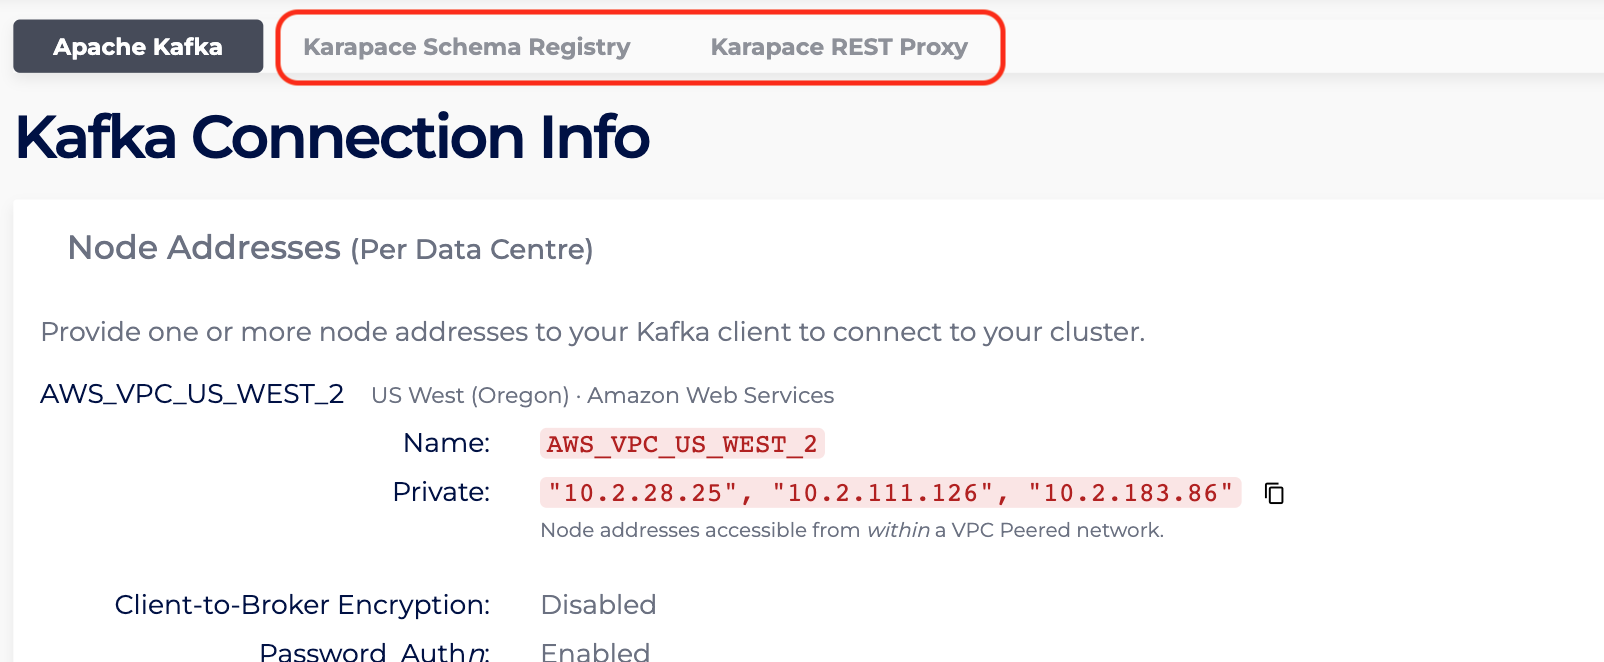
- Next, enter the Connection Info page. The steps are similar to the ones outlined in Retrieve Required Cluster Connection Information in Connecting to a PrivateLink Kafka Cluster .
- “Endpoint Service Name” is related to the parameter, “ClusterEndpointServiceName”, which is com.amazonaws.vpce.us-west-2.vpce-svc-0a5e785f4741a01f6.
- With the advertised hostname kafka.test.com, shown in the “URL”, the “HostedZoneName” is test.com, while the “HostedZoneSubdomain” is kafka.

- Before moving on, please ensure you have added the principal ARN. Please refer to this document on the process.
- Find the client EC2 instances that will connect to the PrivateLink Kafka Cluster. For instance, companyName-client. Find the “ClientVPC” and the “ClientCIDRIp” in the VPC console.https://us-west-2.console.aws.amazon.com/vpc/home?region=us-west-2#vpcs:tag:Instaclustr:ClusterName=companyName-client.In this case, “ClientVPC” is vpc-0402d63e62fe0ceb0 and “ClientCIDRIp” is 10.1.0.0/16.
 The “ClientSubnets” can be found in the EC2 Console. https://us-west-2.console.aws.amazon.com/ec2/v2/home?region=us-west-2#Instances:instanceState=running
Please ensure the region is the same as the created PrivateLink Kafka Cluster.If there are multiple client instances, please be sure to have all the subnets comma separated. For instance, enter subnet-01534d20fd7c6021c,subnet-025aada7d71ff240f,subnet-011a91d95e541d1f0 as “ClientSubnets”
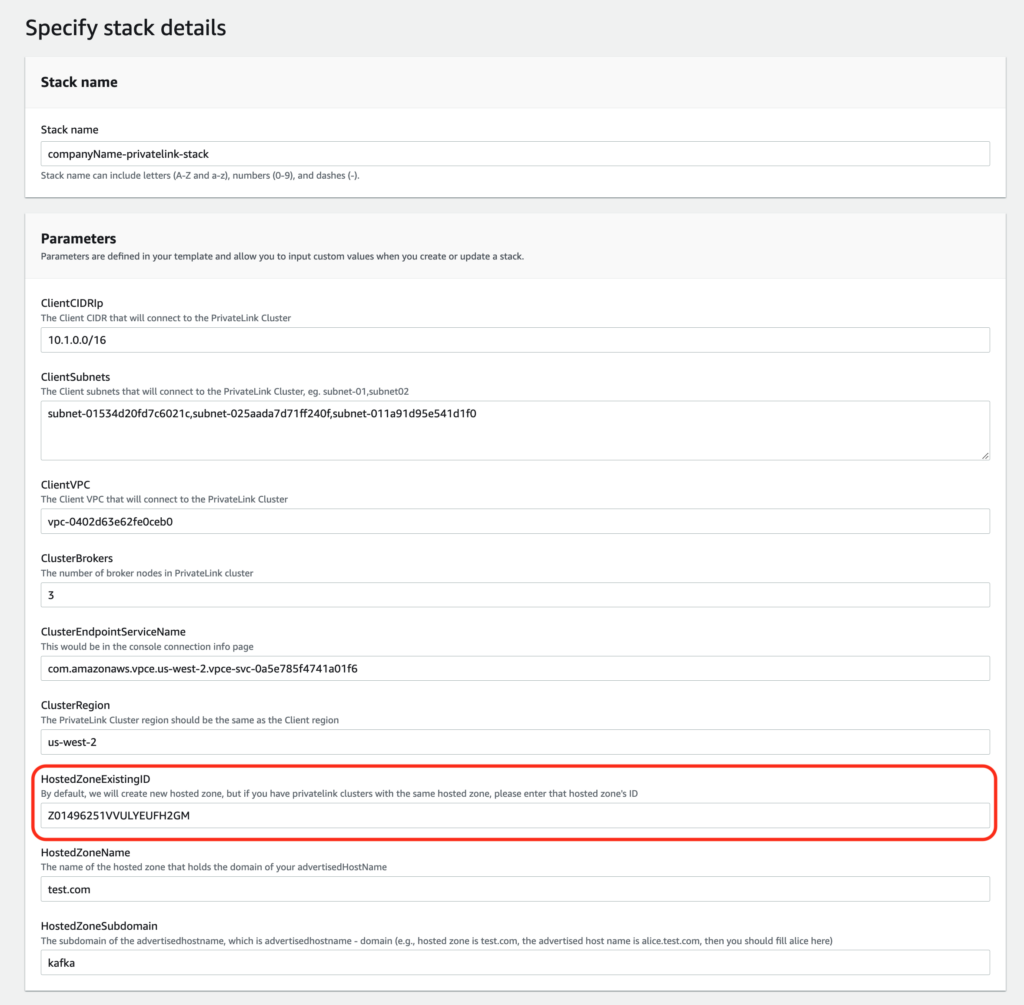
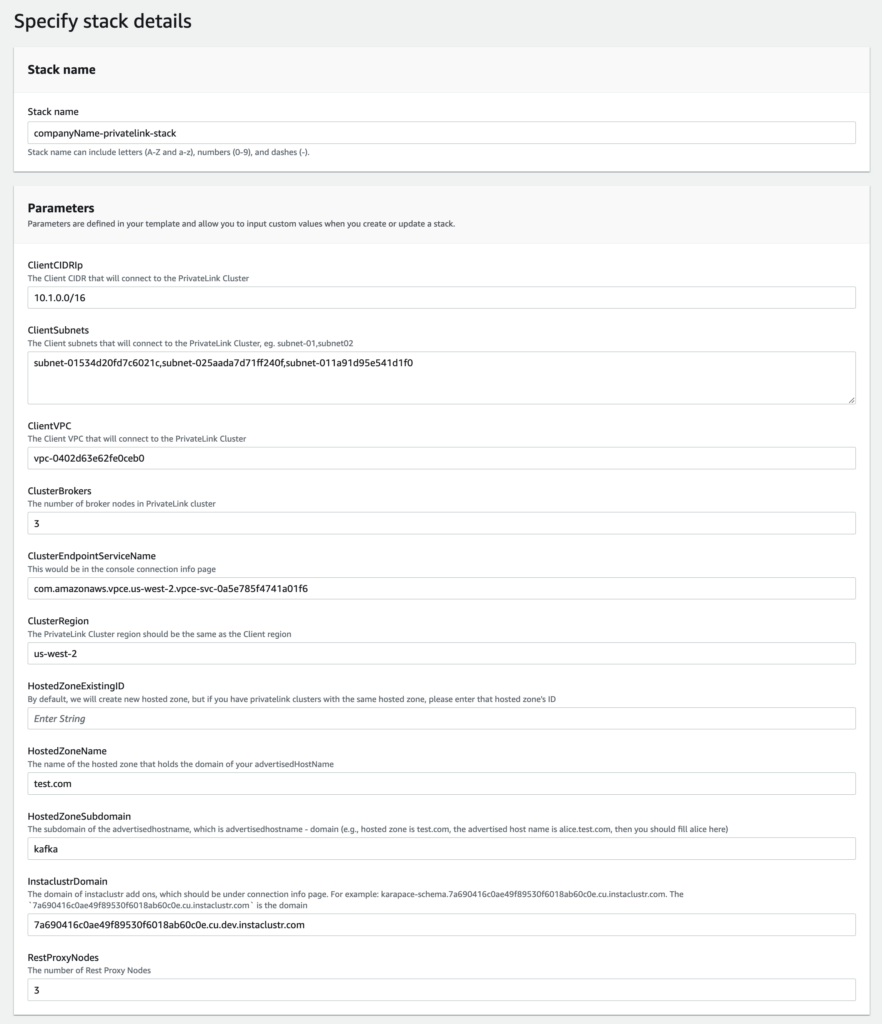
- Once all the values are filled, you should get the following:

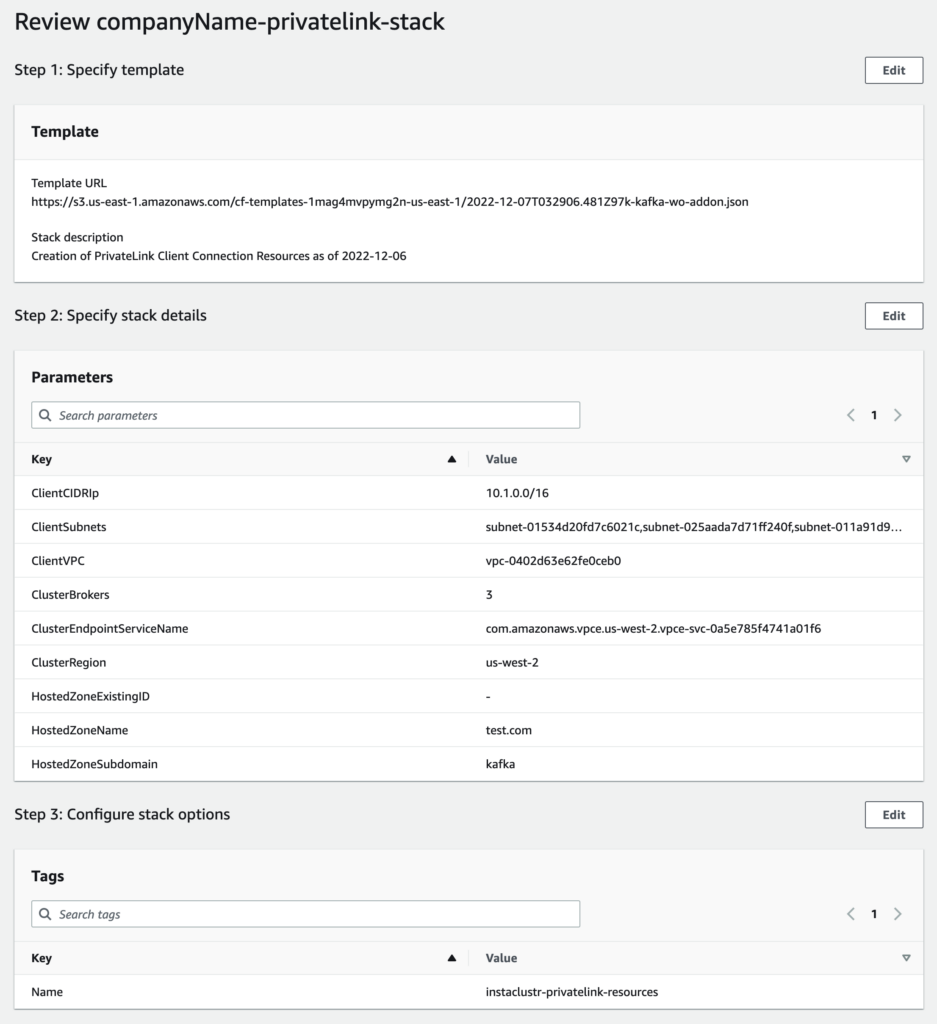
- Enter “Next” and the following form should appear. Please add a tag with key Name and value as instaclustr-privatelink-resources, as this would help in debugging should issues arise.Please update the other permission and policies if needed, otherwise, leave it as default. When it is done, select Next.

- On the next page, ensure the details are correct and hit “Create Stack”.

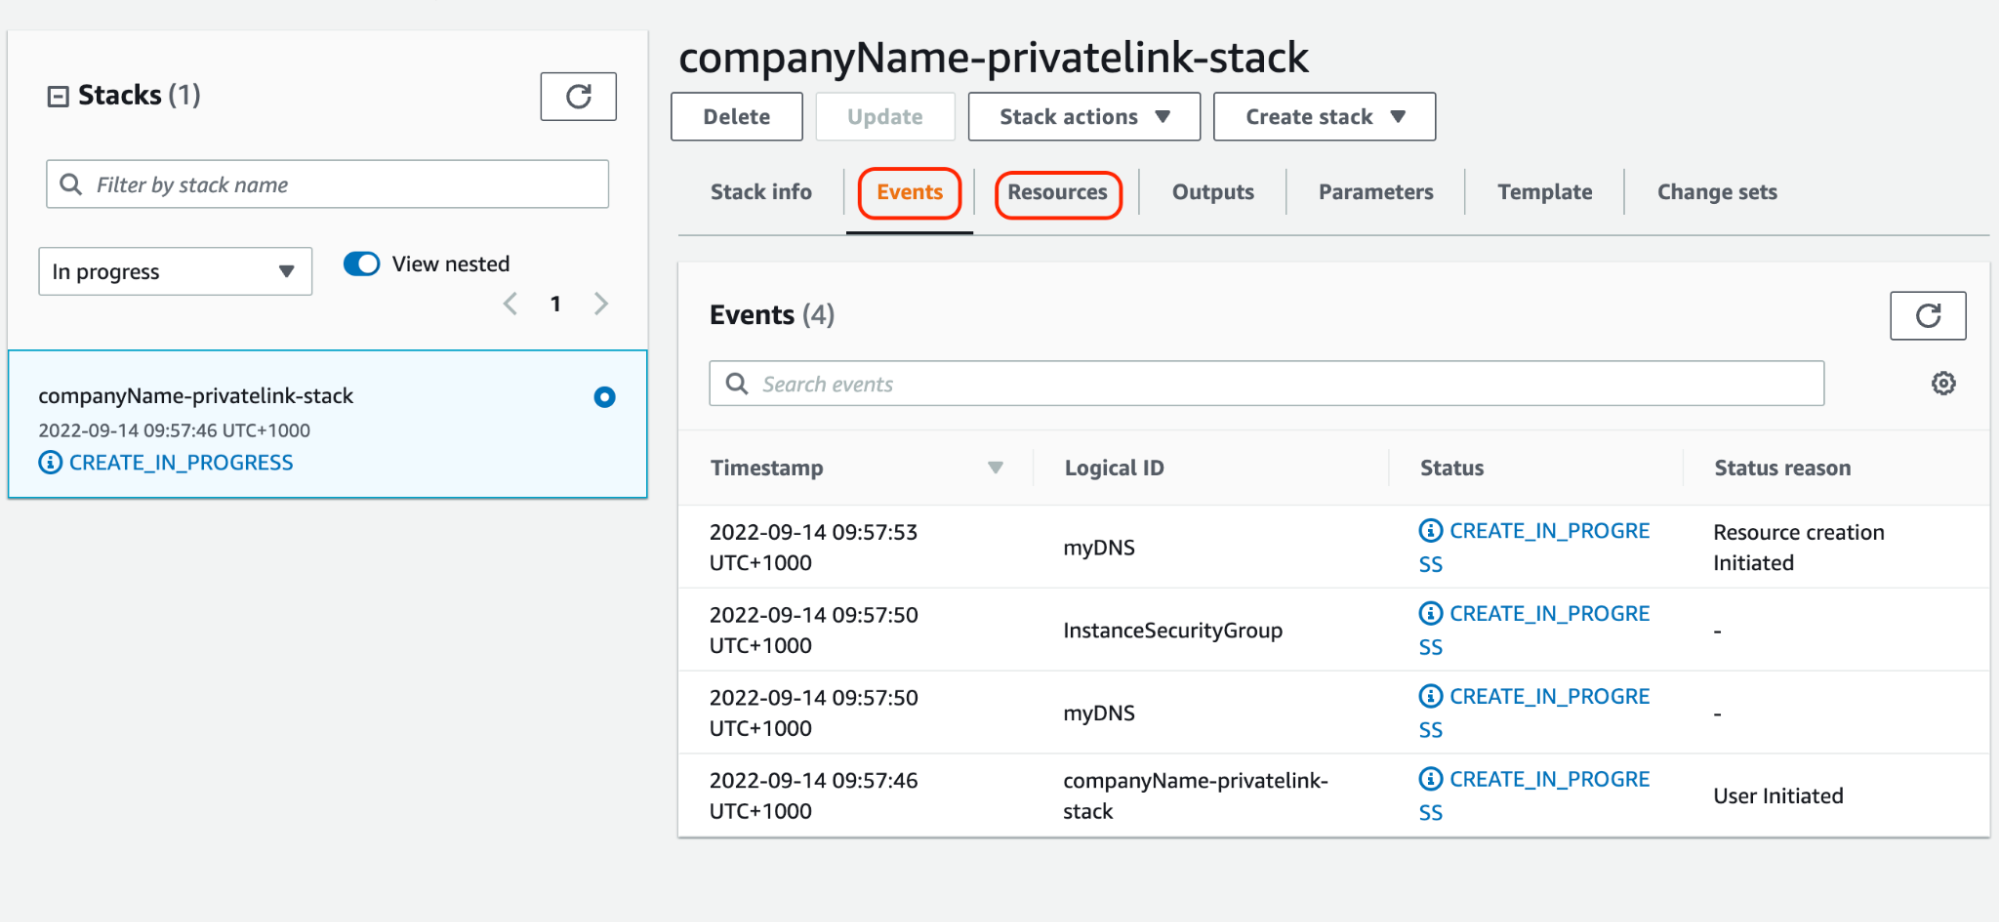
- The page will be redirected back to the AWS CloudFormation page. The progress will be visible in the Events or Resource page. As shown below, the resource creation is currently in progress.
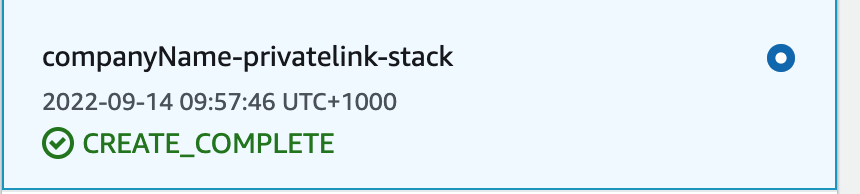
- Once completed, the progress will be displayed as CREATE_COMPLETE, which means the client can start connecting to the PrivateLink Kafka Cluster. You can now connect to the cluster with kafka.test.com:9091 and connect to Kafka Schema registry/Karapace Schema Registry/Karapace Rest Proxy with https://privatelink.7a690416c0ae49f89530f6018ab60c0e.cu.dev.instaclustr.com:{8083/8085}
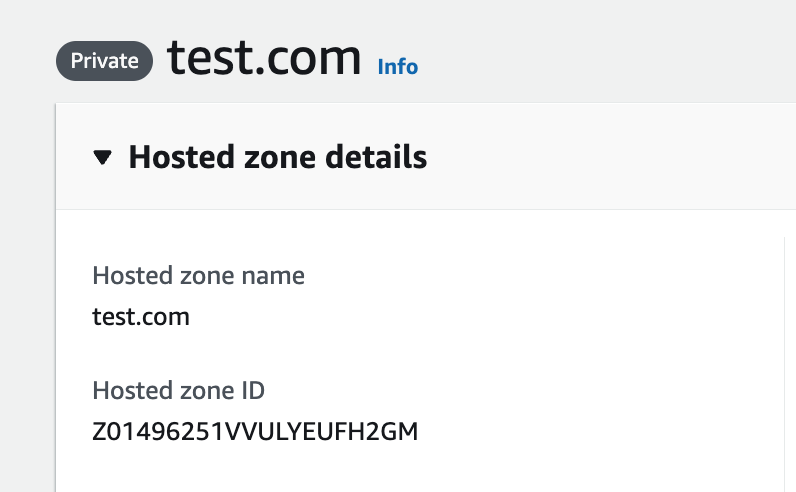
- If there is an existing hosted zone, please find the hosted zone ID under Hosted zone details for the parameter, “HostedZoneExistingID”. For instance, if there is already an existing hosted zone “test.com”, the value of “HostedZoneExistingID” will be Z01496251VVULYEUFH2GM. By specifying the value, the AWS CloudFormation template would not attempt to re-create another hosted zone with the same name.


Section 2: Using the AWS CloudFormation template for PrivateLink Kafka Cluster with Kafka AddOns
The process is the same as the steps listed in Section 1: Using the AWS CloudFormation template for PrivateLink Kafka Cluster without Kafka AddOns. For the purpose of this section, we will refer Section 1: Using the AWS CloudFormation template for PrivateLink Kafka Cluster without Kafka AddOns as Section 1.
- Download the PrivateLink Kafka Cluster with Kafka AddOns AWS CloudFormation template. Please remember to modify the template according to the existing add-ons on the PrivateLink Kafka cluster. In this example, we will use the default JSON template with both Karapace Schema Registry and Karapace Rest Proxy, named as instaclustr-kafka-privatelink-addon.json
- Follow step 2 and 3 in Section 1 to upload the template to AWS CloudFormation, and select “Next”.

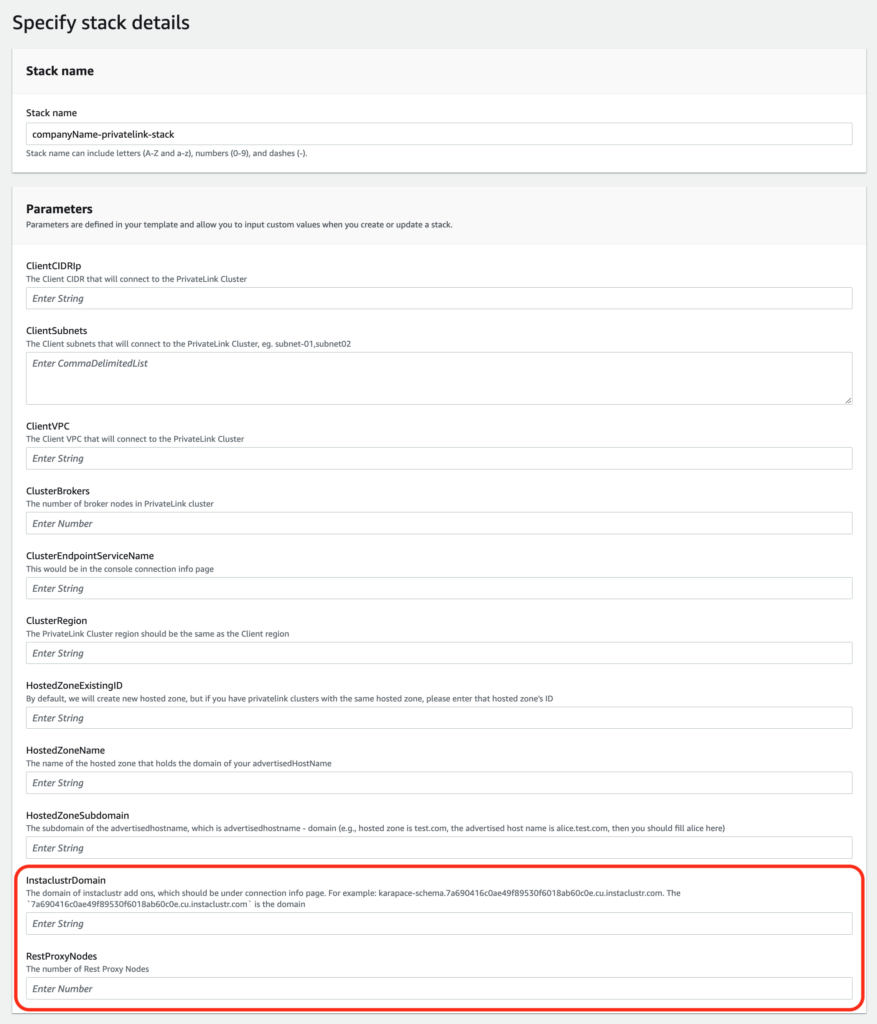
- The form would be similar to the one in step 4 in Section 1. The difference is the additional two parameters: “InstaclustrDomain” and “RestProxyNodes”.

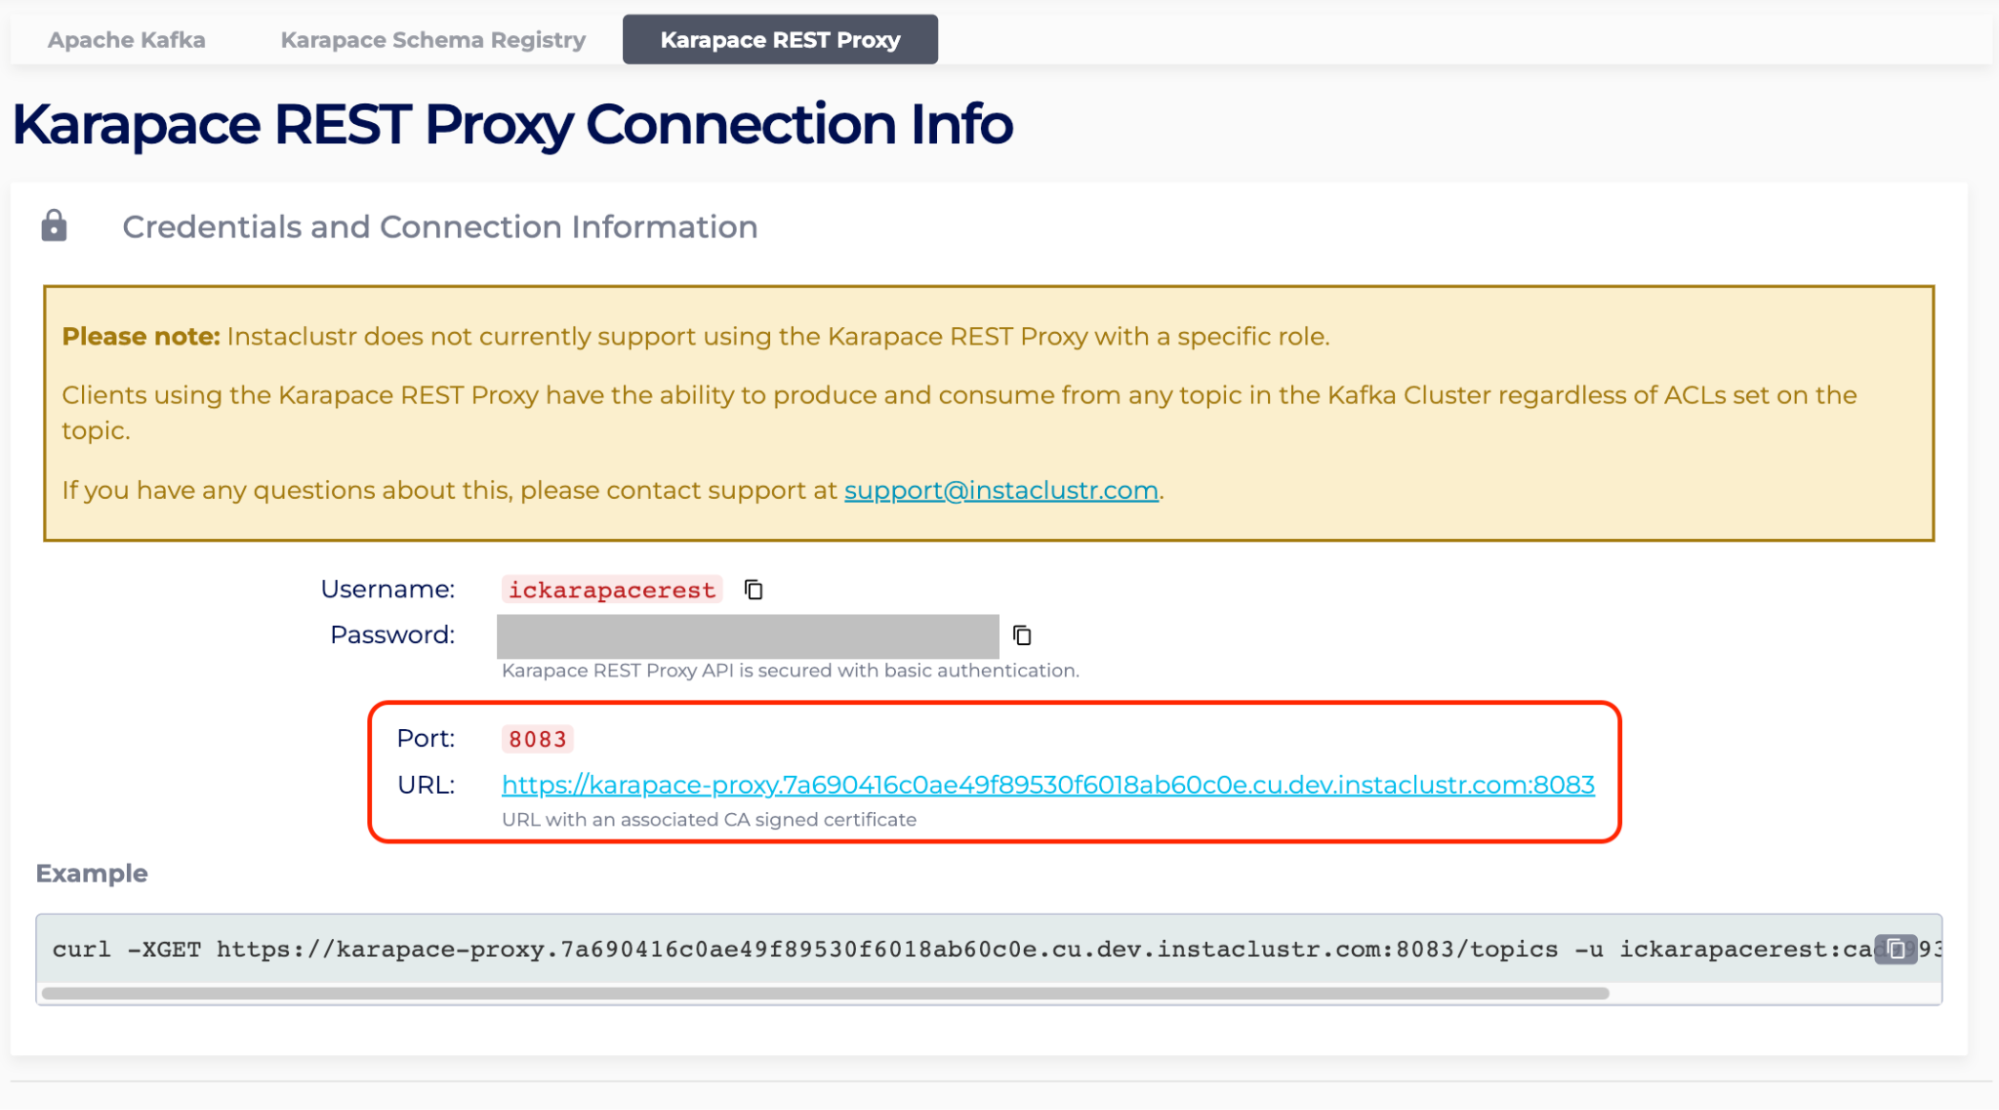
- For “InstaclustrDomain”, enter the Connection Info page of the PrivateLink Kafka cluster with Kafka Add-Ons. There should be tabs for each Kafka Add-Ons. Select one of them.
 For example, under Karapace Rest Proxy, the URL is https://karapace-proxy.7a690416c0ae49f89530f6018ab60c0e.cu.dev.instaclustr.com:8083. The “InstaclustrDomain” is 7a690416c0ae49f89530f6018ab60c0e.cu.dev.instaclustr.com.
- As for “RestProxyNodes”, enter the Details page of the PrivateLink Kafka cluster with Kafka Add-Ons, and count the number of nodes with the tag “Karapace REST Proxy”. In the following case, “RestProxyNodes” is 3.
- Follow step 4 to 8 in Section 1 to fill the other parameters, and hit “Next”.

- From hereon, follow the rest of Section 1 steps from step 10.